Open Ticket
  +373 79 600002
  Telegram Live Chat
  F.A.Q
F.A.Q  English
 Русский
  Română
  Deutsch
  Français
  Türkçe
  Español
  Português
  Українська
  български
  Polski
  Indonesia
  中文 (中国)


















































































































 on All Hosting Services






How to Connect to Your GPU Dedicated Server: A Complete Step-by-Step Guide
Whether you're deploying large language models, running AI inference workloads, or generating images with Stable Diffusion, connecting to a GPU dedicated server for the first time can feel overwhelming. This guide walks you through every stage of the process — from selecting the right plan to logging in and launching your first AI framework — using AlexHost's GPU infrastructure.
Why Choose a GPU Dedicated Server for AI Workloads?
Modern AI applications — including LLM inference, image generation, and deep learning training — demand serious GPU compute power. A standard VPS or shared hosting environment simply cannot meet these requirements. A GPU Hosting solution gives you exclusive access to high-performance graphics cards, dedicated RAM, and full root control, making it the ideal environment for production-grade AI deployments.
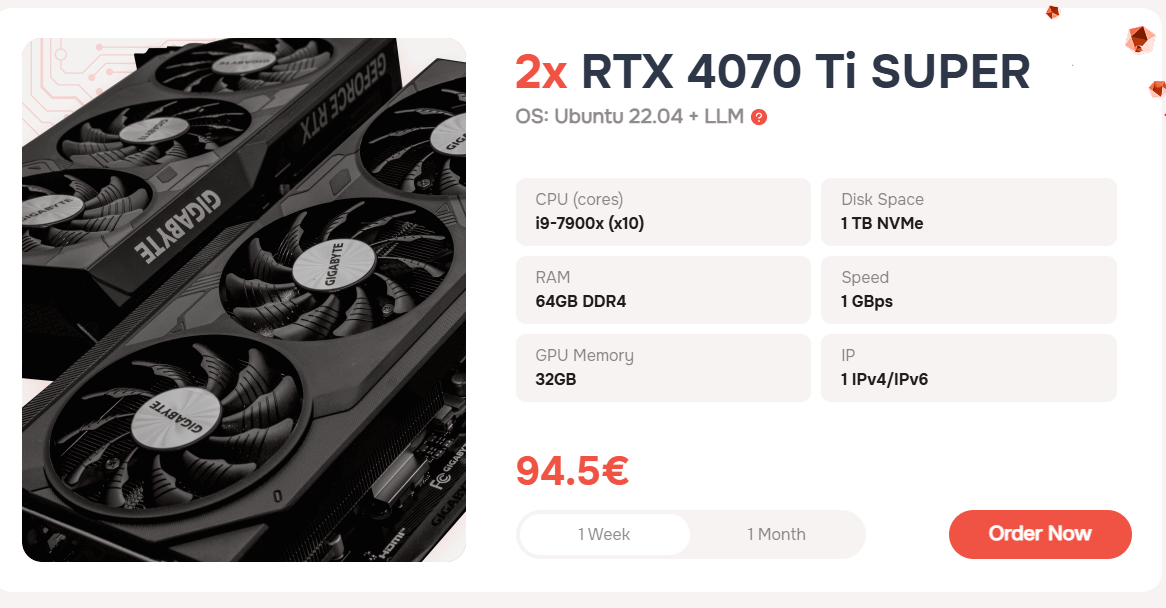
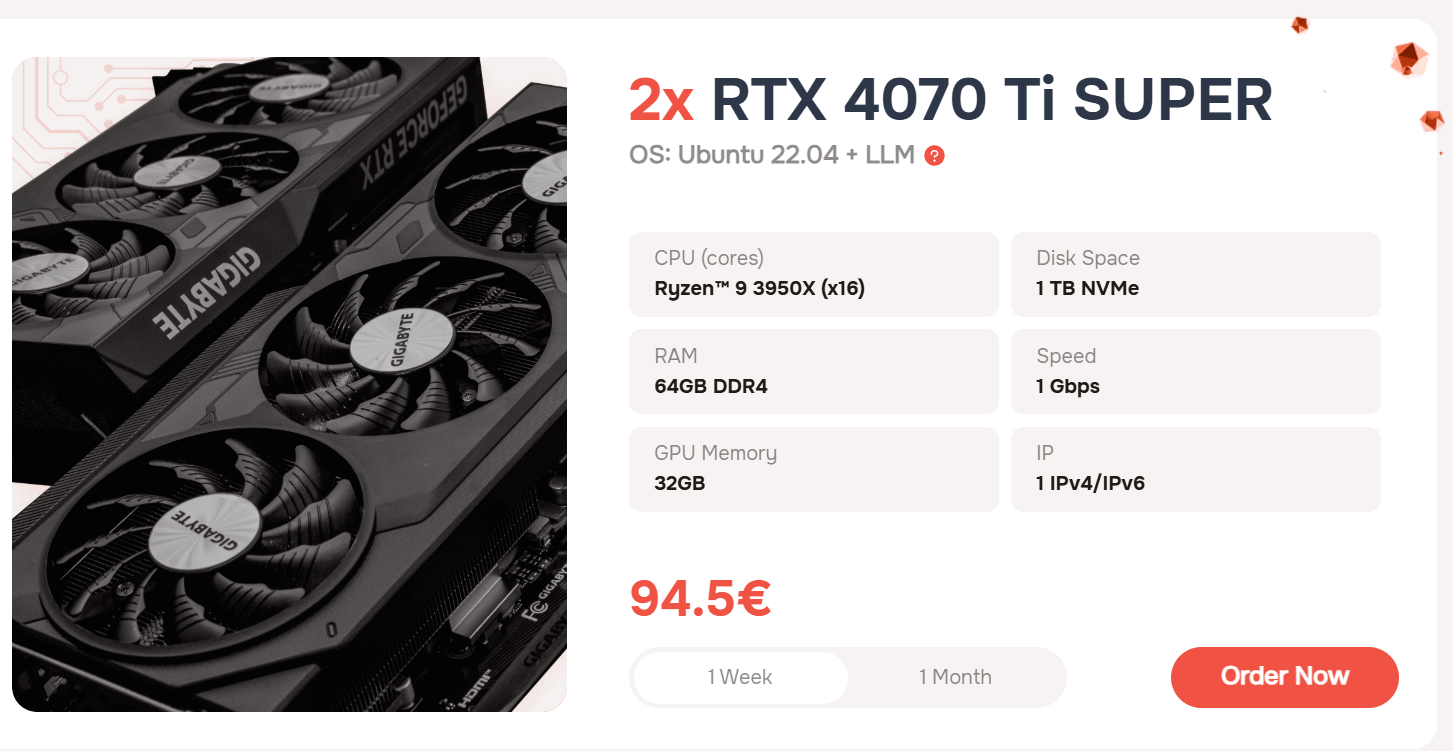
AlexHost's GPU dedicated servers are built around dual NVIDIA RTX 4070 Ti SUPER graphics cards, delivering exceptional VRAM capacity and CUDA throughput for demanding workloads like running LLaMA, Mistral, GPT-based models, and Stable Diffusion pipelines.
Step 1: Choose the Right GPU Server Plan
AlexHost currently offers two GPU dedicated server tariffs, both equipped with 2× RTX 4070 Ti SUPER GPUs. These plans are purpose-built for AI and machine learning use cases and come with a comprehensive suite of pre-installed tools and frameworks so you can start working immediately — no lengthy manual configuration required.
Pre-Installed Tools and Frameworks Available Out of the Box
| Tool / Framework | Purpose |
|---|---|
| Oobabooga Text Generation WebUI | Web interface for running and interacting with LLMs |
| AUTOMATIC1111 Stable Diffusion WebUI | Image generation via Stable Diffusion models |
| PyTorch (CUDA 12.4 + cuDNN) | GPU-accelerated deep learning library |
| Ubuntu 22.04 with GNOME Desktop + RDP | Full graphical desktop environment via Remote Desktop |
| Ubuntu 22.04 with XFCE Desktop + RDP | Lightweight graphical desktop via Remote Desktop |
| Ubuntu 22.04 with KDE Plasma Desktop + RDP | Feature-rich graphical desktop via Remote Desktop |
> Note: AlexHost can also install any custom operating system upon request, giving you full flexibility over your server environment.
This pre-configured approach means your AI-ready server is deployable within minutes of provisioning — a significant advantage over bare-metal setups that require hours of manual framework installation.
Step 2: Complete Your Order and Receive Credentials
After successfully placing your order and completing payment, AlexHost will provision your GPU dedicated server and send your login credentials directly to your registered email address. This email will contain everything you need to access your server management panel.
AlexHost's support team is also available to provide personalized connection instructions if you need additional guidance during the initial setup phase.
Step 3: Access Your Server from the Client Area
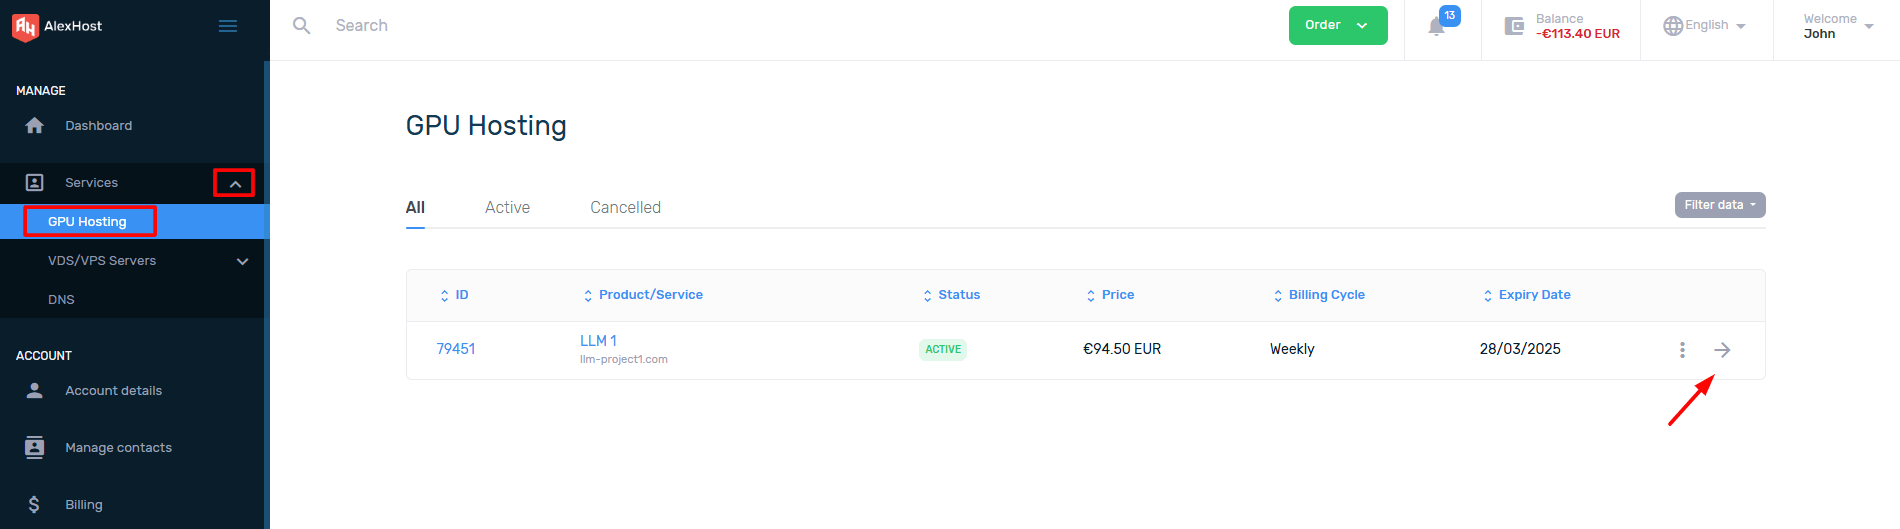
Once you've received your credentials, follow these steps to locate your server in the AlexHost client portal:
- Log in to your AlexHost account at the client area.
- Navigate to Services → My Services to view all active products.
- Locate your GPU dedicated server in the list of activated services.
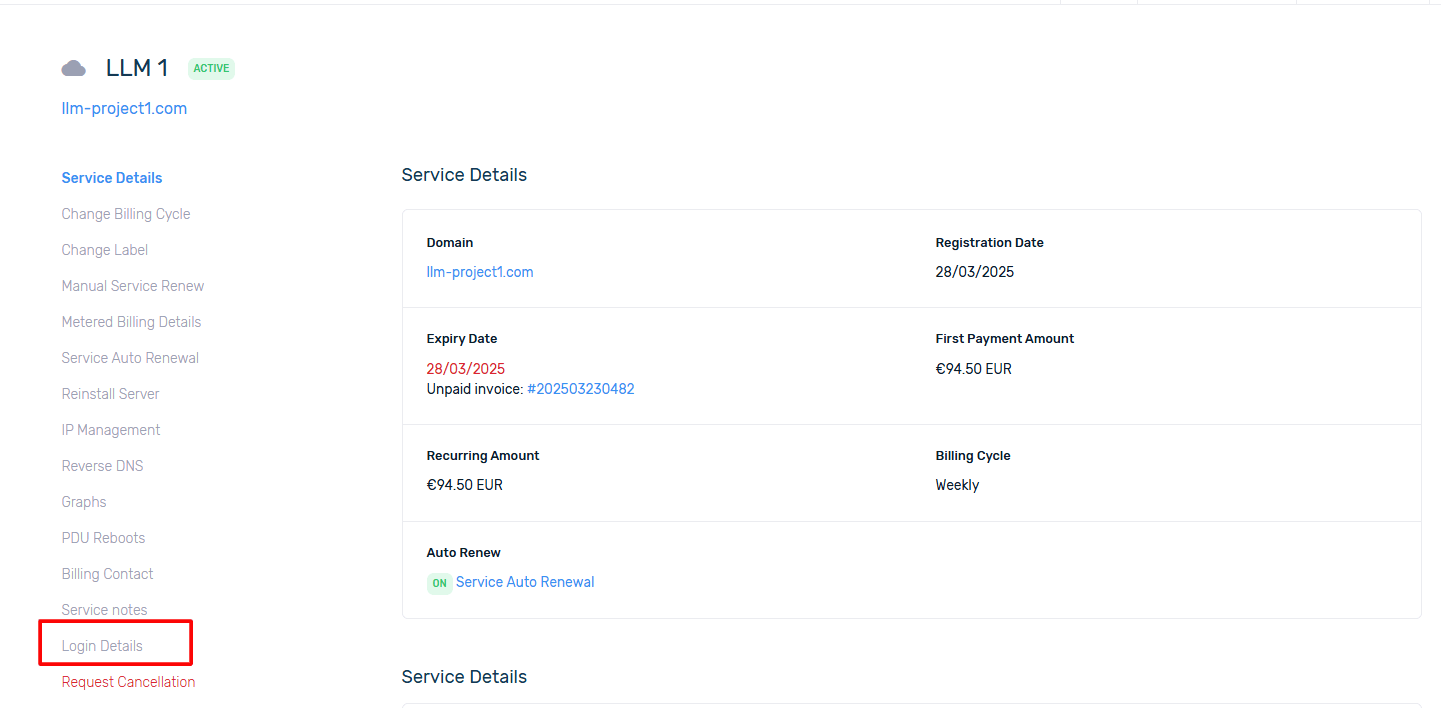
- Click on the service to open its management interface.
This will bring you to the server's dedicated control panel page, where you can manage all aspects of your instance.
Step 4: Retrieve Your DCIManager Login Details
AlexHost uses DCIManager as the server management platform for dedicated GPU servers. To access it:
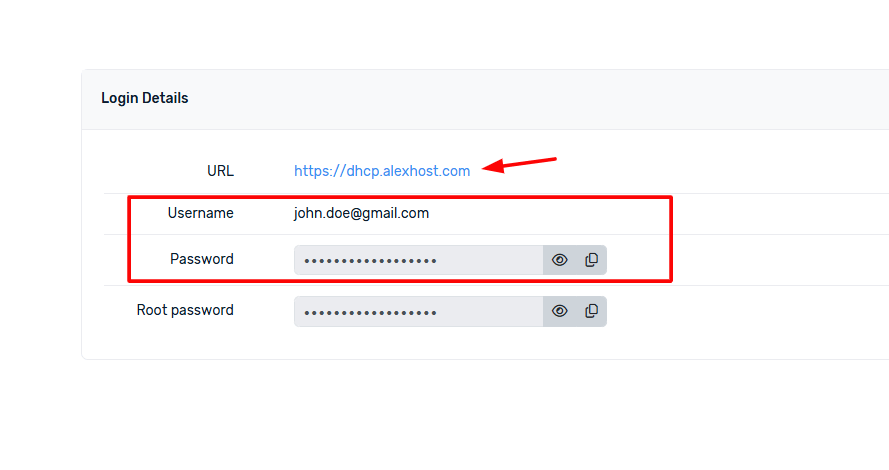
- Inside your service page, navigate to the Login Details section.
- Here you will find:
- The DCIManager panel URL (a direct link to your management interface)
- Your Username
- Your Password
Copy these credentials and open the DCIManager URL in your browser to proceed with OS installation and server configuration.
Step 5: Install an Operating System or LLM Framework
This is where the real power of AlexHost's GPU server platform becomes apparent. To begin the OS installation:
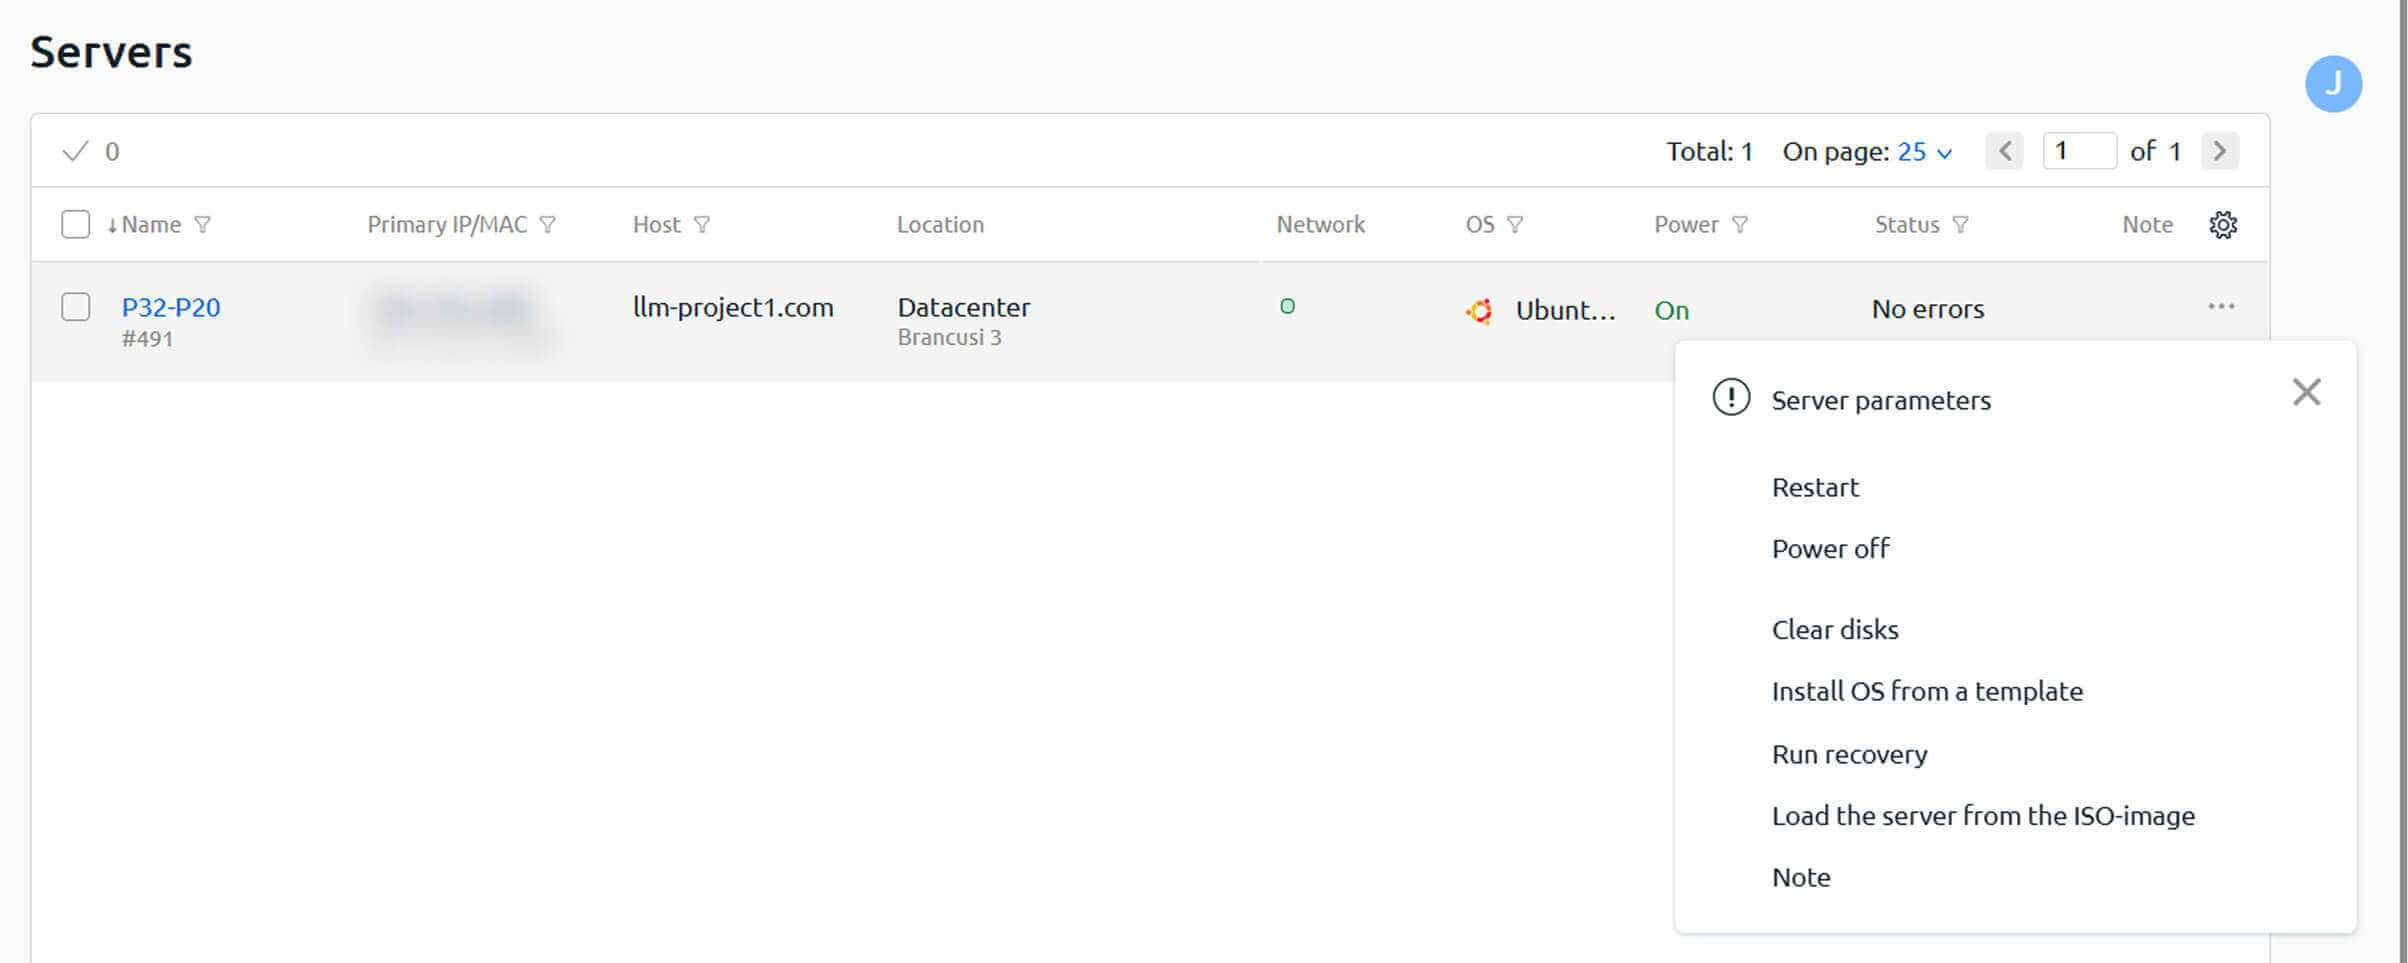
- Inside DCIManager, locate your server and click the three-dot menu (⋮) next to it.
- Select "Install OS from a template" to open the available operating system and framework list.
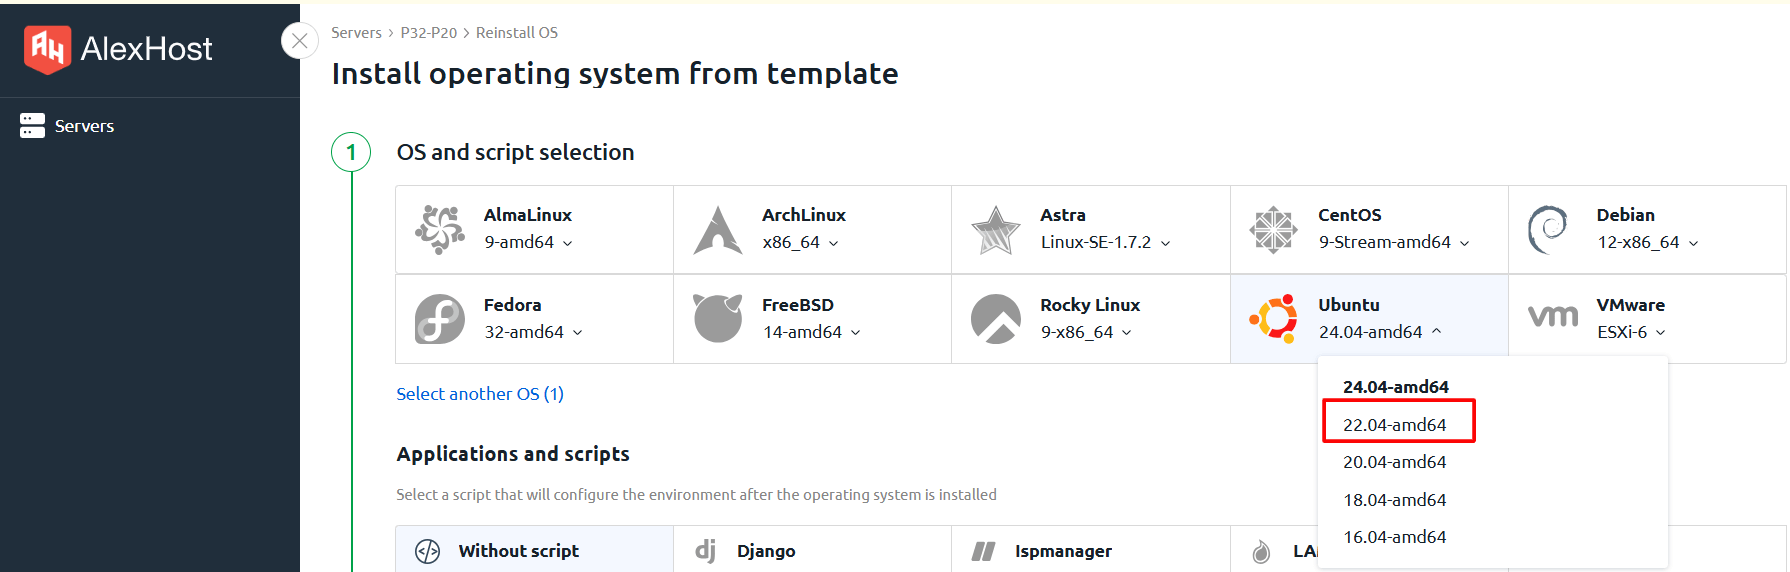
Choosing Your Operating System
You can install any operating system available in the template library. However, it's important to note:
> LLM frameworks and AI tools are currently only supported on Ubuntu 22.04. When you select Ubuntu 22.04 during setup, the corresponding LLM installation scripts become available for selection.
Selecting LLM Frameworks (Ubuntu 22.04 Only)
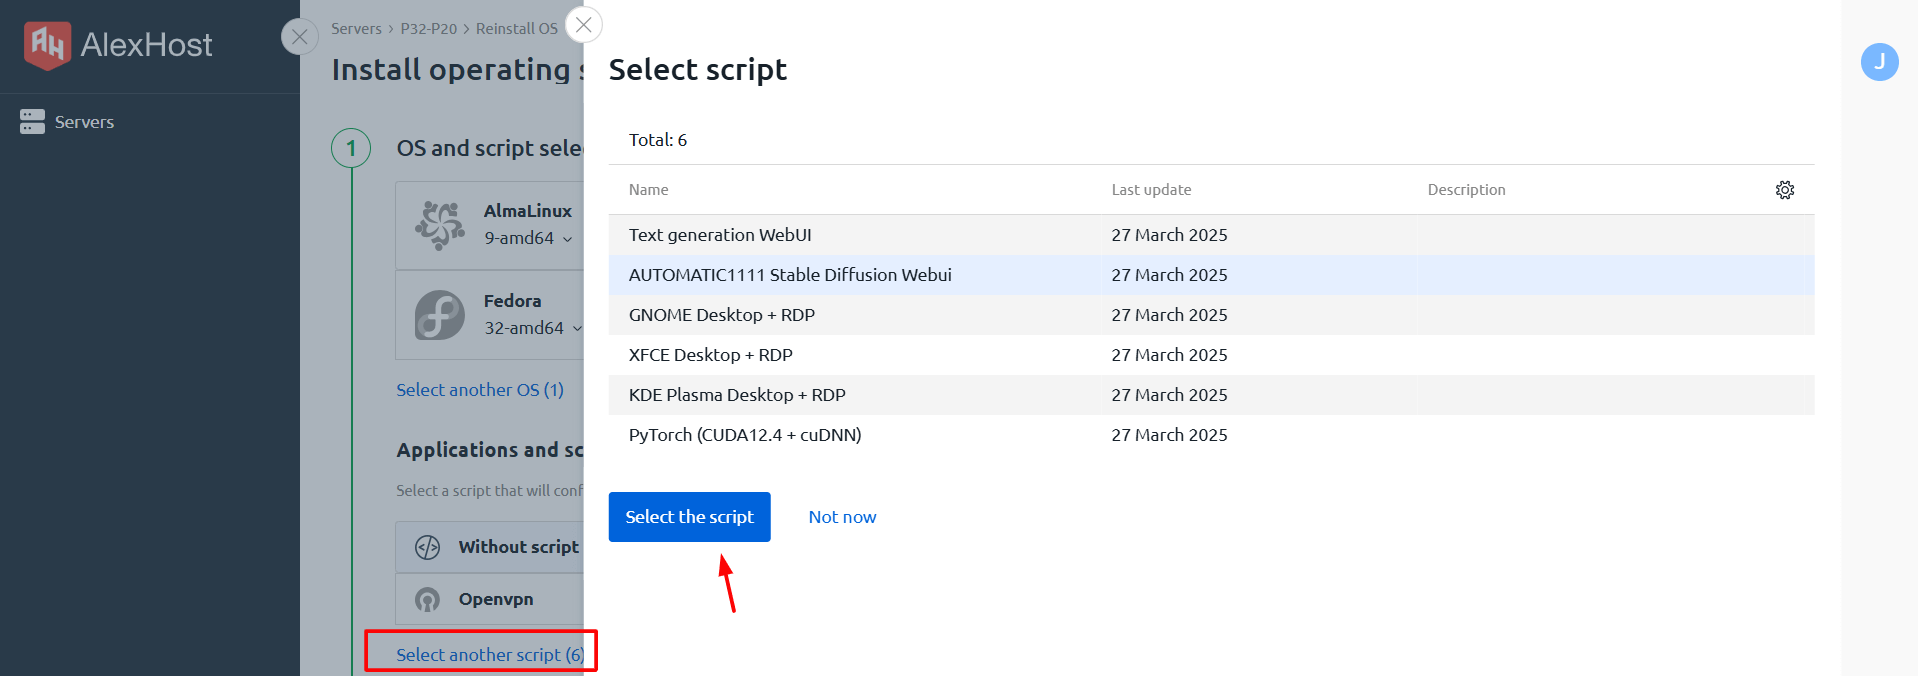
After selecting Ubuntu 22.04, click "Select another scripts" to access the full list of available AI frameworks and tools. Here's a breakdown of each option:
🧠 Text Generation WebUI (Oobabooga)
What it is: A powerful, browser-based web interface for loading and interacting with text generation models including GPT, LLaMA, Mistral, and many others.
Key capabilities:
- Load local or remote language models
- Configure generation parameters (temperature, top-p, repetition penalty, etc.)
- Interact with models via a clean chat or notebook interface
- Supports multiple model backends (Transformers, llama.cpp, ExLlama, etc.)
Best for: Developers and researchers who want a flexible, no-code interface for experimenting with open-source LLMs.
🎨 AUTOMATIC1111 Stable Diffusion WebUI
What it is: The most widely used web interface for AI image generation using Stable Diffusion models.
Key capabilities:
- Load and switch between Stable Diffusion checkpoints
- Fine-tune generation with advanced parameters (CFG scale, sampling steps, seed control)
- Extend functionality with a rich ecosystem of plugins and extensions
- Supports txt2img, img2img, inpainting, and upscaling workflows
Best for: Artists, developers, and content creators building image generation pipelines or experimenting with diffusion models.
🖥️ GNOME / XFCE / KDE Plasma Desktop + RDP
What they are: Full graphical desktop environments accessible remotely via RDP (Remote Desktop Protocol).
- GNOME — Modern, polished interface; ideal for users familiar with Ubuntu's default desktop
- XFCE — Lightweight and fast; great for lower-overhead remote sessions
- KDE Plasma — Feature-rich and highly customizable; suits power users
Best for: Users who prefer a graphical interface for managing their server, running GUI-based AI tools, or performing visual tasks directly on the machine.
> These desktop environments are not AI frameworks themselves, but they provide a convenient graphical workspace for managing and monitoring AI workloads running on the server.
⚙️ PyTorch (CUDA 12.4 + cuDNN)
What it is: The industry-standard open-source deep learning library, pre-configured with full GPU acceleration support.
Key capabilities:
- GPU-accelerated tensor computation via CUDA 12.4
- Optimized neural network operations via cuDNN
- Foundation for training and running LLMs (GPT, LLaMA, Mistral) and image generation models (Stable Diffusion)
- Compatible with the Hugging Face ecosystem, Transformers, and other ML libraries
Best for: ML engineers and researchers who need a clean, GPU-ready PyTorch environment for custom model training, fine-tuning, or inference scripting.
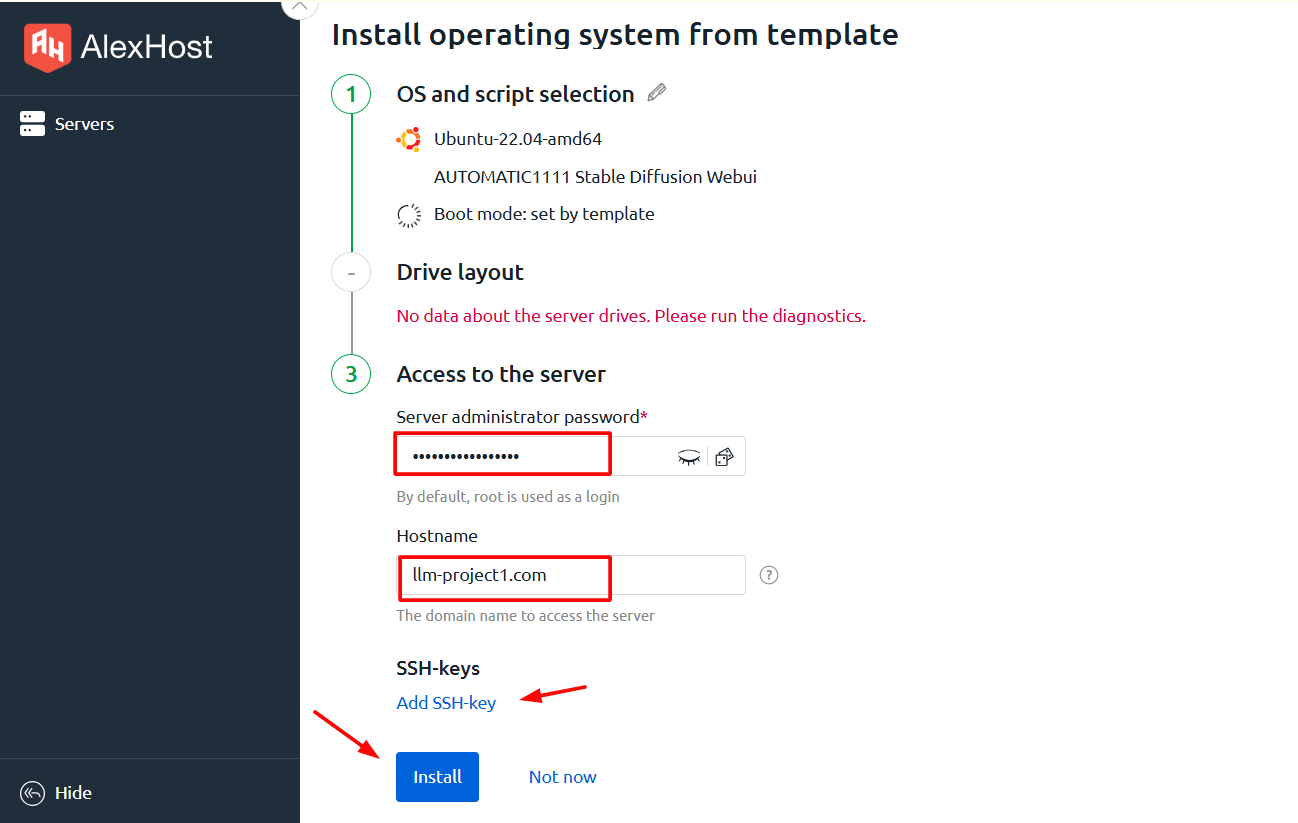
Step 6: Set Your Password and Hostname
After selecting your desired OS and frameworks, you'll be prompted to configure two final parameters before installation begins:
- Password — Set a strong root/admin password for server access
- Hostname — Define a custom hostname for your server (e.g.,
gpu-server-01.yourdomain.com)
Fill in both fields carefully, then confirm to begin the installation process.
Step 7: Wait for Installation to Complete
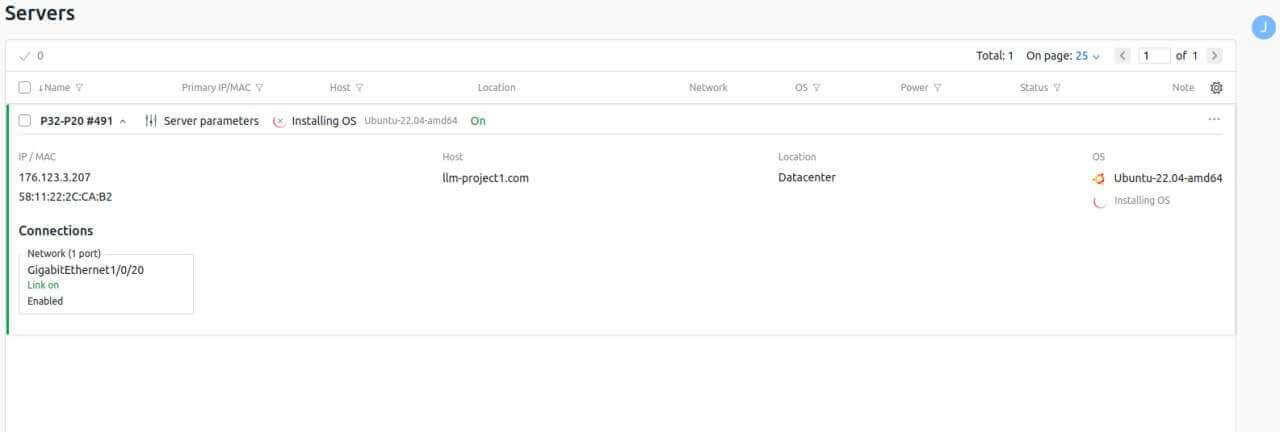
Once you initiate the installation, DCIManager will begin provisioning your selected OS and frameworks automatically.
> ⏱️ Important: The installation process may take up to 30 minutes to complete. This includes OS deployment, driver installation, CUDA configuration, and framework setup.
A successful installation will be confirmed within the DCIManager interface. Once complete, your server is fully operational and ready for AI workloads.
Connecting to Your GPU Server After Installation
Depending on the setup you chose, you'll connect to your server using one of the following methods:
SSH (Command-Line Access)
For PyTorch environments or headless LLM setups:
ssh root@your-server-ipUse the IP address provided in your DCIManager panel and the password you set during installation.
RDP (Remote Desktop)
For GNOME, XFCE, or KDE Plasma desktop environments:
- Open your RDP client (e.g., Microsoft Remote Desktop on Windows/macOS, or Remmina on Linux)
- Enter your server IP address
- Use your configured username and password
- Connect and access your full graphical desktop
Web Interface (Oobabooga / AUTOMATIC1111)
After SSH-ing in and starting the respective service, access the web UI via your browser:
http://your-server-ip:7860   # Oobabooga Text Gen WebUI
http://your-server-ip:7861   # AUTOMATIC1111 Stable Diffusion WebUI
Complementary AlexHost Services Worth Exploring
Depending on your broader infrastructure needs, you may find these AlexHost services useful alongside your GPU server:
- VPS Hosting — Ideal for hosting APIs, web apps, or lightweight services that interact with your GPU backend
- Dedicated Servers — High-performance bare-metal servers for CPU-intensive workloads or large-scale data processing
- SSL Certificates — Secure your AI web interfaces and APIs with trusted HTTPS encryption
- Domain Registration — Register a custom domain to point to your GPU server's web interfaces
Frequently Asked Questions
Can I install a custom OS not listed in the templates?
Yes. AlexHost can install any operating system upon request. Contact the support team with your requirements.
Are LLM frameworks available on operating systems other than Ubuntu 22.04?
Currently, the pre-built LLM installation scripts are only supported on Ubuntu 22.04. Other OS options are available but will require manual framework installation.
How long does the OS installation take?
The full installation process, including OS deployment and framework setup, can take up to 30 minutes.
Can I switch frameworks after the initial installation?
Yes. You can reinstall the OS from a template at any time through DCIManager, which will allow you to select a different framework configuration. Note that this will wipe existing data, so back up your work beforehand.
What GPUs are included in AlexHost GPU dedicated servers?
All GPU dedicated server plans include dual NVIDIA RTX 4070 Ti SUPER graphics cards.
Summary: Your GPU Server Connection Checklist
| Step | Action | Status |
|---|---|---|
| 1 | Select GPU server plan | ✅ Choose based on your compute needs |
| 2 | Complete payment | ✅ Credentials sent to your email |
| 3 | Log in to client area | ✅ Find your server under My Services |
| 4 | Retrieve DCIManager credentials | ✅ Found in Login Details section |
| 5 | Install OS from template | ✅ Select Ubuntu 22.04 for LLM support |
| 6 | Choose AI frameworks | ✅ Select from available scripts |
| 7 | Set password and hostname | ✅ Required before installation starts |
| 8 | Wait for installation | ✅ Up to 30 minutes |
| 9 | Connect via SSH or RDP | ✅ Server ready for AI workloads |
Getting started with a GPU dedicated server doesn't have to be complicated. AlexHost's streamlined provisioning process, pre-built AI framework templates, and intuitive DCIManager interface make it straightforward to go from order to operational AI environment in under an hour. Whether you're running open-source LLMs, building image generation pipelines, or training custom neural networks, AlexHost's GPU Hosting infrastructure gives you the raw compute power and flexibility to do it at scale.