English
 Русский
  Română
  Deutsch
  Français
  Türkçe
  Español
  Português
  Українська
  български
  Polski
  Indonesia
  中文 (中国)


 on All Hosting Services
How to Install OpenClaw on macOS: Complete Setup Guide for Mac Mini
OpenClaw is a powerful open-source, self-hosted AI agent framework that functions as a fully autonomous personal assistant. Running 24/7 on your local hardware, it connects to popular messaging platforms like Telegram, WhatsApp, Slack, and iMessage, executes shell commands, browses the web, manages files, and integrates seamlessly with industry-leading AI models such as Anthropic's Claude and OpenAI's GPT series.
For those who want maximum performance and reliability without cloud dependency, a dedicated Mac Mini — particularly Apple Silicon M-series models (M1 through M4) — is one of the best platforms available. These machines are quiet, energy-efficient, always-on, and deeply integrated with macOS, making them ideal for running a persistent AI agent. This guide walks you through every step of setting up your own OpenClaw assistant on an AlexHost Mac Mini server.
> ⚠️ Security Warning: OpenClaw operates with broad system-level permissions. It can read files, execute terminal commands, send messages, and browse the web autonomously on your behalf. Do not install it on your primary personal machine if sensitive data — such as iCloud files, passwords, or personal photos — is synced to it. A dedicated, isolated device like the Mac Mini server described in this guide is the strongly recommended approach.
Prerequisites: What You Need Before You Begin
Before diving into the installation, make sure you have the following:
- An AlexHost Mac Mini server (Apple Silicon M-series recommended)
- SSH or remote access to your Mac Mini (see AlexHost's connection guide)
- An Anthropic API key from console.anthropic.com (or an OpenAI API key if you prefer GPT models)
- A Telegram account (optional, for messaging channel integration)
- Basic familiarity with Terminal and command-line operations
If you're looking for a reliable, always-on hosting environment beyond Mac Mini, AlexHost also offers high-performance VPS Hosting and Dedicated Servers that can run AI agent workloads around the clock.
Step 1: Connect to Your Mac Mini Server
Begin by establishing a remote connection to your AlexHost Mac Mini. Follow AlexHost's official Mac Mini connection guide to access your server via SSH or remote desktop. Once you have a working Terminal session on the machine, you're ready to proceed.
Step 2: Install Required Dependencies
2.1 Install Homebrew
Homebrew is the de facto package manager for macOS and is required to install Node.js and other dependencies. Open Terminal on your Mac Mini and run the following command:
/bin/bash -c "$(curl -fsSL https://raw.githubusercontent.com/Homebrew/install/HEAD/install.sh)"Follow the on-screen prompts and wait for the installation to complete.
Apple Silicon users only (M1/M2/M3/M4): After installation, you must add Homebrew to your shell's PATH. Run these two commands:
echo 'eval "$(/opt/homebrew/bin/brew shellenv)"' >> ~/.zprofile
eval "$(/opt/homebrew/bin/brew shellenv)"
This ensures that Homebrew-installed binaries are accessible from any new Terminal session.
2.2 Install Node.js (Version 22 or Newer Required)
OpenClaw requires Node.js v22 or higher. Install it via Homebrew:
brew install nodeVerify the installed version:
node --versionYou should see output like v22.x.x or higher. If an older version is displayed, upgrade it immediately:
brew upgrade nodeDo not proceed until Node.js v22 or newer is confirmed — older versions will cause the OpenClaw installer to fail.
Step 3: Install OpenClaw
3.1 Run the Official Installer Script
With Node.js in place, install OpenClaw using its official one-line installer:
curl -fsSL https://openclaw.ai/install.sh | bashThis script automatically:
- Detects your operating system and architecture
- Confirms that a compatible version of Node.js is available
- Installs the OpenClaw CLI globally on your system
- Prepares the runtime environment
Wait until you see the confirmation message:
Installation finished successfully!3.2 Verify the Installation
Confirm that the OpenClaw CLI is correctly installed and accessible:
openclaw --versionA version number should be printed to the terminal. If you receive a "command not found" error, close your Terminal window completely, reopen it, and try the command again. This refreshes your shell's PATH and typically resolves the issue.
Step 4: Onboarding and Configuration
This step configures OpenClaw to use Anthropic's Claude as its AI backend and sets up the background service daemon.
4.1 Run the Onboarding Wizard
openclaw onboard --install-daemonThe --install-daemon flag is important — it registers OpenClaw as a background service that automatically starts on every system boot, ensuring your AI assistant is always available without manual intervention.
The interactive wizard will guide you through three configuration areas:
a) Authentication — API Key Setup
When prompted for your API key, paste your Anthropic API key from console.anthropic.com. OpenClaw will use this key to communicate with Claude.
> 💡 Billing note: Anthropic charges per token usage. For an actively used personal assistant, expect costs in the range of a few dollars per day depending on query volume and model selection.
b) Gateway Settings — Port Configuration
Accept the default gateway settings unless you have a specific reason to use a different port. The default gateway port is 18989. This is the port through which OpenClaw's web UI and messaging integrations communicate.
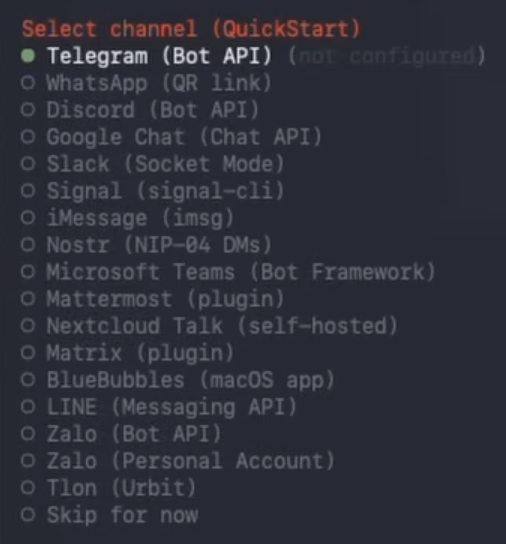
c) Channel Setup — Messaging Integration
At this stage, you can connect a messaging application (covered in detail in Step 5) or skip this for now and use the web-based dashboard instead. Select "skip for now" if you want to test the web UI first.
4.2 Verify the Gateway Is Running
After onboarding, confirm that the OpenClaw gateway service is active:
openclaw gateway statusThe output should confirm the gateway is running. If it is not running, start it manually:
openclaw gateway --port 187894.3 Open the Web Dashboard
Launch the OpenClaw control interface in your browser:
openclaw dashboardThis opens the web-based dashboard at:
http://127.0.0.1:18789/If the dashboard loads successfully, your gateway is fully operational. You can immediately begin chatting with OpenClaw directly from the browser — no messaging app configuration required at this stage.
Step 5: Connect a Telegram Messaging Channel (Optional)
Connecting OpenClaw to Telegram allows you to interact with your AI assistant from any device, anywhere in the world, using the Telegram app.
5.1 Create a Telegram Bot via BotFather
- Open Telegram and search for @BotFather
- Start a conversation and send the command:
/newbot - Follow BotFather's prompts — you'll choose a display name and a username for your bot
- BotFather will generate and send you a bot API token — copy this token immediately and keep it secure
5.2 Register the Bot Token with OpenClaw
Return to your Mac Mini Terminal and run:
openclaw onboardWhen prompted to select a messaging channel, choose Telegram and paste your bot API token when asked.
5.3 Start Chatting
Open Telegram, find your newly created bot by its username, and send it a message. OpenClaw will respond through the Telegram interface, giving you full AI assistant capabilities directly within the app.
Troubleshooting Common Issues
| Issue | Likely Cause | Solution |
|---|---|---|
openclaw: command not found | PATH not refreshed | Close and reopen Terminal |
| Gateway not starting | Port conflict | Try --port 18790 or check for conflicting processes |
| Node.js version too old | Outdated install | Run brew upgrade node |
| API key rejected | Incorrect key or billing issue | Verify key at console.anthropic.com |
| Dashboard not loading | Gateway not running | Run openclaw gateway status and restart if needed |
Why Run OpenClaw on Dedicated Hardware?
Running OpenClaw on a dedicated machine — rather than your personal laptop or desktop — offers significant advantages:
- Isolation: Your personal files, passwords, and sensitive data are not accessible to the agent
- Always-on availability: The assistant runs 24/7 without interrupting your primary workflow
- Performance: Apple Silicon M-series chips handle AI workloads efficiently with low power consumption
- Stability: A dedicated server environment avoids conflicts with personal software and system updates
For teams or developers who need even more computational power for AI workloads, AlexHost's GPU Hosting solutions provide dedicated GPU resources purpose-built for AI and machine learning tasks. Alternatively, if you need a scalable Linux-based environment with full root access, consider AlexHost's VPS Hosting plans.
Securing Your OpenClaw Installation
Because OpenClaw has broad system permissions, hardening your server environment is essential:
- Use a strong SSH key for remote access — disable password-based SSH authentication
- Keep Node.js and OpenClaw updated to receive security patches
- Restrict firewall rules so the gateway port (18789) is not exposed to the public internet
- Use HTTPS for the dashboard if accessing it remotely — consider pairing your setup with an SSL Certificate for encrypted communications
- Regularly audit what tools and permissions OpenClaw has been granted
Conclusion
You now have a fully operational, self-hosted OpenClaw AI assistant running on your AlexHost Mac Mini. The agent starts automatically on boot, is accessible via the web dashboard, and — if you completed Step 5 — responds to your messages directly in Telegram from any device.
From here, you can explore OpenClaw's tool integrations, connect additional messaging channels, configure custom workflows, and expand its capabilities as your needs grow. With dedicated hardware and a properly secured environment, you have a powerful personal AI assistant that works entirely on your terms.
For complementary infrastructure needs — from domain registration to email hosting — explore the full range of AlexHost services to build a complete, self-managed online presence alongside your AI setup.