English
 Русский
  Română
  Deutsch
  Français
  Türkçe
  Español
  Português
  Українська
  български
  Polski
  Indonesia
  中文 (中国)


 on All Hosting Services
How to Install 3x-ui and Choose the Right Anti-Censorship Configuration
Keywords
The quick glossary below keeps the terms straight before the installation starts:
| Emoji + keyword | Brief explanation |
|---|---|
| ⚙️ 3x-ui | A web control panel for Xray-core |
| 🚀 Xray-core | The actual proxy engine |
| 📥 inbound | A listening entry point on the server |
| 🔀 transport layer | How the traffic stream is carried |
| 🎭 Reality | A stealth/security mechanism for Xray |
How to Install 3x-ui on a VPS and Choose the Right Anti-Censorship Configuration
One day your VPN works. The next day it stops working. In restrictive networks, blocking is often aimed less at whether traffic is encrypted and more at whether the traffic looks easy to classify.
That is the part many older VPN tutorials skip. Encryption alone does not guarantee stealth. Networks can still inspect handshake patterns, packet behavior, and protocol fingerprints well enough to decide that your traffic does not look ordinary. So the question stops being “how do I install a VPN?” and becomes “how do I make the traffic shape look normal enough to survive filtering?”
This guide is the foundation step. You will install a working 3x-ui panel on an Ubuntu VPS, secure the admin surface correctly, and leave with a clear framework for choosing what to configure next inside the panel. If you are self-hosting on a small VPS — whether from AlexHost or another provider — this is where the setup starts becoming manageable.
What 3x-ui actually is — and what it is not

The most important misconception to fix early is this: 3x-ui is not the censorship-bypass technology itself. It is the dashboard. Xray is the engine underneath it. The protocol, transport, and security choices inside that engine are what determine how your traffic behaves on the network.
3x-ui matters because it turns Xray from a pile of hand-edited JSON into something an average human can operate. You get a web control panel for creating inbounds, adding clients, exporting links or QR codes, managing limits, updating geofiles, and handling admin access and panel SSL.
The quick glossary below keeps the terms straight before the installation starts:
| Term | Plain meaning | Why it matters here |
|---|---|---|
| 3x-ui | A web control panel for Xray-core | It is the management layer you install in this guide |
| Xray-core | The actual proxy engine | This is what handles protocols, routing, and traffic behavior |
| inbound | A listening entry point on the server | This is where you define how clients connect |
| transport | How the traffic stream is carried | Examples include raw TCP, WebSocket, or gRPC |
| Reality | A stealth/security mechanism for Xray | It helps traffic resemble ordinary HTTPS more closely |
📝 Note: 3x-ui is best understood as a management layer for Xray-core, and the project itself frames it as personal-use software rather than something to treat casually as hardened production infrastructure.
That distinction matters for security too. An HTTPS-enabled panel with strong admin credentials protects the control surface — the place where you log in and manage the server. It does not automatically make user traffic stealthy. Installation gives you control; the protocol stack chosen afterward determines how the connection looks on the wire.
Before you install: server and access checklist

3x-ui does not need a huge server, but it does need a clean install path. For this guide, the baseline is Ubuntu 22.04 LTS or 24.04 LTS, SSH access with root or sudo privileges, a public IP address, and modest resources such as 1 vCPU and 1 GB RAM. Any suitable VPS works, including low-cost entry plans, as long as it gives you predictable network access and firewall control.
Before you touch any commands, verify this checklist:
- Operating system: Ubuntu 22.04 LTS or 24.04 LTS
- Access level: root SSH access, or a user with full sudo privileges
- Network: public IP address and the ability to open required ports
- Traffic port: 443/tcp for HTTPS-style proxy traffic later
- ACME validation port: 80/tcp only if you want the installer’s built-in Let’s Encrypt flow for the panel; ACME is the public reachability check used for certificate validation
- Panel reachability: be ready for the installer to assign a random panel port and randomized webBasePath
- Expected end state: a reachable panel URL, saved credentials, and a verified HTTPS panel service
⚠️ Warning: If you are enabling UFW on a remote VPS for the first time, allow SSH before you enable the firewall. Otherwise, you can lock yourself out of the server you are trying to configure.
Once those basics are true, the rest becomes straightforward. The next two sections take you from “I have a VPS” to “I have a working control panel” without guesswork.
Server Preparation: BBR and Basics
With prerequisites verified, let’s prepare the server. This phase optimizes your VPS before installing any VPN software, ensuring maximum performance from the start.
💡 TIP: Use BBR before deploying — it often improves throughput and latency on constrained or higher-latency links.
First, update your system packages. This ensures you have the latest security updates and required dependencies:
apt update && apt upgrade -y
This step may take 1-5 minutes depending on your VPS provider and network speed. Some providers like Vultr pre-update their images during deployment, so this might complete quickly on some systems.
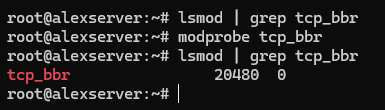
Next, enable Google BBR congestion control. BBR (Bottleneck Bandwidth and Round-trip propagation time) is Google’s congestion control algorithm. Instead of relying mainly on packet loss as a signal, it tries to model available bandwidth and round-trip time more directly, which can improve throughput and responsiveness on some VPS links.
# Verify BBR module is available
lsmod | grep tcp_bbr
If nothing appears, load the module manually:
modprobe tcp_bbr
Now create the sysctl configuration to enable BBR persistently:
cat >> /etc/sysctl.d/99-bbr.conf << 'EOF'
net.core.default_qdisc=fq
net.ipv4.tcp_congestion_control=bbr
EOF
Apply the configuration:
sysctl -p /etc/sysctl.d/99-bbr.conf
Verify BBR is active:
sysctl net.ipv4.tcp_congestion_control
sysctl net.ipv4.tcp_available_congestion_control
You should see bbr as the active algorithm.

Some systems benefit from a reboot after enabling BBR—it ensures the module loads properly and all network optimizations take effect:
reboot
Now make sure port 443 is reachable. If you plan to use the 3x-ui installer’s built-in Let’s Encrypt flow for the panel, allow 80/tcp as well — that port is used for ACME certificate validation, not for the panel itself. If your VPS provider also has a cloud firewall or security group layer, allow the same ports there too. On Ubuntu, the safest path is usually UFW:
# If this is a remote VPS and you're enabling UFW for the first time, allow SSH before enabling the firewall
ufw allow OpenSSH
# Allow HTTPS-style Reality traffic
ufw allow 443/tcp
# Allow ACME validation for the 3x-ui panel's built-in Let's Encrypt setup
ufw allow 80/tcp
# Review rules, then enable only if UFW is not already active
ufw status
ufw enable
⚠️ WARNING: Port 443 is strongly recommended because it matches normal HTTPS traffic. Other ports may work technically, but they blend in less naturally and make the setup easier to flag.
Your server is now optimized and ready for the 3x-ui installation.
Installing 3x-ui Panel
We’ll use the MHSanaei fork, which is actively maintained and supports current protocols. Again, important reminder: the project itself frames 3x-ui as a personal-use panel, so treat it as an admin convenience layer and secure the panel carefully.
Before you run the installer, note one easy-to-miss requirement: if you want the installer’s built-in Let’s Encrypt setup to issue an SSL certificate for the panel, 80/tcp must be open and reachable from the public internet. This ACME validation port is separate from the panel port you choose during setup.
Run the installation command:
bash <(curl -Ls https://raw.githubusercontent.com/mhsanaei/3x-ui/master/install.sh)
Current versions of the installer do not begin with the older numbered Install / Update / Uninstall menu that many tutorials still show. Instead, the script starts installation immediately, installs any missing dependencies, downloads the latest release, and then walks you through the panel setup prompts.
A typical install flow now looks like this:
- Choose whether to set a custom panel port or let the installer generate a random one.
- Let the installer generate a random username, password, and webBasePath.
- Choose how to configure panel SSL:
- 1 = Let’s Encrypt for a domain
- 2 = Let’s Encrypt for the server IP
- 3 = use an existing certificate
- Complete the certificate prompts if you use the built-in Let’s Encrypt flow.
⚠️ IMPORTANT: The panel port is not the same thing as the ACME validation port. You might run the panel on a random port such as 13525 and still need public 80/tcp open so Let’s Encrypt can validate the certificate.
The important rule is simple: use the exact credentials, path, and URL printed by your own installer, not assumptions copied from older tutorials.
Your final output will look more like this:
Username:    GENERATED_USERNAME
Password:    GENERATED_PASSWORD
Port:        13525
WebBasePath: RANDOM_PATH
Access URL:  https://YOUR_SERVER_IP:13525/RANDOM_PATH
Verify the service is running:
systemctl status x-ui
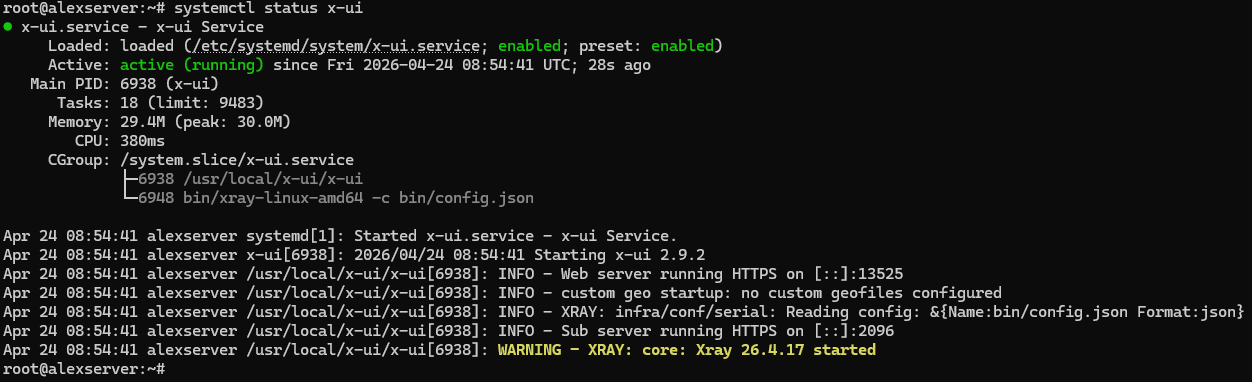
This check matters. Look specifically at the web server line in the status output:
- If you see Web server running HTTPS …, panel SSL is working correctly.
- If you see Web server running HTTP …, the panel installed successfully but the SSL setup did not complete.
Access the panel using the exact URL, username, and password generated by your own install. Do not assume the path is /panel, and do not assume the credentials are admin/admin unless your own install explicitly says so.
💡 TIP 1: To view again the current panel settings and print the Access URL, in the CLI run “x-ui” command, and choose number 10 “View Current Settings” from the menu output.
💡 TIP 2: If the access URL does not load, make sure the 3x-ui panel port is open on your VPS firewall. For example, if your panel is running on port “13525”, allow it with: ” ufw allow 13525/tcp “. Replace 13525 with the actual port you configured for the 3x-ui panel.
If the installer finishes but systemctl status x-ui shows HTTP instead of HTTPS
The most common cause is that 80/tcp was not reachable from the public internet during Let’s Encrypt validation. In that case, the panel may still install and start, but certificate issuance fails.
Fix the firewall first:
ufw allow 80/tcp
ufw status
If your VPS provider has a cloud firewall or security group layer, allow 80/tcp there too. Then rerun panel certificate setup from the 3x-ui management script:
x-ui
For an IP-based panel certificate, choose:
- 19 → 6 (Get SSL for IP Address)
For a domain-based panel certificate, choose:
- 19 → 1 (Get SSL (Domain))
After the certificate is issued, verify again:
systemctl status x-ui
You want the status output to show Web server running HTTPS … before continuing.
💡 TIP: Save the generated credentials and panel URL immediately. Also note that the installer summary can be misleading if certificate issuance fails — if the final block prints an HTTPS URL but systemctl status x-ui still shows HTTP, trust the service status output and fix SSL before moving on.
The decision mind map: where “bypass censorship” actually starts

Once the panel is installed, the problem changes. You are no longer trying to install software correctly. You are deciding how client traffic should present itself to the network. That is where “configure to bypass censorship” actually begins.
The easiest way to reduce the terminology mess is to think in three layers: how the client and server speak, how the stream is carried, and how that traffic looks to an outside observer. Otherwise, if you flatten those into one list of buzzwords, 3x-ui starts to look more complicated than it really is.
| Layer | What question it answers | Common examples |
|---|---|---|
| Protocol | How do client and server identify and speak to each other? | VLESS, Trojan, VMess, Shadowsocks |
| Transport | How is the traffic stream carried? | TCP (RAW), WebSocket, gRPC, QUIC |
| Security / obfuscation | What does the traffic look like to the network? | Reality, TLS, browser-like fingerprints, domain-fronted-looking stacks |
Take one anchor example: VLESS + TCP/RAW + Reality on 443. VLESS is the protocol. TCP/RAW carries the stream. Reality shapes how the connection resembles ordinary HTTPS behavior. And 443 matters because the camouflage works best when it also matches the default port for normal encrypted web traffic. In some places the Xray docs say raw while the panel UI says TCP; for this article, treat those as the same conceptual transport choice.
⚠️ Warning: There is no universal winner and no permanently unblockable combination. Networks change, filters evolve, and what blends in well on one path may stand out on another. The goal is not magic. The goal is choosing the most sensible stack for your environment.
That is why this article stops at the map instead of pretending one page can cover every full build. The next step is choosing the configuration family that fits your network and goals.
Which 3x-ui path fits your use case?

If you want the clearest default answer first, here it is: for restrictive, DPI-heavy environments, start with VLESS + Reality. It separates protocol from stealth clearly, works well on port 443, and does not force you to begin with a domain or reverse proxy.
That does not make it the answer to every situation. If you already run a domain or prefer a more traditional TLS-and-reverse-proxy workflow, then VLESS or Trojan over TLS with WebSocket or gRPC is often the better fit. That path makes more sense when you already manage a domain and certificates.
If your priority is throughput and your network handles UDP well, Hysteria 2 deserves attention. It is the specialized path here because its appeal is less “look like the most ordinary browser session possible” and more “get strong performance from a QUIC/UDP-based design.” It is compelling, but not the default beginner recommendation for stealth-first setups.
Shadowsocks 2022, VMess, and similar compatibility paths still have a place, but mostly for migration, older client support, or narrow compatibility constraints. VMess in particular is not the best equal-first-choice beginner recommendation because of its time dependency — one more operational detail to get wrong when simpler options already exist.
| Path | Best for | Needs a domain? | Why choose it | Why it is not the universal default |
|---|---|---|---|---|
| VLESS + Reality | Restrictive or heavily filtered networks | No | Strong beginner mental model for stealth-oriented self-hosting on 443 | Still not future-proof, and some networks or clients may push you elsewhere |
| VLESS/Trojan + TLS + WebSocket/gRPC | Domain-based stacks, reverse proxies, website-plus-proxy setups | Usually yes | Fits readers already comfortable with domains, certificates, and web stack layering | More moving parts than a no-domain Reality path |
| Hysteria 2 | Speed-focused setups where UDP works well | No | Excellent when throughput and QUIC/UDP performance are the main goal | Not the most browser-like camouflage story, and UDP conditions vary |
| Shadowsocks 2022 / VMess / compatibility paths | Migration, older client support, narrower constraints | Depends | Useful when compatibility is the real requirement | Not the strongest beginner default when cleaner modern choices are available |
💡 Quick Decision Checklist
- Censored network: start with VLESS + Reality
- Domain / reverse proxy setup: evaluate TLS + WS/gRPC or Trojan
- High-speed UDP: test Hysteria 2
- Compatibility edge cases: consider Shadowsocks 2022 or VMess
WireGuard and OpenVPN are useful contrast examples here, not the recommended next step, because ordinary VPN protocol shapes are often what restrictive networks learn to recognize first. Choose the path that matches your environment, then build that path before adding more options.
What you can do next inside 3x-ui after choosing a path
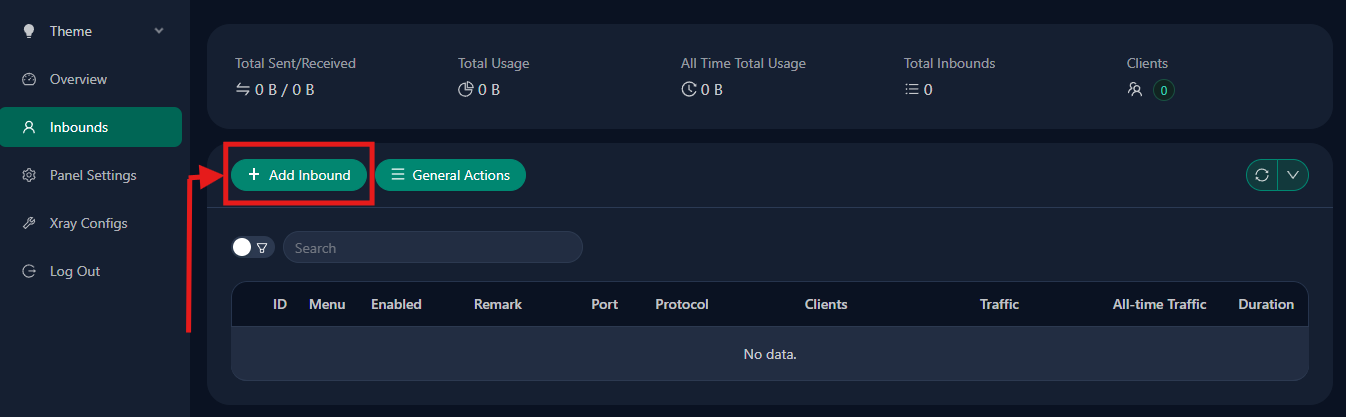
Once you choose the path, 3x-ui becomes the operational layer. This is where you create the inbound, add clients, export a share link or QR code, set traffic limits or expiry dates, and keep the server manageable over time instead of digging through raw Xray files.
📝 Note: The panel is not “just the login screen.” It is the admin surface where protocol decisions become running inbounds, client credentials, usage controls, and visibility.
In practical terms, the sequence is usually simple: create the inbound, add a client identity, export the connection details, import them into the client app, and return later for limits, renewals, logs, traffic stats, and routing or geofile updates if needed. That operational visibility is a big part of why the panel is worth using.
If you are continuing this setup as a series, the first follow-up guide should be the VLESS + Reality build for readers on restrictive networks. That is the most natural next article because it turns this mental model into one concrete configuration.
Conclusion

Installing 3x-ui is not the final anti-censorship solution. It is the control room. The real result comes from what you configure inside it next. Keep the split simple: the dashboard makes Xray manageable, but the engine and route — protocol, transport, and security choice — decide how well the connection survives filtering.
So take the honest next step, and select the actual path which fits your goals most. And once you get serious about self-hosting your choice, stable VPS infrastructure matters too — whether that means AlexHost or another provider that gives you predictable network control and clean firewall access.