Open Ticket
  +373 79 600002
  Telegram Live Chat
  F.A.Q
F.A.Q  English
 Русский
  Română
  Deutsch
  Français
  Türkçe
  Español
  Português
  Українська
  български
  Polski
  Indonesia
  中文 (中国)






































































































































 on All Hosting Services






How to Install HAProxy with Docker Compose on Ubuntu VPS
One web service on a VPS is easy to expose directly — until you want one clean public front door, the freedom to swap the backend later, or a safer way to stop sending traffic to something broken. That is the point where a proxy stops feeling like “something for big infrastructure teams” and starts feeling practical.

HAProxy fits that role well. Think of it as the traffic manager sitting in front of your application: requests hit HAProxy first, and HAProxy decides where they should go next. You do not need a large cluster to benefit from that. Even on one Ubuntu 24.04 VPS, it gives you a cleaner edge between the internet and the service you are actually running.
This guide keeps the first deployment intentionally structured: one Ubuntu 24.04 VPS, Docker Compose, one HAProxy container, one demo backend, and proof that routing really works.
Why HAProxy Matters Before You Need It
Imagine a small VPS running one app just fine today. It answers on a port, the site loads, and everything looks good. The friction starts when you want a stable public entry point, the option to replace the backend later without changing the public address, or a front layer that can stop sending traffic to a failing service. Exposing the app directly starts to feel fragile surprisingly quickly.

Those requirements all point to the same missing layer: a controlled entry point between the internet and your application. HAProxy provides that layer. Clients connect to HAProxy first, and HAProxy decides where each request goes next.
That separation is useful even before you have multiple servers. It gives you a cleaner public edge now and a safer path to later changes such as backend replacement, health-aware routing, and HTTPS. The rest of the guide shows that pattern in its simplest working form and verifies it with a real request path.
Quick HAProxy Terms That Make the Rest of This Guide Easier

You only need a small vocabulary set to follow a first HAProxy deployment confidently. The table below covers the terms that matter in this guide.
| Term | Plain-English meaning |
|---|---|
| 🌐 reverse proxy | A front-facing service that receives requests first and passes them to another internal service. |
| ⚖️ load balancer | A front layer that can distribute requests across more than one backend target. |
| 🚪 frontend | The place where clients connect to HAProxy. |
| 🧩 backend | The service or server HAProxy sends the request to next. |
| ❤️ health check | A way for HAProxy to notice whether a backend should keep receiving traffic. |
| 🐳 image | A packaged application template used to create containers. |
| 📦 container | A running instance of an image. |
For this guide, reverse proxy is the first mental model to keep in mind. HAProxy sits in front of something else and controls the handoff. Load balancing is the extended capability that becomes useful when you add multiple backend servers later.
The two terms that matter most once you open the config are frontend and backend. The frontend is where the client arrives. The backend is where HAProxy sends the request next. A health check matters because it lets HAProxy notice when a target should stop receiving traffic.
What HAProxy Is Good At — and What This Guide Intentionally Skips

If you picture your stack as an office building, HAProxy is the front desk: traffic arrives there first, gets directed to the right room, and stops being sent to a room that is clearly unavailable.
In this guide, that translates into three beginner-relevant jobs:
- accept incoming HTTP requests
- forward them to the demo backend
- monitor whether that backend is healthy enough to keep receiving traffic
That is already useful with one backend because it gives you one controlled public edge in front of the application.
Later on, the same pattern scales cleanly. You can replace the backend, add more backends, introduce HTTPS, or let HAProxy spread traffic across multiple targets instead of just one. To keep the first pass teachable, this guide stays in HTTP mode and intentionally skips TLS termination, ACLs, rate limiting, stick tables, and HA pairs. Those are all real HAProxy topics. They are just not the right starting point for a first working deployment.
What You’re Building and What You Need First

Before creating files, it helps to see the final shape of the stack. The deployment in this guide looks like this:
Client browser or curl
        |
        v
HAProxy frontend (:80)
        |
        v
demo backend service (demo:5678)

Optional local-only validation:
HAProxy stats frontend (127.0.0.1:8404/stats)
Docker Compose is the main path here because it keeps the first install reproducible, visible, and easy to edit. Instead of building a custom image on day one, you keep the HAProxy config on the host, mount it into the container, and start the whole stack from one file. On a self-managed Ubuntu VPS — for example, an AlexHost VPS — that is a clean fit because the layout stays easy to inspect.
💡 Tip: This guide uses Docker Compose plus a bind-mounted haproxy.cfg on purpose. It is the most transparent first-install path because you can edit the proxy config directly without adding an image-build step.
Before you start, make sure you have these basics in place:
- Ubuntu 24.04 VPS
- Docker Engine installed
- Docker Compose v2 available through docker compose
- Terminal access and permission to run Docker
- Port 80 available on the host
- Inbound HTTP allowed if you use UFW or provider-side firewall rules
First, check your Ubuntu version
lsb_release -a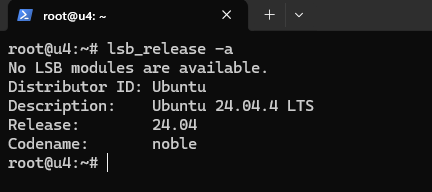
Next, confirm Docker and modern Compose are available:
docker --version
docker compose version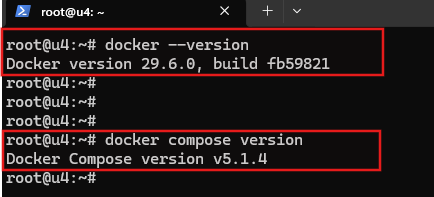
If both commands return version information, the container runtime side is ready and you can stay focused on HAProxy instead of detouring into Docker installation.
Next, make sure port 80 is not already in use, then check whether UFW is active and whether HTTP is already allowed:
sudo ss -tlnp | grep -E ':(80)\s' || true
sudo ufw status
sudo ufw allow 80/tcp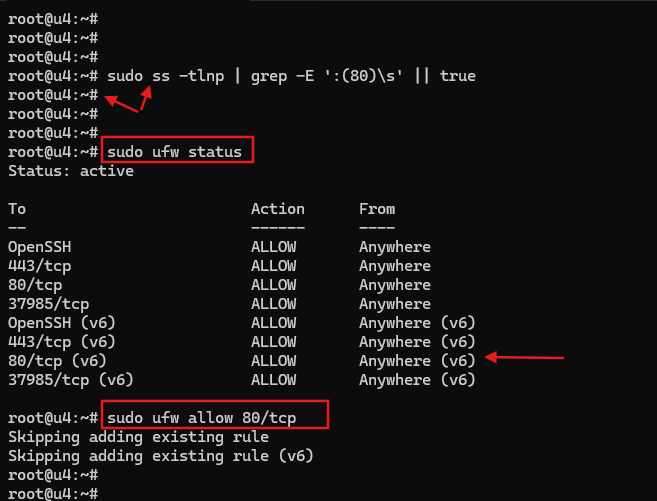
✏️ NOTE: No output from the ss check usually means port 80 is free. If you see nginx, apache2, caddy, or another service already listening there, fix that first. It is a ten-second preflight step that saves a lot of confusion later.
In the example above, sudo ufw status shows Status: active, and 80/tcp is already present in the allow list. That is why sudo ufw allow 80/tcp returns Skipping adding existing rule instead of adding a new one. That output is normal and simply means the firewall rule was already in place.
Create the Project Folder and Compose File
Start by creating a small project folder for the two files this first deployment needs:
mkdir -p ~/haproxy-docker
cd ~/haproxy-docker
After that, the layout should be as small as possible:
~/haproxy-docker/
├── compose.yaml
└── haproxy.cfg
Now create compose.yaml and use this exact content:
services:
  demo:
    image: hashicorp/http-echo:1.0
    command: ["-listen=:5678", "-text=Hello from the HAProxy demo backend"]
    restart: unless-stopped

  haproxy:
    image: haproxy:3.4.1
    depends_on:
      - demo
    ports:
      - "80:80"
      - "127.0.0.1:8404:8404"
    volumes:
      - ./haproxy.cfg:/usr/local/etc/haproxy/haproxy.cfg:ro
    sysctls:
      net.ipv4.ip_unprivileged_port_start: "0"
    restart: unless-stopped
This file wires the containers together, but it does not define HAProxy request logic yet. It tells Docker which images to run, which ports to publish, and where the HAProxy config will be mounted from on the host.
The following settings are the ones that matter most for a clean first deployment:
| Compose setting | Why it is here |
|---|---|
| hashicorp/http-echo:1.0 | Gives you a tiny, predictable demo backend without teaching a second web server at the same time. |
| haproxy:3.4.1 | Uses a pinned stable tag instead of latest, which keeps the guide less fragile over time. |
| depends_on | Starts the demo service before HAProxy, which is helpful for first-run order. |
| 80:80 | Publishes the main HTTP listener on the standard web port readers expect. |
| 127.0.0.1:8404:8404 | Keeps the stats page available for local validation without exposing it publicly by default. |
| ./haproxy.cfg:/usr/local/etc/haproxy/haproxy.cfg:ro | Mounts your visible host-side config file into the official HAProxy image as read-only. |
| sysctls with net.ipv4.ip_unprivileged_port_start: “0” | Lets the non-root HAProxy container bind to low ports like 80. |
| restart: unless-stopped | Gives you a practical VPS default: restart after failure or reboot, but respect an intentional manual stop. |
One more detail matters here: there is no custom Docker network in this file because Docker Compose creates a default network automatically. That gives you service-name DNS inside the project, which is why HAProxy will be able to reach the backend as demo:5678 without extra wiring.
⚠️ Warning: Port 80 is a privileged port, so the sysctls line is not decorative. Changing the host mapping to 8080:80 does not remove the privileged-port requirement inside the container if HAProxy still binds to :80 internally.
Write and Validate a Minimal haproxy.cfg
With the container wiring in place, HAProxy still needs instructions for where traffic arrives, where it should go, and how backend health is checked. Create haproxy.cfg next:
global
    log stdout format raw local0

defaults
    mode http
    timeout connect 5s
    timeout client 30s
    timeout server 30s

frontend http
    bind :80
    default_backend demo_backend

backend demo_backend
    balance roundrobin
    server demo1 demo:5678 check

frontend stats
    bind :8404
    stats enable
    stats refresh 10s
    stats uri /stats
This is a minimal config, but it is not a throwaway one. log stdout format raw local0 is the container-friendly logging choice because Docker can surface stdout easily, and mode http in defaults keeps the entire example in HTTP mode so the listener and backend behavior stay consistent and readable.
✏️ NOTE: One detail is worth calling out before the section breakdown: balance roundrobin is set explicitly because newer HAProxy versions changed the default backend algorithm to random, and roundrobin is easier to teach predictably on a first pass.
Here is the plain-English breakdown of each section:
| Section | Key lines | What it does |
|---|---|---|
| global | log stdout format raw local0 | Sends logs to stdout so Docker logging stays straightforward. |
| defaults | mode http, timeouts | Establishes baseline HTTP behavior and sane timeout values. |
| frontend http | bind :80, default_backend demo_backend | Creates the public listener and connects it to the backend definition. |
| backend demo_backend | balance roundrobin, server demo1 demo:5678 check | Tells HAProxy which service to use and to monitor its health. |
| frontend stats | bind :8404, stats enable, stats uri /stats | Adds an optional local validation page so you can see runtime status later. |
You may notice one thing missing: option forwardfor. That omission is intentional in the base path. Preserving the original client IP is useful later, but this first deployment is about proving routing and backend health, not teaching header behavior with a demo container that does not make that signal especially valuable.
💡 Tip: Always validate the HAProxy config before you start the full stack. Because this config refers to the backend by its Compose service name (demo), start that backend first so HAProxy can resolve it during validation.
Run the validation from the same project directory:
docker compose up -d demo
docker compose run --rm --no-deps haproxy haproxy -V -c -f /usr/local/etc/haproxy/haproxy.cfg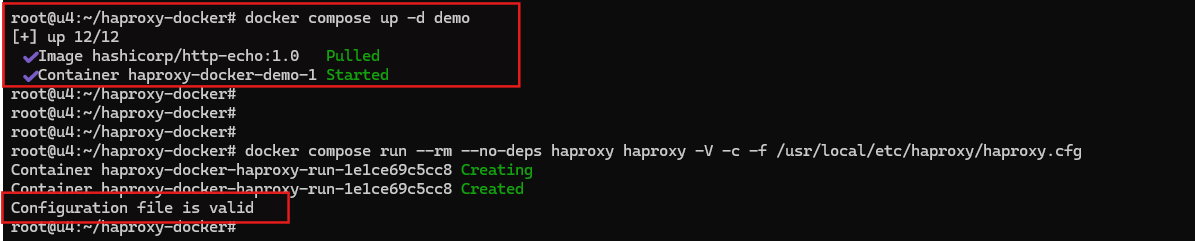
If the second command ends with Configuration file is valid, you have already proved that HAProxy can parse the file correctly and resolve the backend target before any live listener starts.
Start the Stack and Prove the Proxy Works
Once the config validates, start the stack in detached mode:
Because the validation step already started demo, this command mainly brings up HAProxy and reconciles the full two-service stack:
docker compose up -d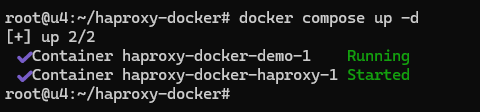
Then check whether both containers are alive:
docker compose ps
That process view is only the first checkpoint. It confirms that Docker started the containers, but not yet that HAProxy is successfully routing traffic to the backend. The next request verifies the actual data path.
Now run the actual routing test from the VPS itself:
curl -i http://127.0.0.1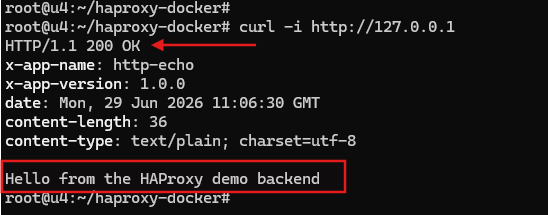
The success signal is HTTP/1.1 200 OK plus the response body containing Hello from the HAProxy demo backend. Some http-echo builds wrap that text in a tiny HTML response, so focus on the body phrase more than the exact formatting.
If you want a browser-level proof, open http://YOUR_SERVER_IP from another machine.
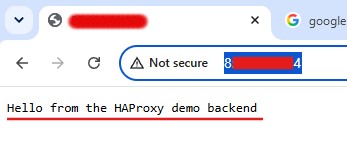
For a second validation surface, check the local-only stats page from the VPS:
curl http://127.0.0.1:8404/statsOn the stats page, the most useful signals are a frontend named http, a backend named demo_backend, a server row named demo1, status shown as UP, and usually a last-check value like L4OK in 0ms. Also keep one small Docker nuance in mind: short-syntax depends_on controls startup order, but it does not wait for a service to become healthy. If the very first curl fails once right after startup, wait a few seconds and try again before assuming the config is wrong.
The difference between process state and real success is easier to keep straight in table form:
| State | What it tells you |
|---|---|
| Containers are running | Docker started the processes. |
| curl -i http://127.0.0.1 returns 200 OK and the demo phrase | HAProxy is actually routing traffic to the backend. |
| Stats page shows demo1 as UP | HAProxy sees the backend as healthy. |
Common First-Run Mistakes and Fast Fixes

If the setup does not work immediately, resist the urge to rewrite both files at once. Most first-run failures on this stack are predictable, and they become much easier to fix when you change one variable at a time.
Use this matrix as the fast diagnosis layer:
HAProxy exits immediately
Likely cause: haproxy.cfg is missing.
Fast fix: Make sure haproxy.cfg exists next to compose.yaml.
Why it happens: The official image does not ship with a ready-to-use config.
Error says it cannot open /usr/local/etc/haproxy/haproxy.cfg
Likely cause: Wrong bind-mount path.
Fast fix: Verify ./haproxy.cfg:/usr/local/etc/haproxy/haproxy.cfg:ro exactly.
Why it happens: HAProxy cannot start without a valid config file.
Error says Permission denied on port 80
Likely cause: Privileged-port binding issue.
Fast fix: Keep net.ipv4.ip_unprivileged_port_start: “0” in Compose, or move both HAProxy and the published port to 8080.
Why it happens: The container runs as the non-root haproxy user.
You changed the mapping to 8080:80 and still get a bind error
Likely cause: HAProxy still binds to :80 inside the container.
Fast fix: Change both the host mapping and the internal bind line if you move away from port 80.
Why it happens: The privileged-port rule applies inside the container too.
Port 80 is already in use
Likely cause: Another service owns the host port.
Fast fix: Re-run the ss check and stop or move the conflicting service.
Why it happens: Only one process can listen on the same host port.
Syntax check reports unknown keyword or line-specific errors
Likely cause: HAProxy config typo.
Fast fix: Re-run the syntax check and fix the exact line it reports.
Why it happens: HAProxy’s parser is strict, which is helpful once you use it intentionally.
Containers are up, but curl does not return the demo response
Likely cause: Routing path is wrong.
Fast fix: Re-check default_backend demo_backend, server demo1 demo:5678 check, and the demo service name.
Why it happens: A running container is not proof of a correct frontend-to-backend path.
Local curl works but the site is unreachable from outside
Likely cause: Firewall or provider security rule.
Fast fix: Open port 80 in UFW and any provider-side firewall.
Why it happens: Local publishing can work even when public access is still blocked.
⚠️ Warning: Change one thing at a time. If you edit both compose.yaml and haproxy.cfg blindly, you make it much harder to tell whether the failure is a file path issue, a port issue, or a routing issue.
When you need fast evidence, keep these commands nearby:
docker compose logs haproxy
docker compose ps
docker compose up -d demo
docker compose run --rm --no-deps haproxy haproxy -V -c -f /usr/local/etc/haproxy/haproxy.cfg
sudo ss -tlnp | grep -E ':(80|8404)\s' || true
These are the three alert patterns most worth recognizing on sight:
[ALERT] ... Cannot open configuration file /usr/local/etc/haproxy/haproxy.cfg : No such file or directory
[ALERT] ... Starting frontend http: cannot bind socket (Permission denied) [0.0.0.0:80]
[ALERT] ... parsing [/usr/local/etc/haproxy/haproxy.cfg:12] : unknown keyword 'chekc'; did you mean 'check' maybe?
That is the reassuring part of a small first deployment: the failure shapes are usually small too. You do not need to start over. You need to identify which layer is complaining and correct that one thing first.
Where to Go After the Install
Once the one-backend demo works, the architecture is already useful. The next real step is to replace the demo container with your actual application while keeping the same HAProxy structure. After that, add HTTPS/TLS as a dedicated follow-up step, and treat domain-based routing plus ACLs as separate topics rather than rushing them into this first install.

When you are ready for more than one backend, the same pattern becomes visibly meaningful:
backend app_backend
    balance roundrobin
    server app1 app1:8080 check
    server app2 app2:8080 check
For safe edits to a bind-mounted config, validate first and then reload HAProxy gracefully:
docker compose up -d demo
docker compose run --rm --no-deps haproxy haproxy -V -c -f /usr/local/etc/haproxy/haproxy.cfg
docker compose kill -s HUP haproxy
📝 Note: The stats page is intentionally local-only in this guide. If you ever expose it publicly, add authentication and access controls first.
That brings you back to the original problem: you wanted one clean front door in front of a service, without turning the first setup into a full operations project. You now have that working path. More importantly, you also have the right mental model: HAProxy receives the traffic first, forwards it where it belongs, and gives you a cleaner way to grow the stack on a self-managed VPS without losing control of the configuration.