English
 Русский
  Română
  Deutsch
  Français
  Türkçe
  Español
  Português
  Українська
  български
  Polski
  Indonesia
  中文 (中国)


 on All Hosting Services
How to Upload Your Own ISO Image via IPKVM Access on AlexHost Dedicated Servers
Managing a dedicated server at the highest level means having complete, unrestricted control over every aspect of your hardware — from BIOS configuration to operating system installation. At AlexHost, every Dedicated Server comes with the option to enable IPKVM (IP-based Keyboard, Video, and Mouse) access, giving you true out-of-band hardware control, including the ability to upload and boot from any custom ISO image you choose.
This guide focuses specifically on dual-CPU (2xCPU) server platforms, where IPKVM access is most commonly used for complex virtualization environments, custom hypervisor deployments, and advanced operating system installations. Whether you are running Proxmox, VMware ESXi, FreeBSD, or a specialized Linux distribution, this walkthrough will take you through the entire process step by step.
What Is an ISO Image?
An ISO image is a single archive file that represents the complete contents of an optical disc — most commonly a bootable installation medium for an operating system such as Linux, Windows, or BSD. It encapsulates all files, directory structures, and boot sector data required to install or run a system from scratch, making it the universally preferred format for remote server provisioning and custom deployments.
System administrators and DevOps engineers rely on ISO images to accomplish a wide range of tasks, including:
- Installing a custom OS or hypervisor — such as Proxmox VE, VMware ESXi, XCP-ng, or FreeBSD
- Deploying preconfigured environments — for testing, staging, or production workloads
- Ensuring consistent system installations — across multiple physical servers in a data center
- Performing OS reinstallations — without requiring physical access to the hardware
- Recovering a failed system — by booting into a live rescue environment
In short, ISO images give you complete freedom over what runs on your hardware — a critical capability for any serious infrastructure operator.
What Is IPKVM Access?
IPKVM stands for Internet Protocol Keyboard, Video, Mouse — a remote hardware management interface that allows you to interact directly with your dedicated server at the hardware level, exactly as if you were physically seated in front of it.
Unlike standard SSH or RDP access, which requires a functioning operating system and network stack, IPKVM operates independently of the server's software state. This makes it an invaluable tool for scenarios where the OS is unresponsive, misconfigured, or not yet installed.
With IPKVM access enabled on your AlexHost dedicated server, you can:
- View live screen output in real time, including POST messages and BIOS screens
- Access and modify BIOS/UEFI settings without physical presence
- Mount an ISO image directly from your local computer or a remote URL as a virtual disc
- Reinstall or recover the operating system without relying on network-based PXE tools
- Manage the server even when the OS is completely non-functional or the network is misconfigured
- Perform full hardware diagnostics at the firmware level
IPKVM essentially bridges the gap between physical and remote access, providing true out-of-band control of your dedicated hardware — a capability that is indispensable for professional server management.
Pricing and Availability
IPKVM access is available as an optional paid add-on for all AlexHost Dedicated Servers at a one-time cost of €10. Once enabled, you will receive your unique access credentials, allowing you to connect securely to the IPKVM interface directly from your AlexHost client area or through the provided access link.
This feature unlocks the following capabilities:
| Feature | Details |
|---|---|
| BIOS-Level Access | Full control over firmware settings |
| Custom ISO Mounting | Upload any ISO from local storage or URL |
| Remote Installation | Install any OS without physical access |
| System Recovery | Boot rescue environments on demand |
| Out-of-Band Control | Works regardless of OS state |
> Important: All dual-CPU server configurations at AlexHost include automatic IPKVM provisioning, meaning you can begin your ISO-based installation process almost immediately after activation — no waiting, no manual setup delays.
If you are evaluating hosting options and need full hardware control from day one, AlexHost dedicated servers with IPKVM access represent one of the most flexible solutions available. You may also want to explore our VPS Hosting plans if you need scalable virtual infrastructure alongside your dedicated hardware.
How IPKVM Works — The Core Concept
When IPKVM access is activated for your server, you gain direct communication with the server's Baseboard Management Controller (BMC) — a dedicated embedded chip responsible for out-of-band remote administration. The BMC operates independently of the main CPU and operating system, which is why IPKVM remains functional even when the server is powered off, crashed, or in the middle of a BIOS POST sequence.
Through the web-based KVM console, you can mount an ISO file from:
- Your local machine — uploaded directly through the browser interface
- A network share — via NFS or SMB path
- A remote URL — pointing to a publicly accessible ISO file
Once mounted, the server treats the ISO as if a physical optical disc had been inserted into a local DVD drive. You can then configure the boot order to prioritize this virtual media, triggering a standard installation sequence for any operating system or tool that supports bootable ISO media.
This approach provides complete independence from AlexHost's automated installation templates, giving you total freedom over your system configuration — whether you are deploying a standard Linux distribution, a custom-compiled kernel, a commercial hypervisor, or a specialized network appliance OS.
HP-Based Dual-CPU Platforms — Step-by-Step Guide
AlexHost operates HP-based dedicated servers equipped with high-performance dual-CPU configurations. The following processor combinations are supported on this platform:
- 2× Intel® Xeon® E5-2680 v2
- 2× Intel® Xeon® E5-2690 v2
- 2× Intel® Xeon® E5-2620 v3
- 2× Intel® Xeon® E5-2699 v3
- 2× Intel® Xeon® E5-2690 v4
These platforms use HP's integrated iLO (Integrated Lights-Out) management interface, which powers the IPKVM functionality. Follow the steps below to upload and boot from your custom ISO image.
Step 1: Access the Remote Console
Log in to your AlexHost client area and navigate to your dedicated server's management panel. Locate the Remote Console link associated with your server. Click it to open the iLO web interface in your browser.
Step 2: Launch the HTML5 Console
Inside the iLO interface, select the HTML5 Console option and launch it. The HTML5 console provides a fully platform-independent remote access experience — no Java plugin, no browser extensions, no compatibility issues. You will immediately gain real-time keyboard, video, and mouse control over your server.
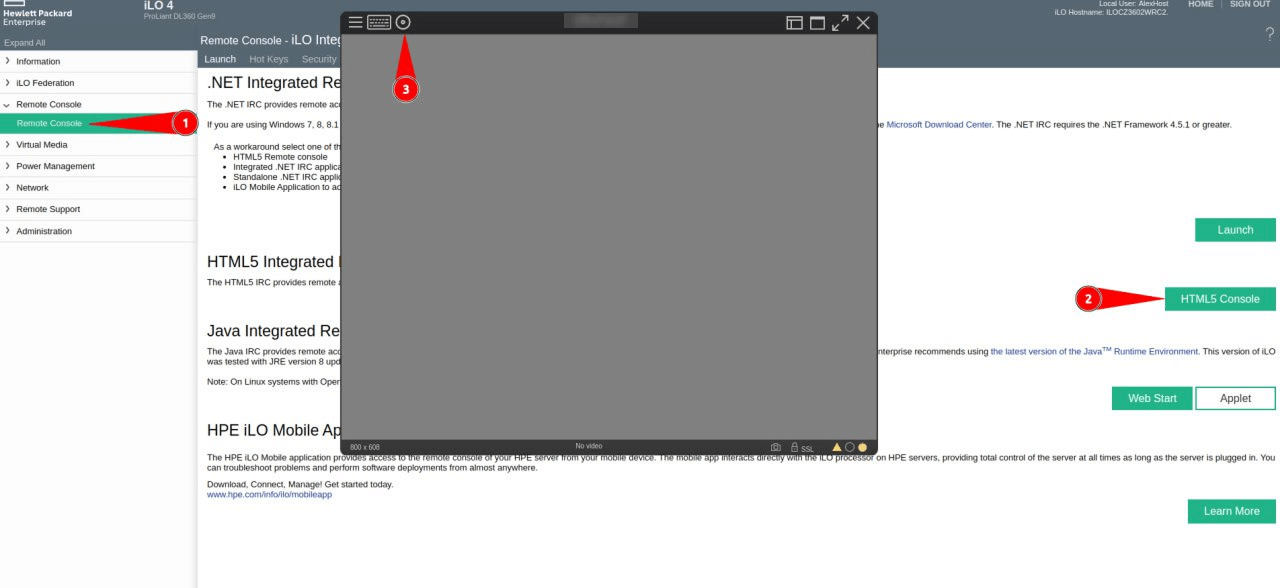
> Why HTML5? Older KVM interfaces relied on Java applets, which are no longer supported by modern browsers. The HTML5 console works natively in Chrome, Firefox, Edge, and Safari, making it accessible from any operating system.
Step 3: Mount Your ISO Image
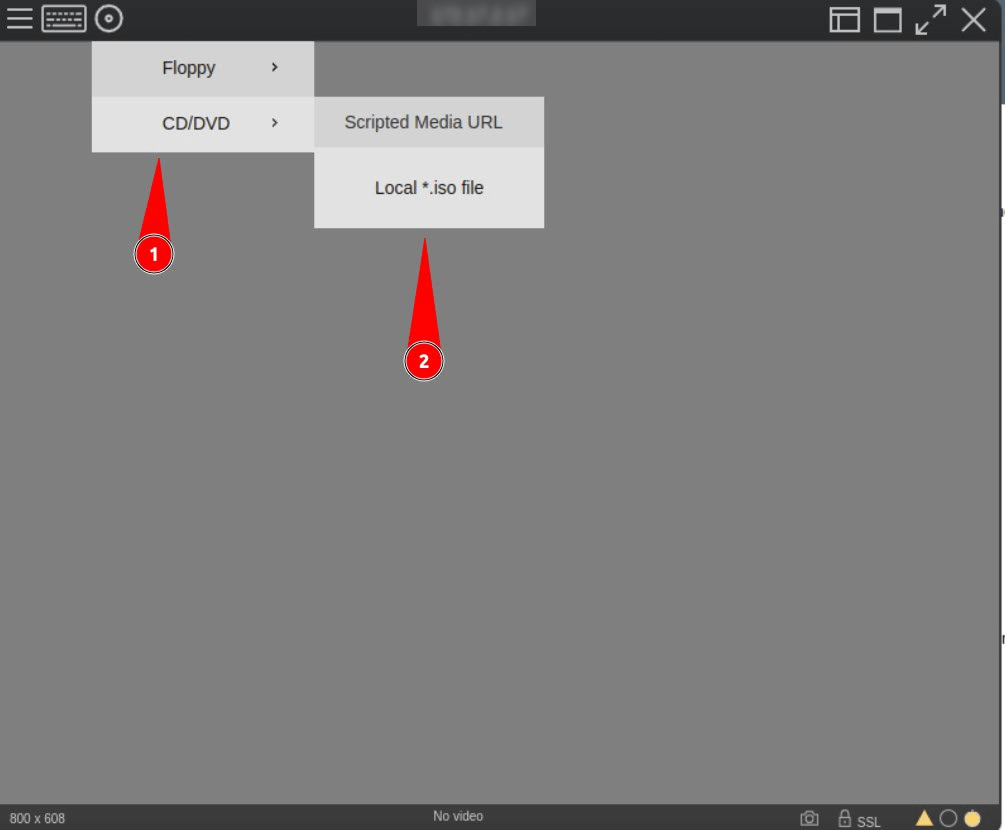
Once the HTML5 console is open and you have an active view of your server's screen, navigate to the Virtual Media section within the iLO console toolbar. Select "Choose File" and browse to the ISO image stored on your local machine. Click to attach the file — it will be mounted as a virtual optical drive on the server.
Step 4: Configure the Boot Order and Install
With the ISO mounted, you can either:
- Restart the server and interrupt the boot sequence to access the BIOS boot menu
- Modify the boot order in the BIOS/UEFI settings to prioritize the virtual CD/DVD drive
Once the server boots from your ISO, the standard installation wizard for your chosen operating system will launch. Proceed with your installation exactly as you would on a physical machine.
DELL-Based Dual-CPU Platforms — Step-by-Step Guide
AlexHost also operates DELL-based dedicated servers with the same high-performance dual-CPU configurations listed above. These platforms use DELL's iDRAC (Integrated Dell Remote Access Controller) for IPKVM functionality, which provides a slightly different workflow compared to the HP iLO interface.
Step 1: Open the IPKVM Panel
Log in to your AlexHost client area and navigate to your dedicated server's management section. Locate and open the IPKVM Panel associated with your server. This panel provides direct access to the server's hardware-level interface — equivalent to standing in front of the physical machine in the data center.
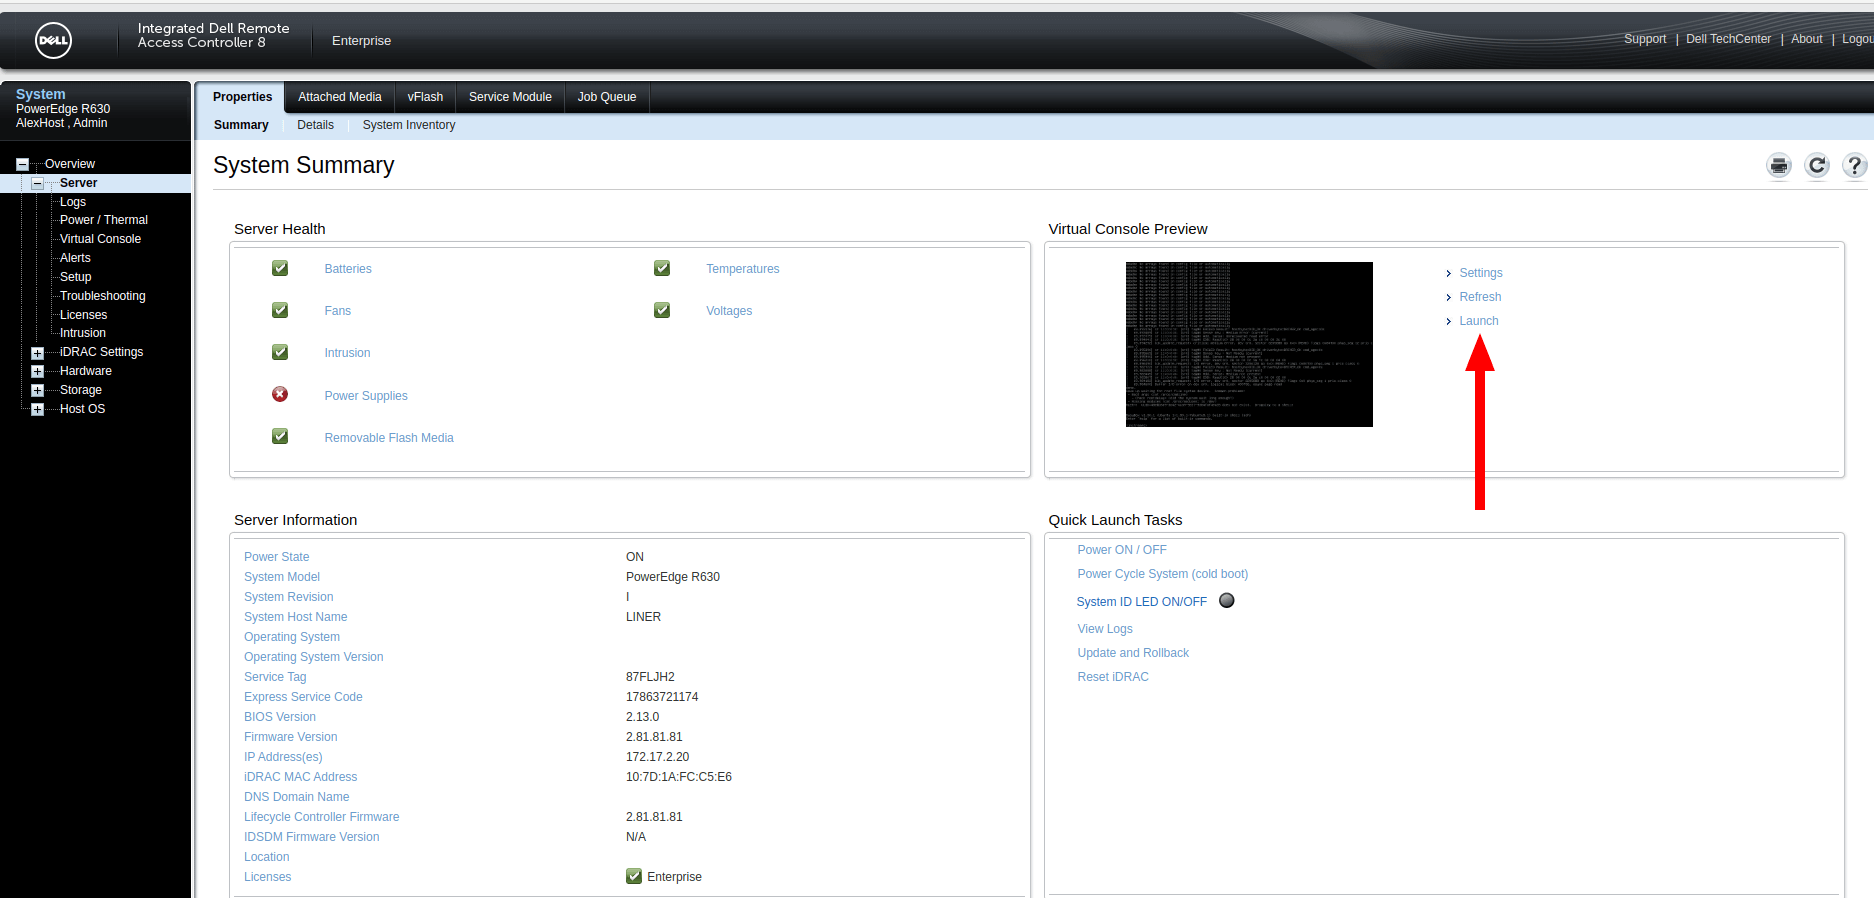
Step 2: Launch the Remote Console
Inside the IPKVM panel, click the "Launch" button to initiate the remote console session. A console window will open, giving you full real-time control over the server. From this window, you can:
- Monitor the full boot sequence and POST output
- Access the BIOS/UEFI configuration interface
- Interact with any running or installing operating system
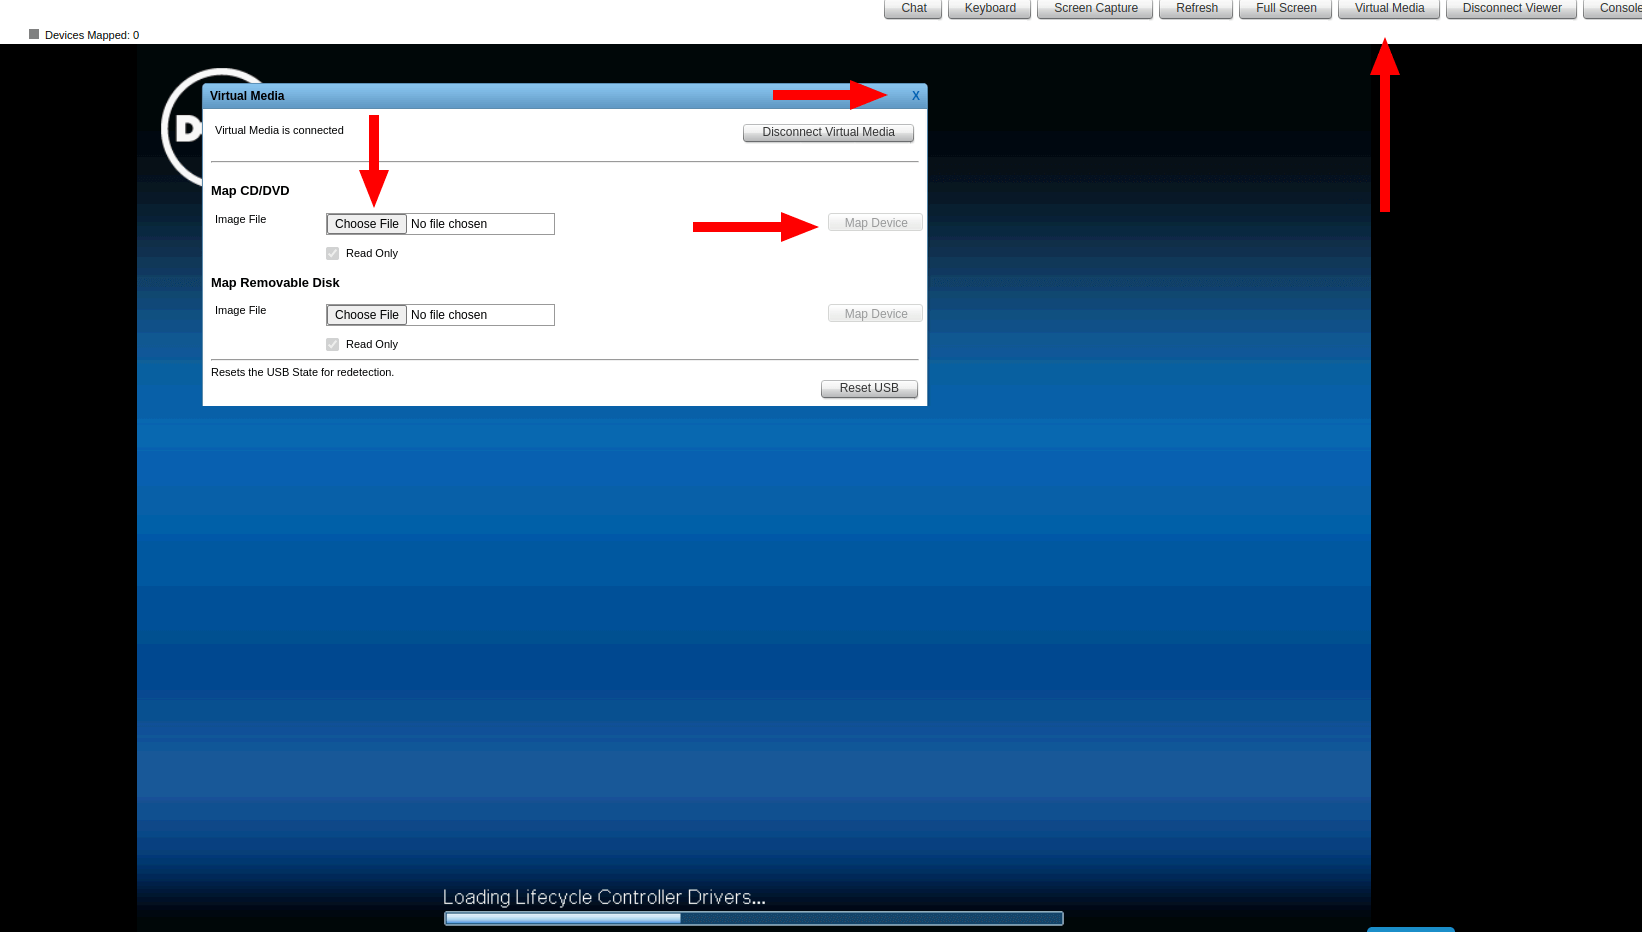
Step 3: Mount Your ISO via Virtual Media
Navigate to the Virtual Media section within the iDRAC console interface. Click "Choose File" and select the ISO image you wish to upload from your local storage. Once selected, confirm the attachment — the ISO will be mounted as a virtual drive and made available to the server's boot system.
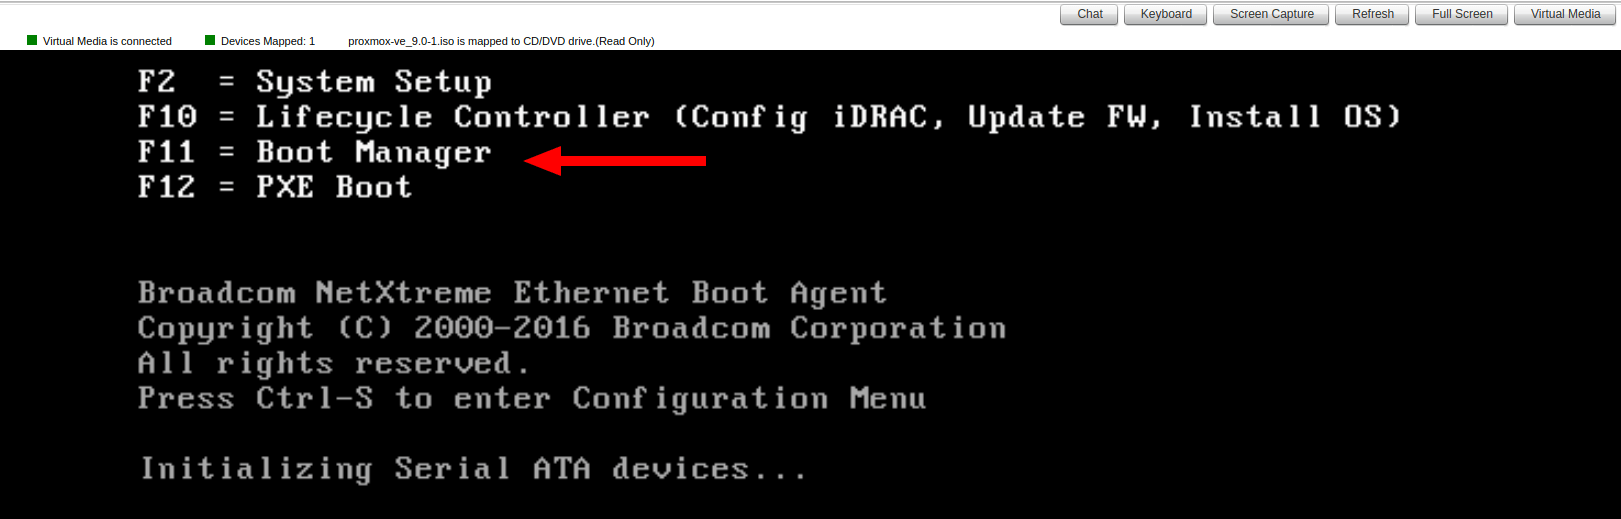
Step 4: Enter the Boot Manager Using F11
After mounting the ISO, restart the server (or power it on if it is currently off). During the boot sequence, press F11 when prompted to enter the Boot Manager. This key combination interrupts the normal boot process and opens the hardware boot selection menu.
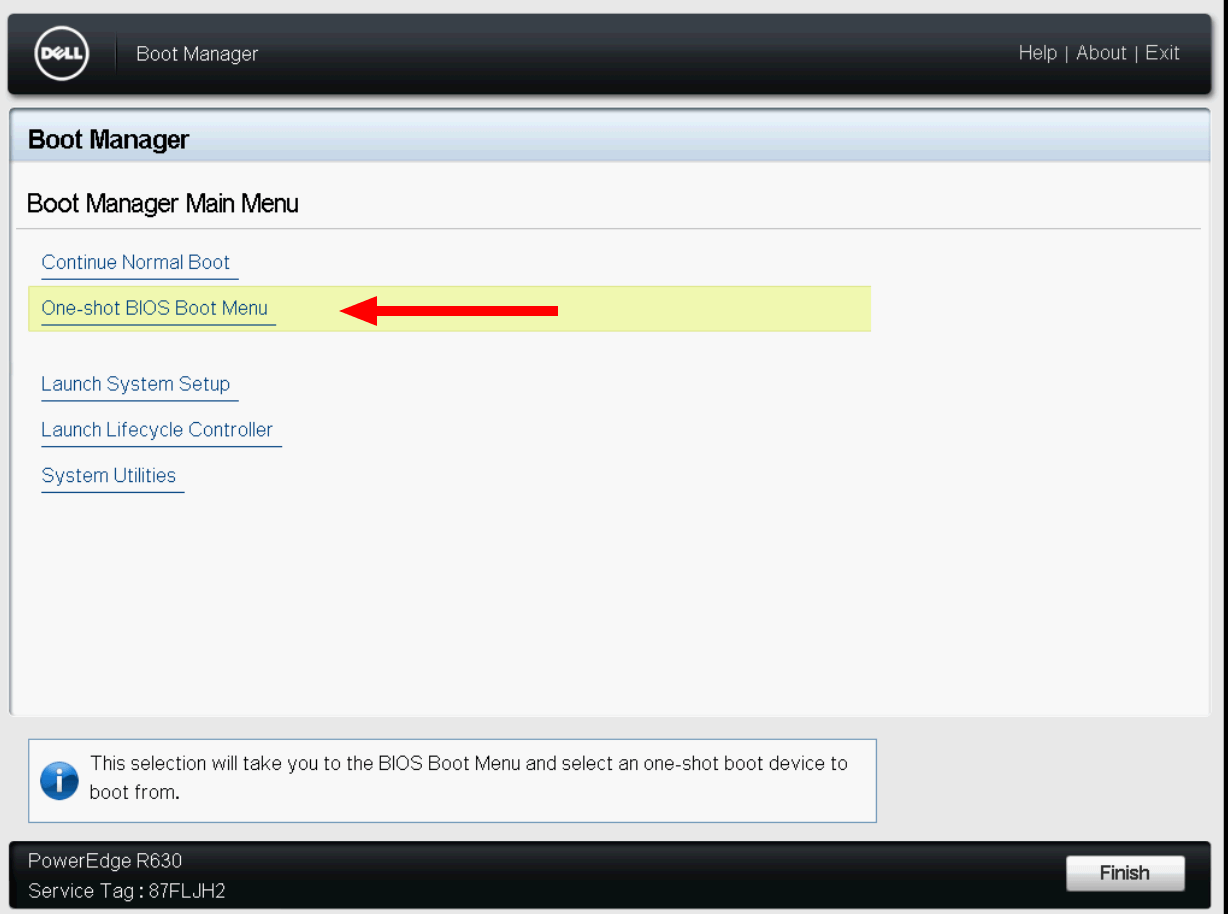
Step 5: Select One-Shot BIOS Boot Menu
Inside the Boot Manager, select the "One-Shot BIOS Boot Menu" option. This allows you to choose a specific boot device for the current session only, without permanently altering your server's boot order configuration — a safer and more flexible approach for one-time OS installations.
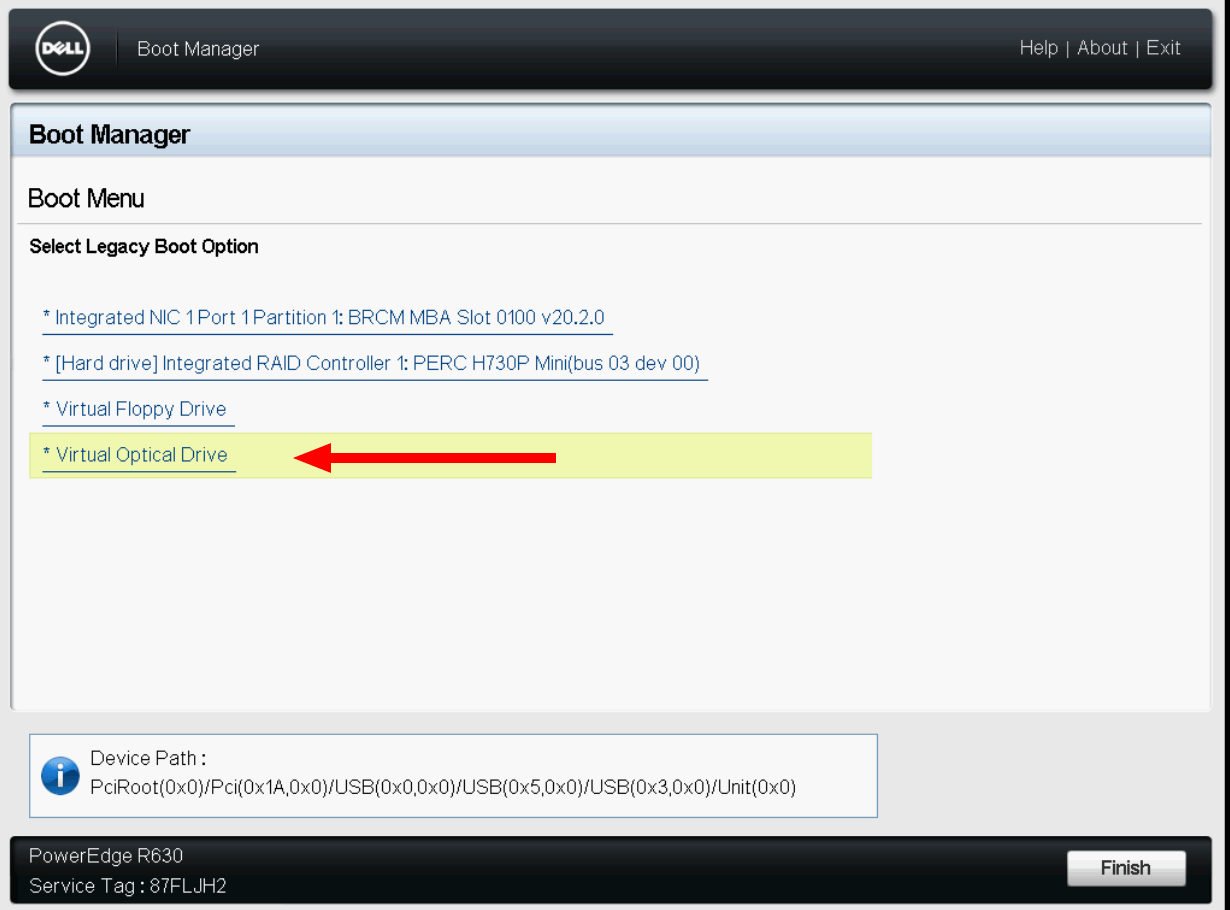
Step 6: Boot from the Virtual ISO Drive
In the list of available boot devices, locate and select the virtual drive corresponding to your mounted ISO image. Confirm your selection, and the server will immediately begin booting from that image. Your chosen operating system's installation interface will launch, and you can proceed with a full manual installation entirely through the IPKVM console.
Supported Server Configurations
The following dual-CPU server configurations at AlexHost support full IPKVM access and custom ISO mounting on both HP and DELL platforms:
| Processor Configuration | Platform | IPKVM Interface |
|---|---|---|
| 2× Intel® Xeon® E5-2680 v2 | HP / DELL | iLO / iDRAC |
| 2× Intel® Xeon® E5-2690 v2 | HP / DELL | iLO / iDRAC |
| 2× Intel® Xeon® E5-2620 v3 | HP / DELL | iLO / iDRAC |
| 2× Intel® Xeon® E5-2699 v3 | HP / DELL | iLO / iDRAC |
| 2× Intel® Xeon® E5-2690 v4 | HP / DELL | iLO / iDRAC |
All configurations listed above are available with IPKVM provisioning enabled at the time of order or as a post-activation add-on.
Why Choose AlexHost for Custom OS Deployments?
AlexHost is purpose-built for system administrators, developers, and businesses that demand full control over their infrastructure. Here is why our dedicated server platform stands out for custom OS deployments:
- True hardware-level access — IPKVM gives you BIOS/UEFI control that no cloud provider can match
- No OS restrictions — install any operating system, hypervisor, or custom distribution you need
- Immediate provisioning — dual-CPU servers include automatic IPKVM activation
- European data center infrastructure — low-latency connectivity with strong privacy compliance
- Transparent, affordable pricing — IPKVM access at just €10 with no hidden fees
Beyond dedicated servers, AlexHost offers a complete ecosystem of hosting solutions to match every workload. If you need scalable virtual environments, explore our VPS Hosting plans, including options with VPS Control Panels for simplified server management. For high-performance AI and machine learning workloads, our GPU Hosting platform delivers the raw computational power you need. And if you are building a complete web presence alongside your server infrastructure, our Shared Web Hosting plans offer an easy and cost-effective starting point.
Frequently Asked Questions
Can I upload any ISO image, including custom or self-built ones?
Yes. IPKVM places no restrictions on the ISO image you mount. You can upload any bootable ISO — including custom-compiled kernels, modified distributions, commercial hypervisors, or proprietary operating systems.
Does IPKVM work if my server's OS is completely broken?
Yes. IPKVM operates through the BMC or iDRAC/iLO chip, which is entirely independent of the main operating system. Even if the OS fails to boot, is corrupted, or is not yet installed, IPKVM remains fully functional.
Is there a file size limit for ISO uploads?
File size limits depend on the specific IPKVM interface (iLO or iDRAC version). For very large ISO files, mounting via a remote URL or network share is recommended as an alternative to direct browser upload.
Can I use IPKVM to install Windows Server on my dedicated server?
Yes. You can mount a licensed Windows Server ISO and perform a full installation through the IPKVM console, just as you would on a physical machine.
Do I need any special software to use the HTML5 console?
No. The HTML5 console runs entirely in your web browser with no plugins, Java, or additional software required. Any modern browser on Windows, macOS, or Linux will work.
*Need help getting started with your dedicated server or IPKVM setup? Contact the AlexHost support team through your client area — our technical specialists are available around the clock to assist with configuration, OS installation, and any infrastructure challenges you encounter.*