Using the Scan Commands in Redis on Linux ⋆ ALexHost SRL

Test your skills on our all Hosting services and get 15% off!

Use code at checkout:

Skills
04.11.2024

Using the Scan Commands in Redis on Linux

Using the Scan Commands in Redis on Linux

Redis, an open-source, in-memory data structure store, is known for its speed and versatility as a key-value database. One of its powerful features is the ability to incrementally iterate through datasets using scan commands. This is particularly useful when dealing with large datasets, as it allows for efficient data retrieval without overwhelming the server. For users on a dedicated Linux server, using scan commands in Redis can enhance data handling performance by allowing precise, resource-optimized dataset processing. In this article, we will explore how to effectively use scan commands in Redis within a Linux environment, offering detailed examples and best practices for managing and retrieving data at scale..

What Are Scan Commands?

The scan commands in Redis provide a way to iterate over keys, sets, hashes, and sorted sets in a non-blocking manner. Unlike the KEYS command, which can be dangerous for large datasets because it returns all matching keys at once, scan commands return a small number of elements at a time. This minimizes performance impact and allows for incremental iteration.

Key Scan Commands

  1. SCAN: Iterates through keys in the keyspace.
  2. SSCAN: Iterates through elements in a set.
  3. HSCAN: Iterates through fields and values in a hash.
  4. ZSCAN: Iterates through members and scores in a sorted set.

Basic Syntax of Scan Commands

Each scan command has a similar syntax:

SCAN cursor [MATCH pattern] [COUNT count]
  • cursor: An integer that represents the position to start scanning from. To start a new scan, use 0.
  • MATCH pattern: (optional) A pattern to filter the keys returned. Supports glob-style patterns.
  • COUNT count: (optional) A hint to Redis about how many elements to return in each iteration.

Installing Redis on Linux

Before we dive into using scan commands, ensure that Redis is installed on your Linux system. For those using a Debian Dedicated Server, setting up Redis is straightforward and can enhance the server’s capability for handling in-memory data processing efficiently. Here’s how to install Redis on a Debian-based system, ensuring a stable environment optimized for high-performance operations.

By following these steps, you’ll set up Redis in a way that leverages the resources and stability of your dedicated Debian server, ideal for robust data handling tasks.

sudo apt update
sudo apt install redis-server

For CentOS/RHEL, use:

sudo yum install redis

Once installed, start the Redis server:

sudo systemctl start redis

Connecting to Redis

Open your terminal and connect to your Redis instance using the Redis CLI:

redis-cli

You can now execute Redis commands in the CLI.

Using the SCAN Command

Example 1: Basic SCAN

To retrieve all keys in the Redis database, you can use:

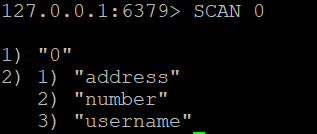
SCAN 0

This command will return a cursor and a list of keys.

Example 2: Using MATCH to Filter Keys

If you want to find keys that match a specific pattern, such as keys that start with “user:”, you can use:

SCAN 0 MATCH username:*

This command returns only the keys that start with “user:”.

Example 3: Specifying COUNT

To hint how many keys Redis should return in each iteration, you can specify a count:

SCAN 0 COUNT 10

This will attempt to return approximately 10 keys. Note that the actual number returned may be less than this.

Example 4: Iterating Through All Keys

To iterate through all keys in multiple iterations, you need to keep track of the cursor returned. Here’s a simple shell script example:

cursor=0
while true; do
result=$(redis-cli SSCAN myset $cursor MATCH apple:*)
echo "$result" # Process the result as needed
cursor=$(echo "$result" | awk 'NR==1{print $1}') # Update the cursor
if [[ "$cursor" == "0" ]]; then
break  # Stop when the cursor is back to 0
fi
done

Using the SSCAN Command

The SSCAN command is used to iterate through elements in a set. Its syntax is similar to SCAN:

SSCAN key cursor [MATCH pattern] [COUNT count]

Example of SSCAN

Step 1: Create a Set and Add Elements

Let’s create a set called myset and add some elements to it:

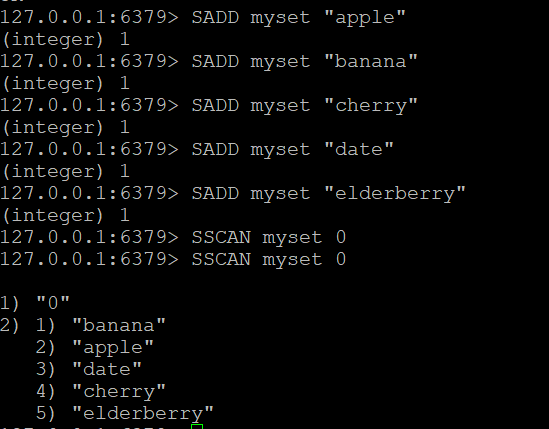
SADD myset "apple"
SADD myset "banana"
SADD myset "cherry"
SADD myset "date"
SADD myset "elderberry"

Step 2: Use the SSCAN Command

Now that we have a set named myset, we can use the SSCAN command to iterate through its elements.

  1. Basic SSCAN Command:Suppose you have a set called “myset”. To scan through its elements:
    SSCAN myset 0
  2. Using MATCH:To filter the elements in a set based on a pattern and add some elements that include the word “mango” and other variations::
    SSCAN myset 0 MATCH mango:*
  3. Iterating Through a Set:You can use a loop to iterate through a set :

#!/bin/bash
cursor=0
echo "Scanning through myset:"
while true; do
# Scan the set
result=$(redis-cli SSCAN myset $cursor)
# Print the elements returned by SSCAN
echo "$result"
# Update the cursor for the next iteration
cursor=$(echo "$result" | awk 'NR==1{print $1}')
# Break the loop if cursor is back to 0
if [[ "$cursor" == "0" ]]; then
break
fi
done

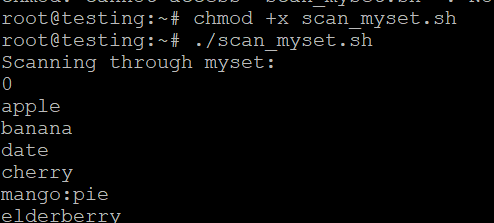
Running the Script

  1. Save the script as scan_myset.sh.
  2. Make it executable:
    chmod +x scan_myset.sh
  3. Run the script:
    ./scan_myset.sh

Using the HSCAN and ZSCAN Commands

HSCAN Command

The HSCAN command iterates through fields and values in a hash:

HSCAN key cursor [MATCH pattern] [COUNT count]

The HSCAN command is used to iterate through fields and values in a hash.

Step 1: Create a Hash and Add Fields

  1. Create a hash named myhash and add some fields to it:
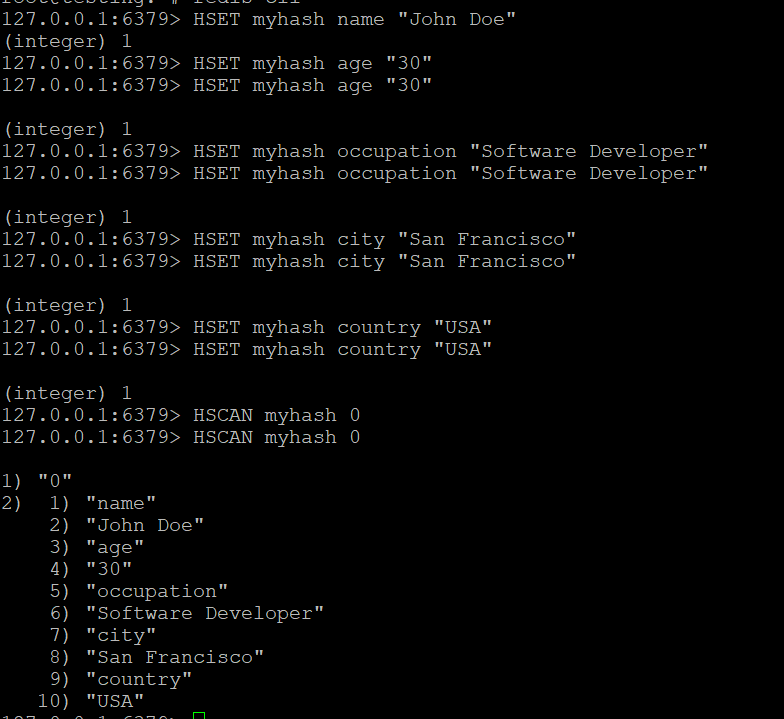
HSET myhash name "John Doe"
HSET myhash age "30"
HSET myhash occupation "Software Developer"
HSET myhash city "San Francisco"
HSET myhash country "USA"

Step 2: Use HSCAN to Iterate Through the Hash

  1. Use the HSCAN command to iterate through the fields in myhash:
HSCAN myhash 0

ZSCAN Command

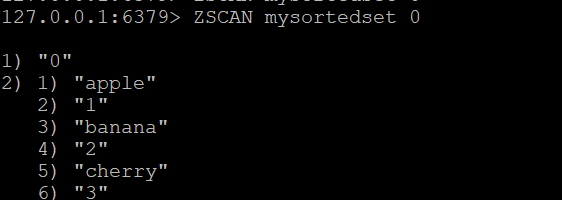
ZSCAN is a Redis command used to iterate through the members of a sorted set incrementally. It allows you to retrieve members along with their associated scores in a way that is efficient and non-blocking. This command is particularly useful for working with large sorted sets where fetching all members at once may not be practical.

The ZSCAN command iterates through members and scores in a sorted set:

ZSCAN key cursor [MATCH pattern] [COUNT count]

Step 1: Create a Sorted Set and Add Members

Let’s create a sorted set called mysortedset and add some members with scores:

ZADD mysortedset 1 "apple"
ZADD mysortedset 2 "banana"
ZADD mysortedset 3 "cherry"

Basic ZSCAN Command:

To start scanning the sorted set, use:

ZSCAN mysortedset 0

Step 2: Using MATCH to Filter Members (Optional)

If you want to filter the members returned by ZSCAN, you can use the MATCH option. For example, to find members that contain the letter “e”, you can run:

ZSCAN mysortedset 0 MATCH *e*

Best Practices for Using Scan Commands

  1. Use SCAN Over KEYS: Avoid using the KEYS command in production as it can block the server. Use SCAN for non-blocking iteration.
  2. Combine with MATCH and COUNT: Utilize the MATCH and COUNT options to improve performance and limit the result set.
  3. Handle Large Datasets: When dealing with large datasets, process the keys in batches using cursors to manage memory effectively.
  4. Test in Development: Always test your scan logic in a development environment to ensure it behaves as expected before deploying in production.

Conclusion

Using the scan commands in Redis allows you to efficiently iterate through large datasets in a Linux environment without overwhelming your server. By understanding how to use SCAN, SSCAN, HSCAN, and ZSCAN, you can effectively manage and retrieve data from Redis. These commands are essential for building scalable applications that require real-time data processing. For more information and detailed usage, refer to the official Redis documentation and experiment with these commands in your Redis environment.

Test your skills on our all Hosting services and get 15% off!

Use code at checkout:

Skills