English
 Русский
  Română
  Deutsch
  Français
  Türkçe
  Español
  Português
  Українська
  български
  Polski
  Indonesia
  中文 (中国)


 on All Hosting Services
VPS with ispmanager License – Instant Installation and Full Setup Guide
Managing websites, domains, and email shouldn't require hours of manual server configuration. With a VPS pre-installed with ispmanager, you get a fully operational hosting environment the moment your server goes live — no command-line wizardry required, no complex setup scripts to debug.
This guide walks you through everything you need to know: what ispmanager is, which edition fits your needs, and exactly how to order, access, and start using your control panel within minutes of deployment.
What Is ispmanager and Why Does It Matter?
ispmanager is a professional, web-based server control panel designed for Linux-based hosting environments. It provides a clean graphical interface for managing:
- Websites and virtual hosts — create, configure, and monitor sites without touching config files
- Domains and DNS records — point domains, manage zones, and configure subdomains
- Email accounts and mailboxes — set up professional email with spam filtering and aliases
- Databases — create and manage MySQL/MariaDB databases and users
- SSL/TLS certificates — install and renew certificates directly from the panel
- FTP and SSH access — manage user permissions and secure connections
- Backups and scheduled tasks — automate routine maintenance with cron jobs and snapshots
For anyone running a web project — from a personal blog to a multi-client hosting business — ispmanager dramatically reduces the time spent on server administration and lowers the barrier to entry for non-technical users.
Choosing the Right ispmanager Edition
At AlexHost VPS Hosting, you can select from three ispmanager editions during the ordering process. Each is designed for a distinct use case and scale:
| Edition | Best For | Key Capabilities |
|---|---|---|
| Lite | Individual users, developers, personal projects | Single-user environment, website and email management, basic server control |
| Pro | Small businesses, agencies, growing teams | Multi-user support, advanced resource management, reseller-ready features |
| Host | Hosting providers, enterprises, multi-client environments | Full multi-tenant management, client billing integration, large-scale site hosting |
Not sure which to choose? Start with Lite if you're managing your own projects. Upgrade to Pro when you need team access or client separation. Choose Host when you're running a hosting business and need to manage dozens of clients from a single dashboard.
Why Order a VPS with Automatic ispmanager Installation?
Manually installing a control panel on a fresh VPS involves downloading packages, resolving dependencies, configuring firewall rules, and troubleshooting compatibility issues. It can take anywhere from 30 minutes to several hours — and that's assuming everything goes smoothly.
With AlexHost's pre-configured ispmanager VPS, the entire process is automated:
- ✅ Zero manual installation — the control panel is deployed as part of the server image
- ✅ Instant access — log in to ispmanager within minutes of VPS activation
- ✅ Pre-configured environment — Ubuntu 24.04 base with ispmanager fully integrated
- ✅ Immediate productivity — start adding websites and domains right away
- ✅ No compatibility guesswork — the OS and panel version are tested and validated together
This is particularly valuable for users who want to focus on building and managing their online presence rather than spending time on infrastructure setup. If you're looking for a managed alternative, explore our VPS Control Panels overview to compare all available options.
Step-by-Step: How to Order a VPS with ispmanager
Step 1 — Select Your VPS Plan
Navigate to the AlexHost VPS Hosting page and choose a plan that fits your resource requirements — consider CPU cores, RAM, storage, and bandwidth based on the number of sites and expected traffic you'll be managing.
Click Order or Get Started on your chosen plan to proceed to the configuration page.
> Tip: If you're managing multiple client websites or running resource-intensive applications, opt for a plan with at least 2 vCPUs and 4 GB RAM to ensure ispmanager runs smoothly alongside your hosted services.
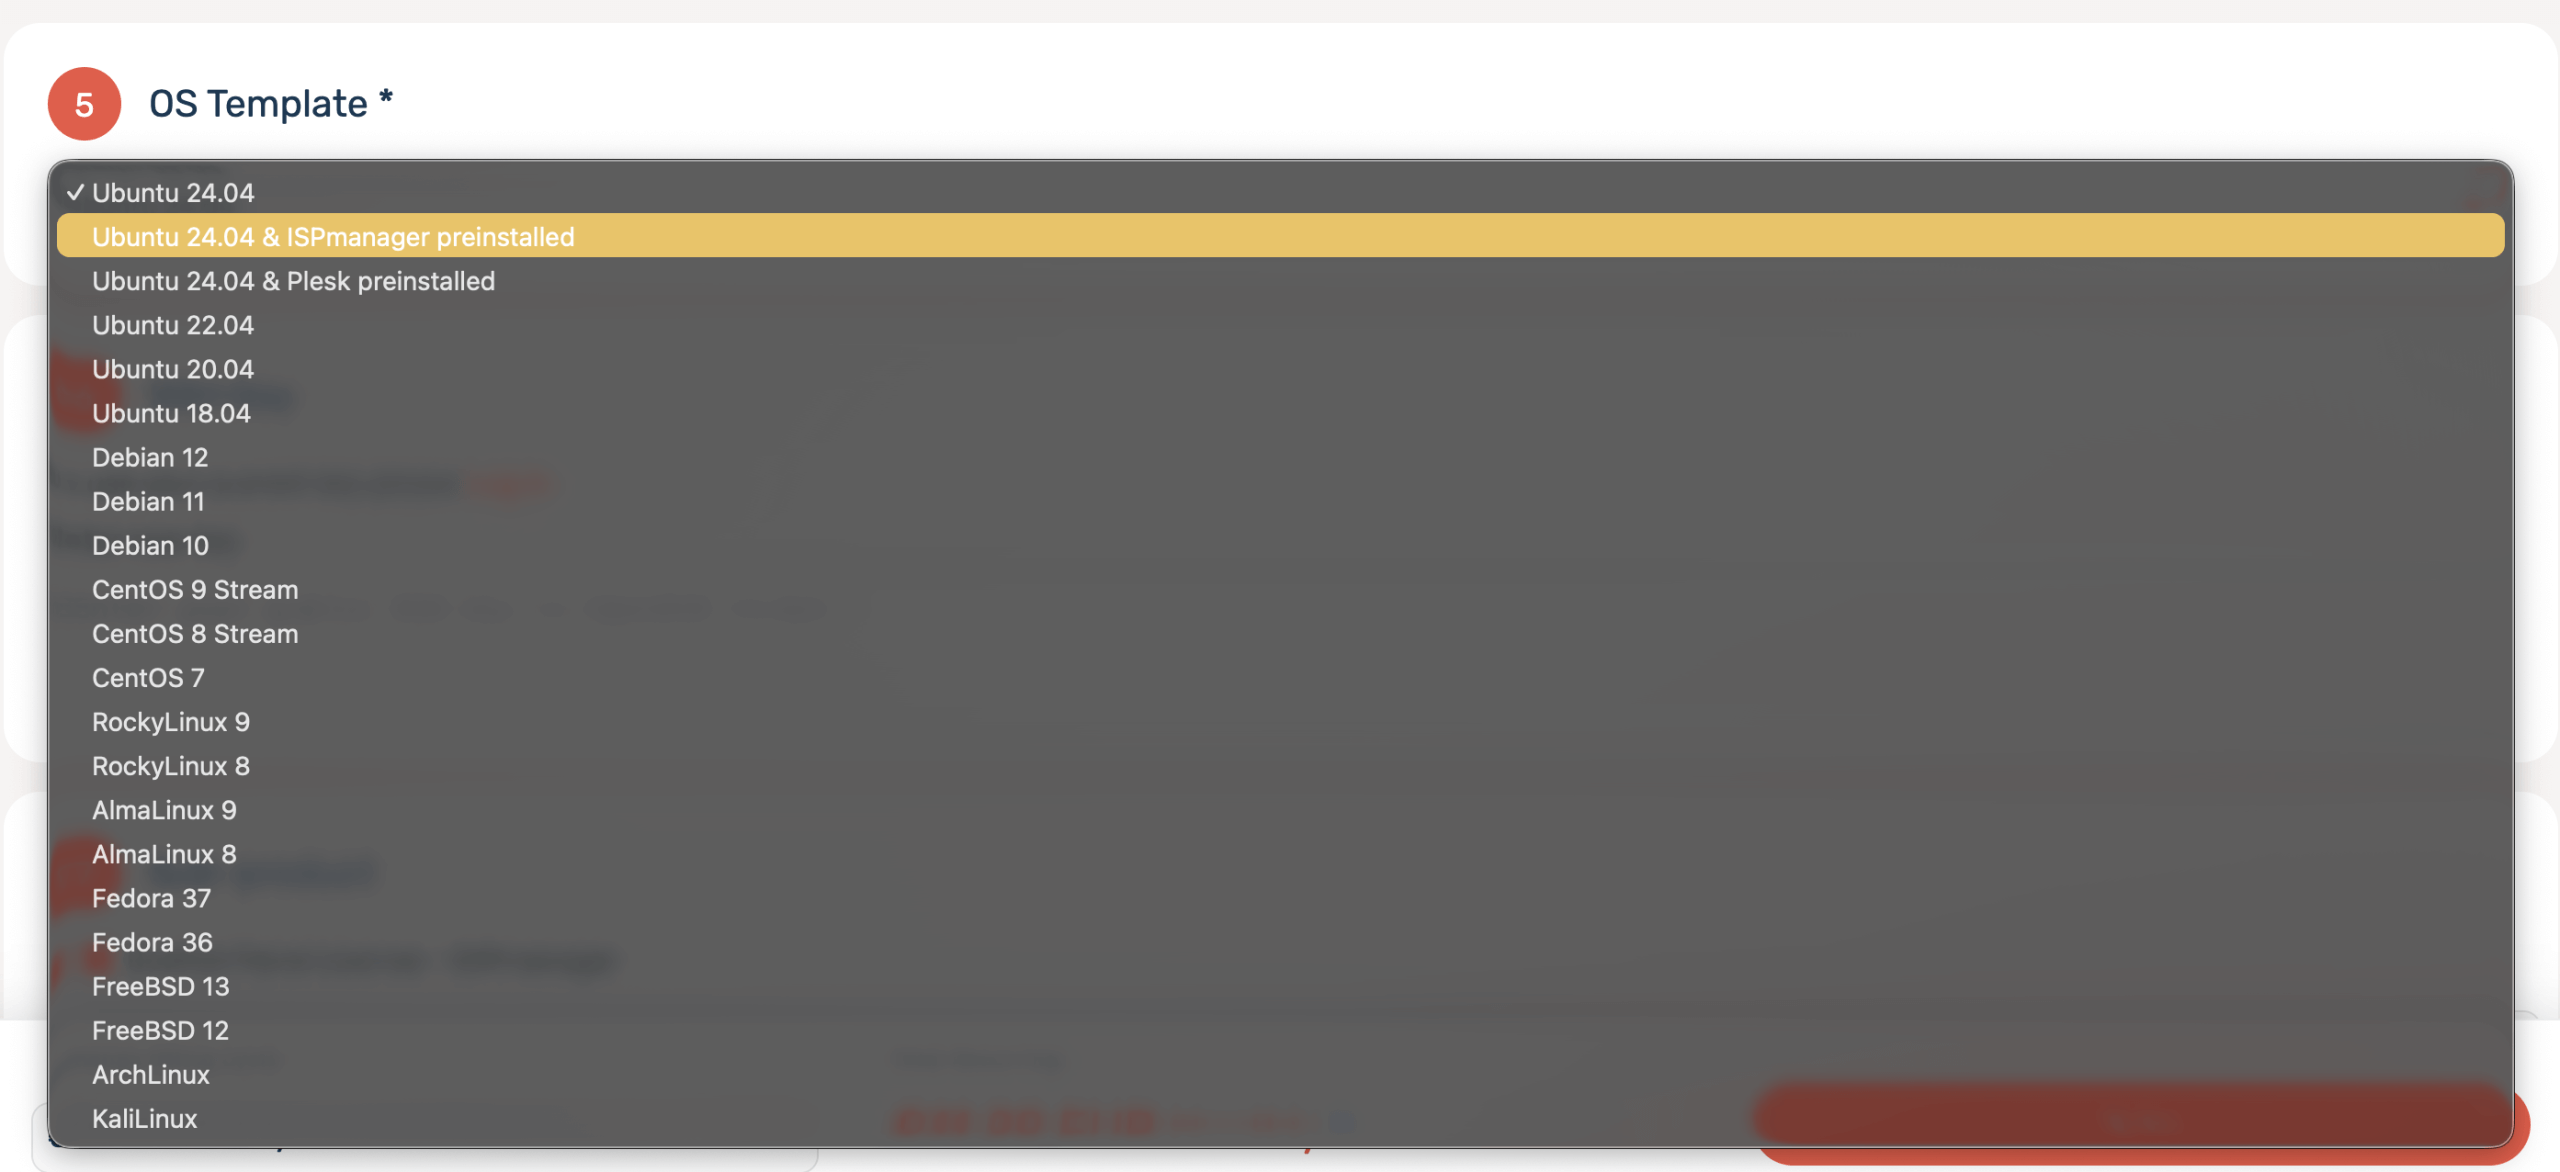
Step 2 — Select the ispmanager Pre-Installed Image
On the server configuration page, you'll be prompted to choose an operating system image. Look for the option labeled:
Ubuntu 24.04 with ispmanager (pre-installed)Selecting this image means your VPS will boot with ispmanager already installed and configured — no additional steps required on your end. Confirm your selection before proceeding to the next step.
> Note: The pre-installed image includes the ispmanager edition you selected (Lite, Pro, or Host). Make sure you've chosen the correct edition at this stage, as switching editions later may require a license upgrade.
Step 3 — Choose Your ispmanager Edition
If prompted separately, select your preferred ispmanager edition:
- ispmanager Lite — for personal use and solo developers
- ispmanager Pro — for small teams and business websites
- ispmanager Host — for hosting providers and multi-client management
Review the licensing terms associated with each edition and confirm your selection.
Step 4 — Complete Payment and Wait for Deployment
Review your full order summary, confirm the selected plan, image, and edition, then proceed to payment. AlexHost supports multiple payment methods for your convenience.
Once payment is confirmed, your VPS will begin provisioning automatically. Deployment typically completes within 2 to 5 minutes, after which your server will be fully booted with ispmanager installed and running.
Step 5 — Retrieve Your Server Credentials
After deployment, your login credentials will be delivered to your registered email address and will also be visible in your AlexHost client dashboard. Note the following:
- Root username — typically
root - Root password — a randomly generated secure password
- Server IPv4 address — the public IP assigned to your VPS
Keep these credentials secure. You will use them to log in to ispmanager for the first time and to access your server via SSH if needed.
Step 6 — Verify Your Assigned IPv4 Address
Log in to your AlexHost billing dashboard and navigate to your active services. Locate your newly deployed VPS and confirm the public IPv4 address that has been assigned to it.
This IP address is what you'll use to access ispmanager through your browser.
Step 7 — Access ispmanager via Your Browser
ispmanager runs on port 1500 by default and requires an HTTPS connection. To access your control panel, open a browser and enter the following URL format:
https://<your-server-IP>:1500Example:
https://203.0.113.45:1500You may see a browser security warning about an untrusted SSL certificate on first access — this is expected, as the panel initially uses a self-signed certificate. Proceed past the warning to reach the login screen.
> Port configuration note: If your VPS was deployed with custom settings or if the ispmanager configuration was modified post-installation, the listening port may differ from the default. However, port 1500 is the standard default for all fresh ispmanager installations. If you cannot connect, verify that your firewall rules allow inbound traffic on port 1500. You can also check the active port in the ispmanager configuration file located at /etc/ispmgr/ispmgr.conf.
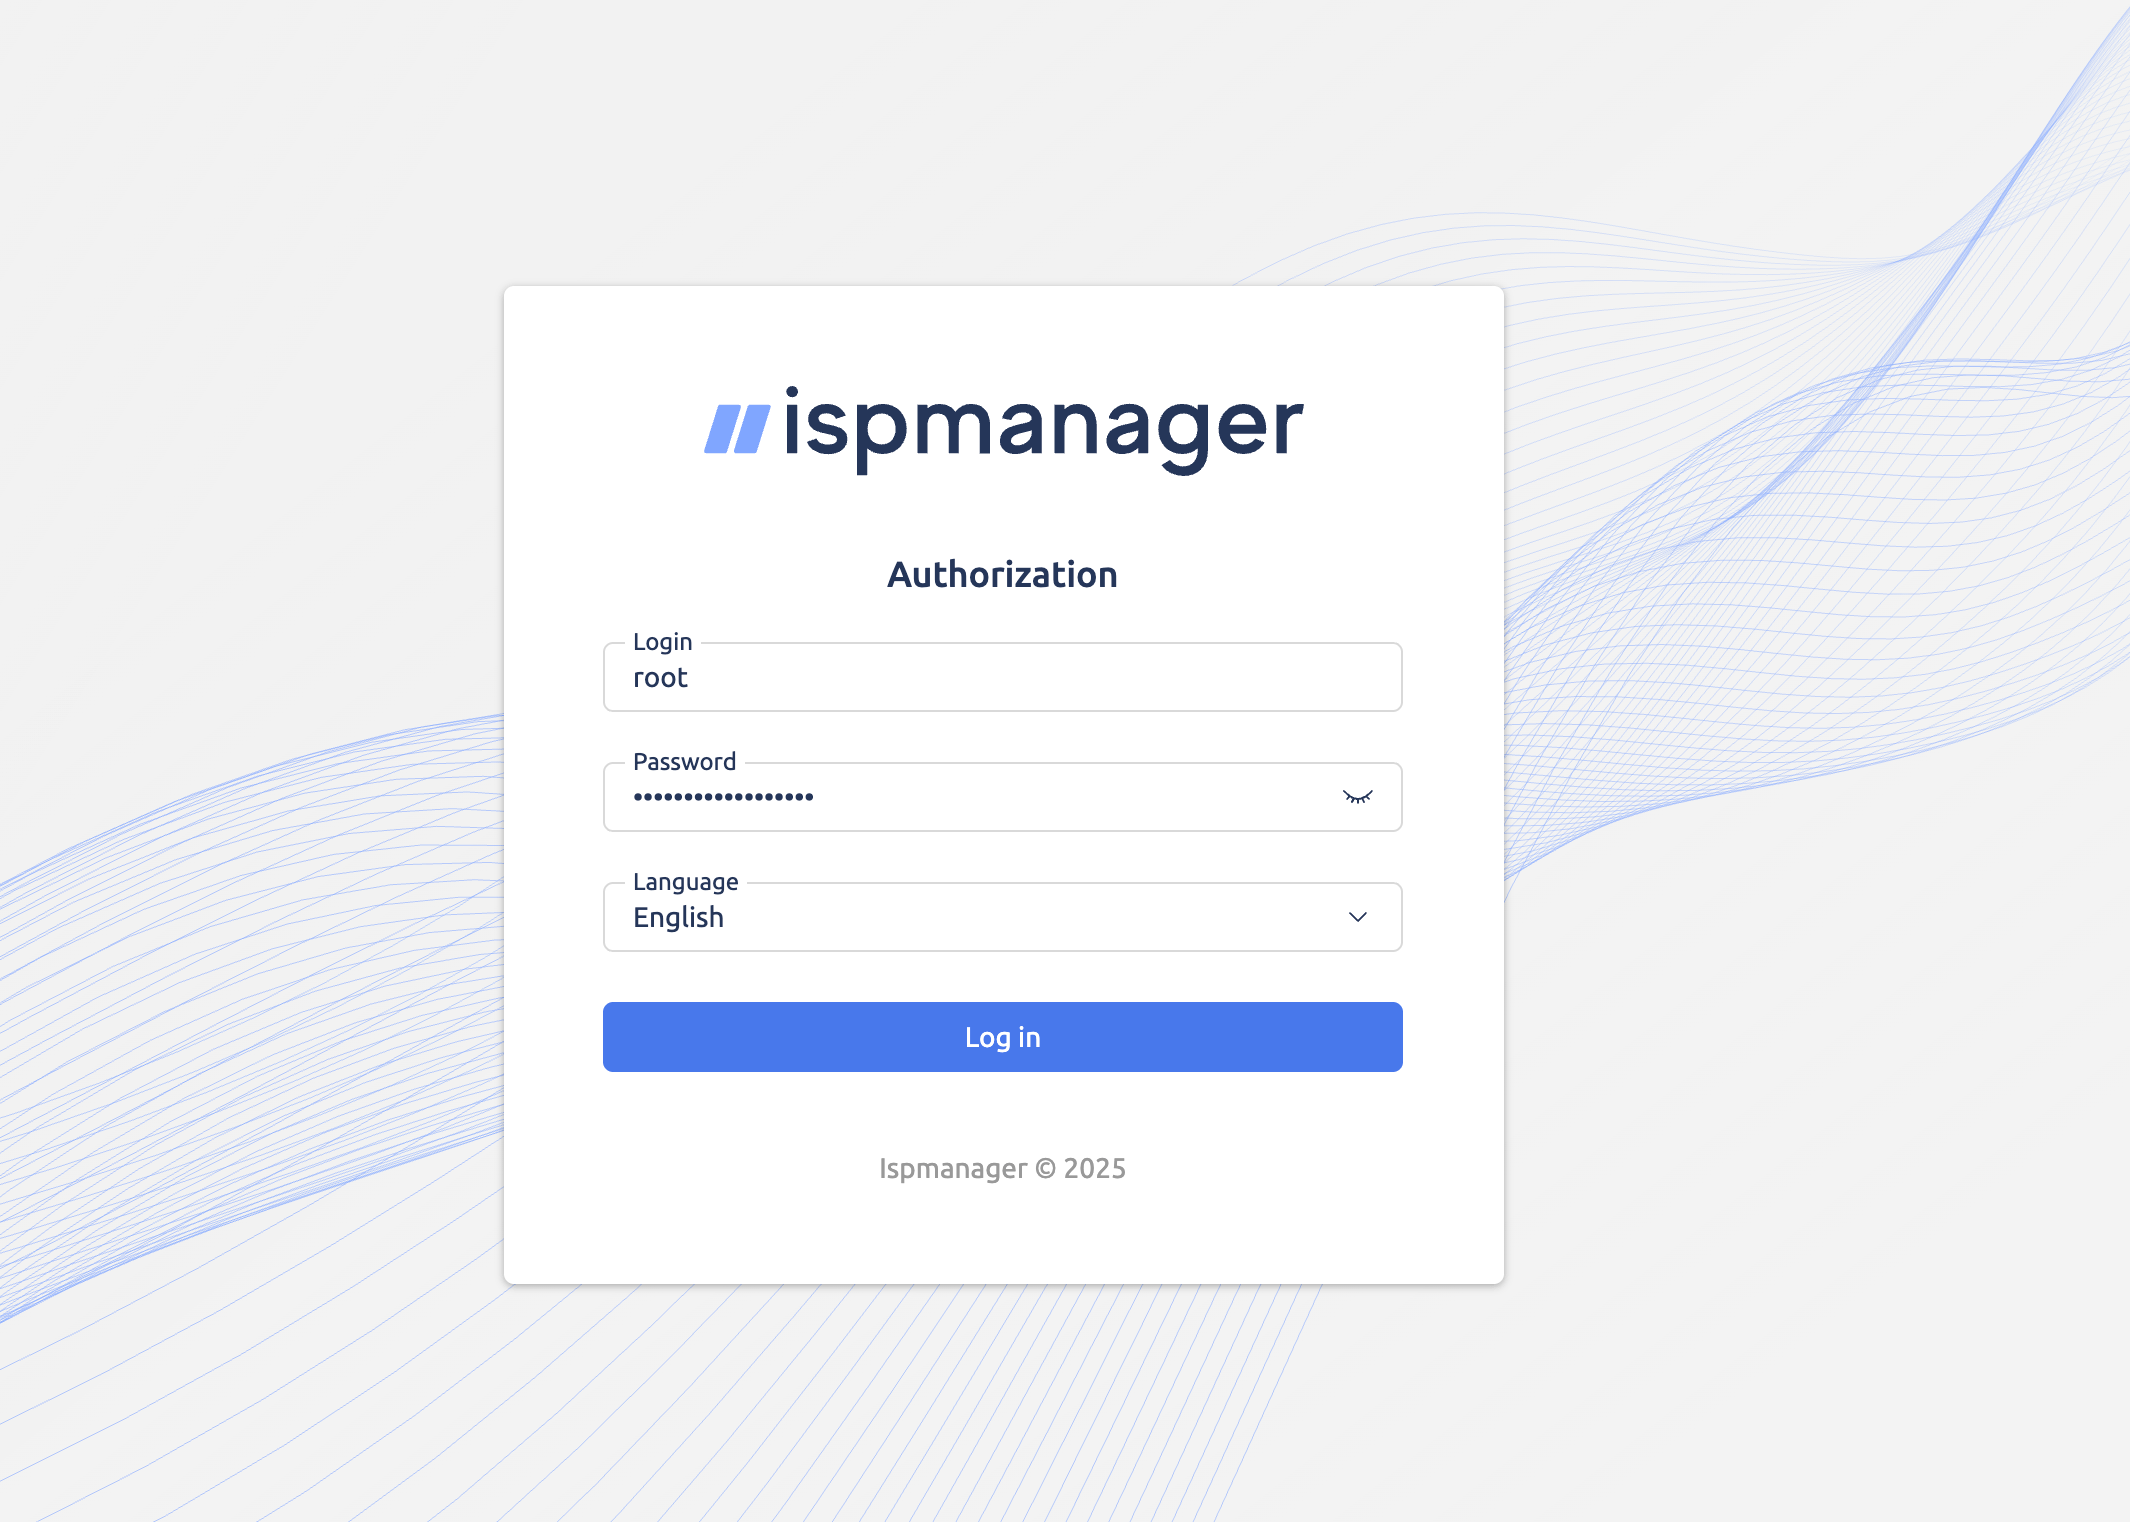
Step 8 — Log In with Root Credentials
On the ispmanager login screen, enter:
- Username:
root(or the username provided in your credentials) - Password: the root password from your VPS credentials
Click Log In to authenticate. These credentials grant you full administrative access to the control panel, including the ability to:
- Add and configure websites and virtual hosts
- Create and manage email accounts
- Install SSL certificates
- Manage databases and users
- Configure DNS records and domain settings
- Set up FTP accounts and manage file permissions
- Schedule backups and automated tasks
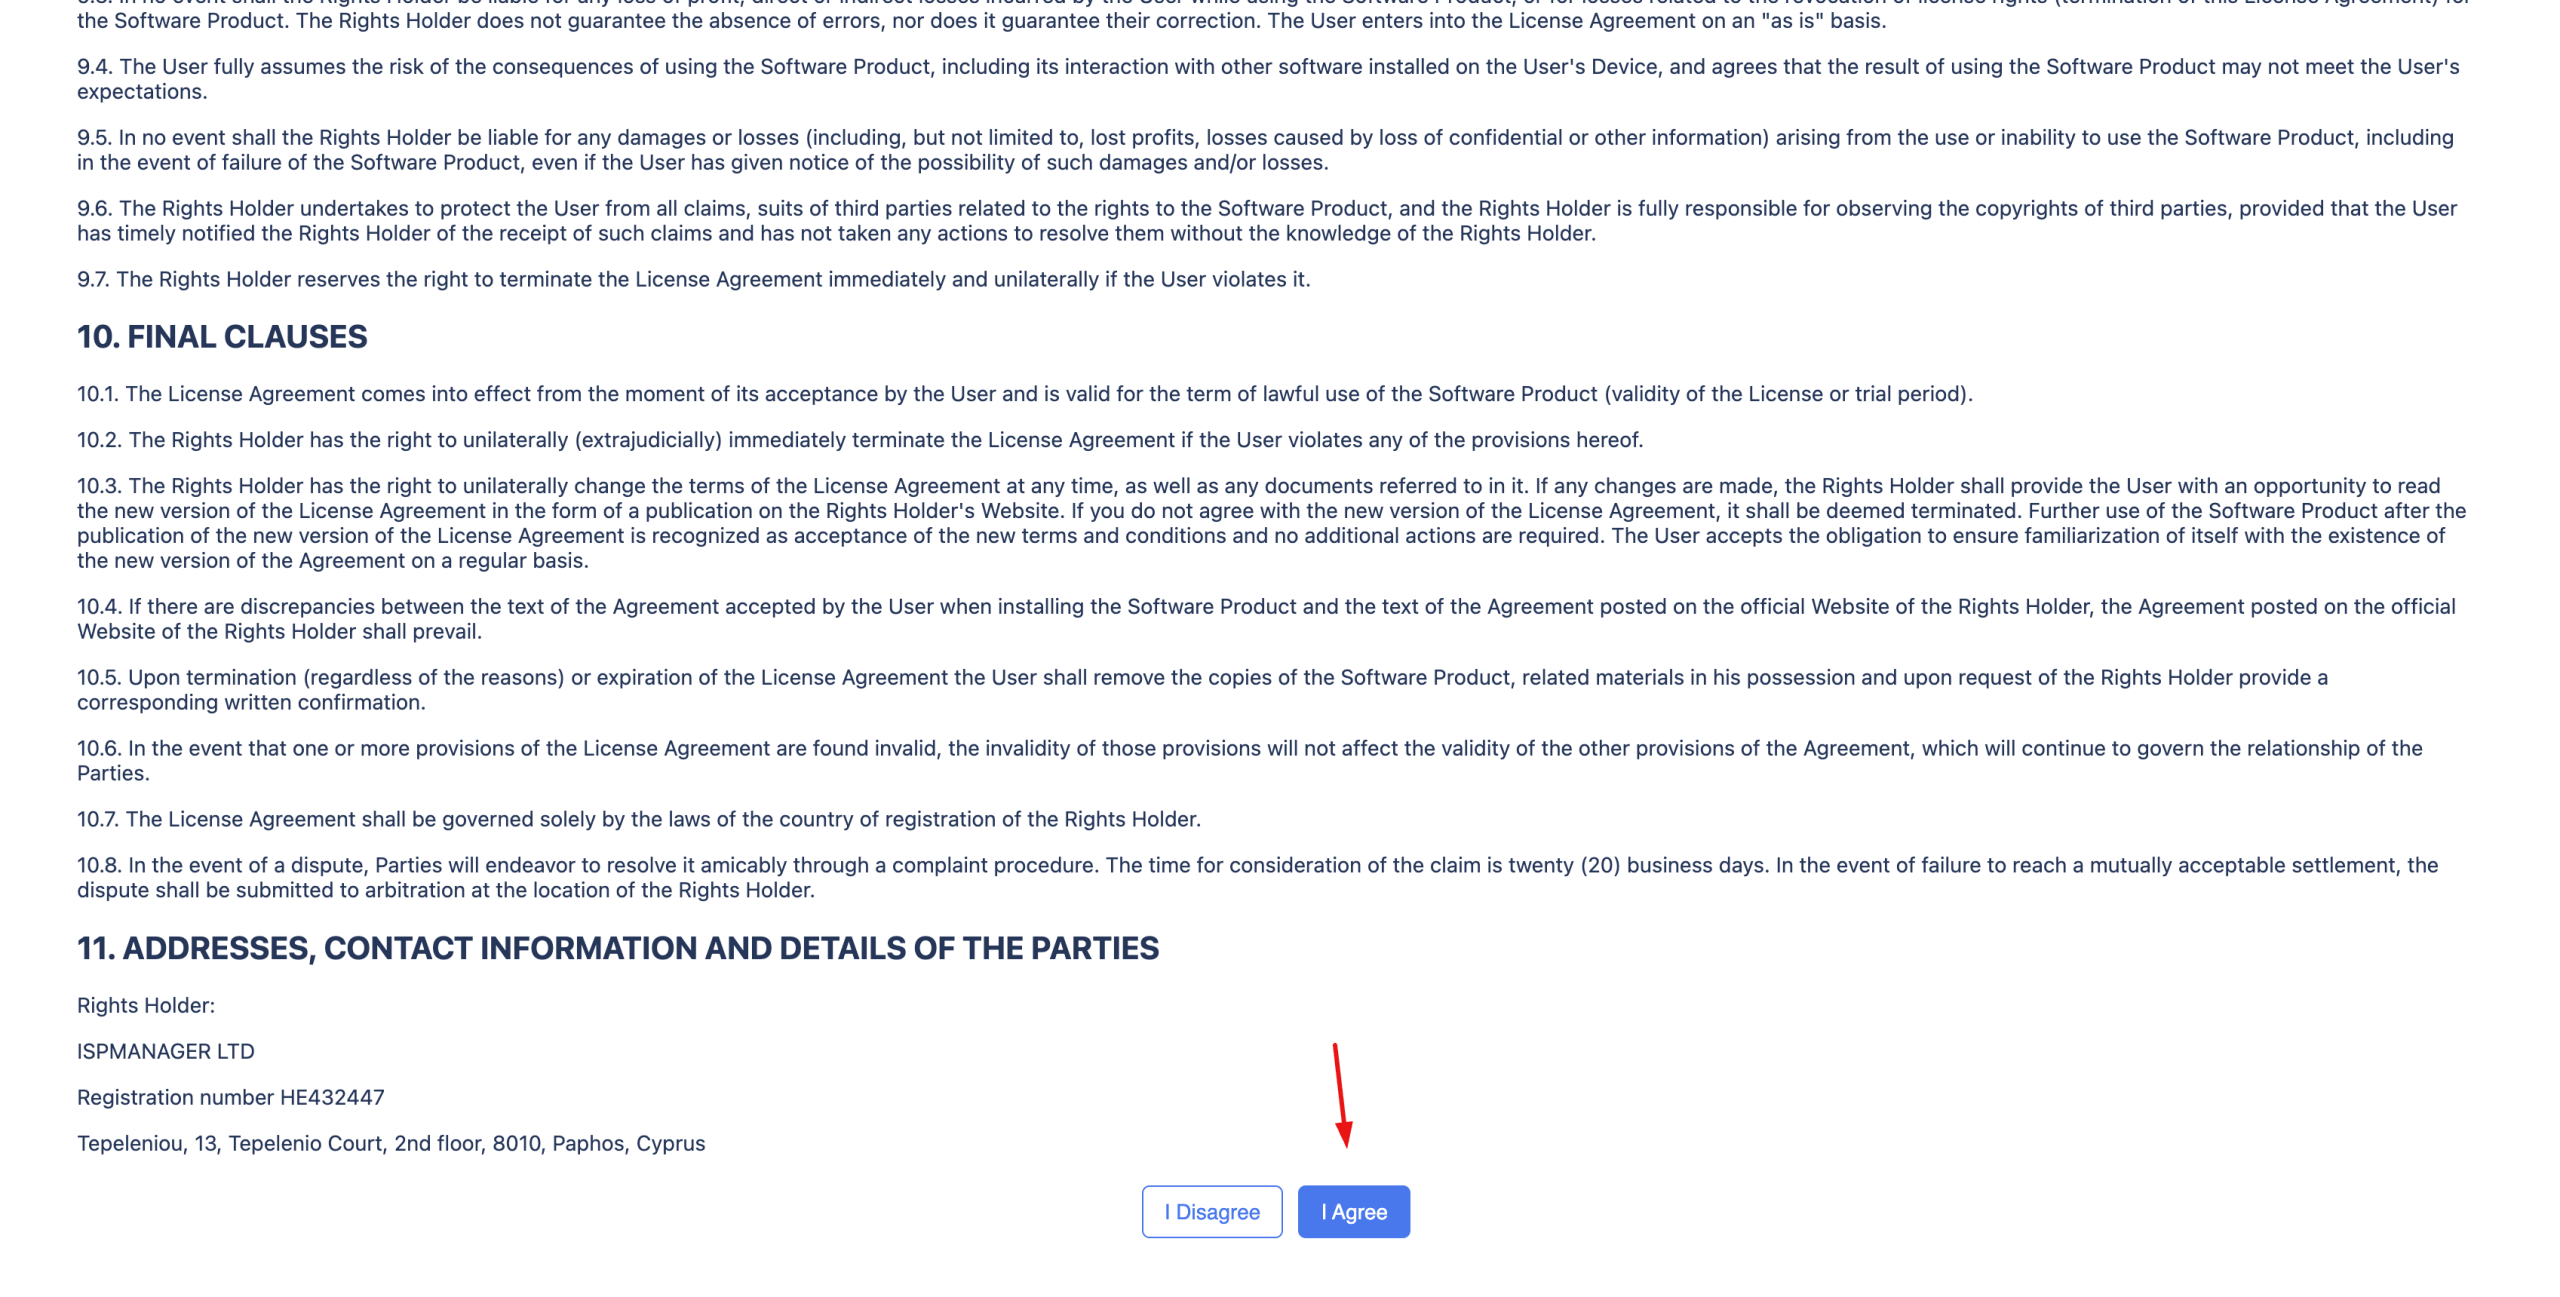
Step 9 — Accept the License Agreement
On your first login, ispmanager will present its End User License Agreement (EULA). Read through the terms and click Accept or Agree to proceed. This is a one-time step required to activate the panel interface.
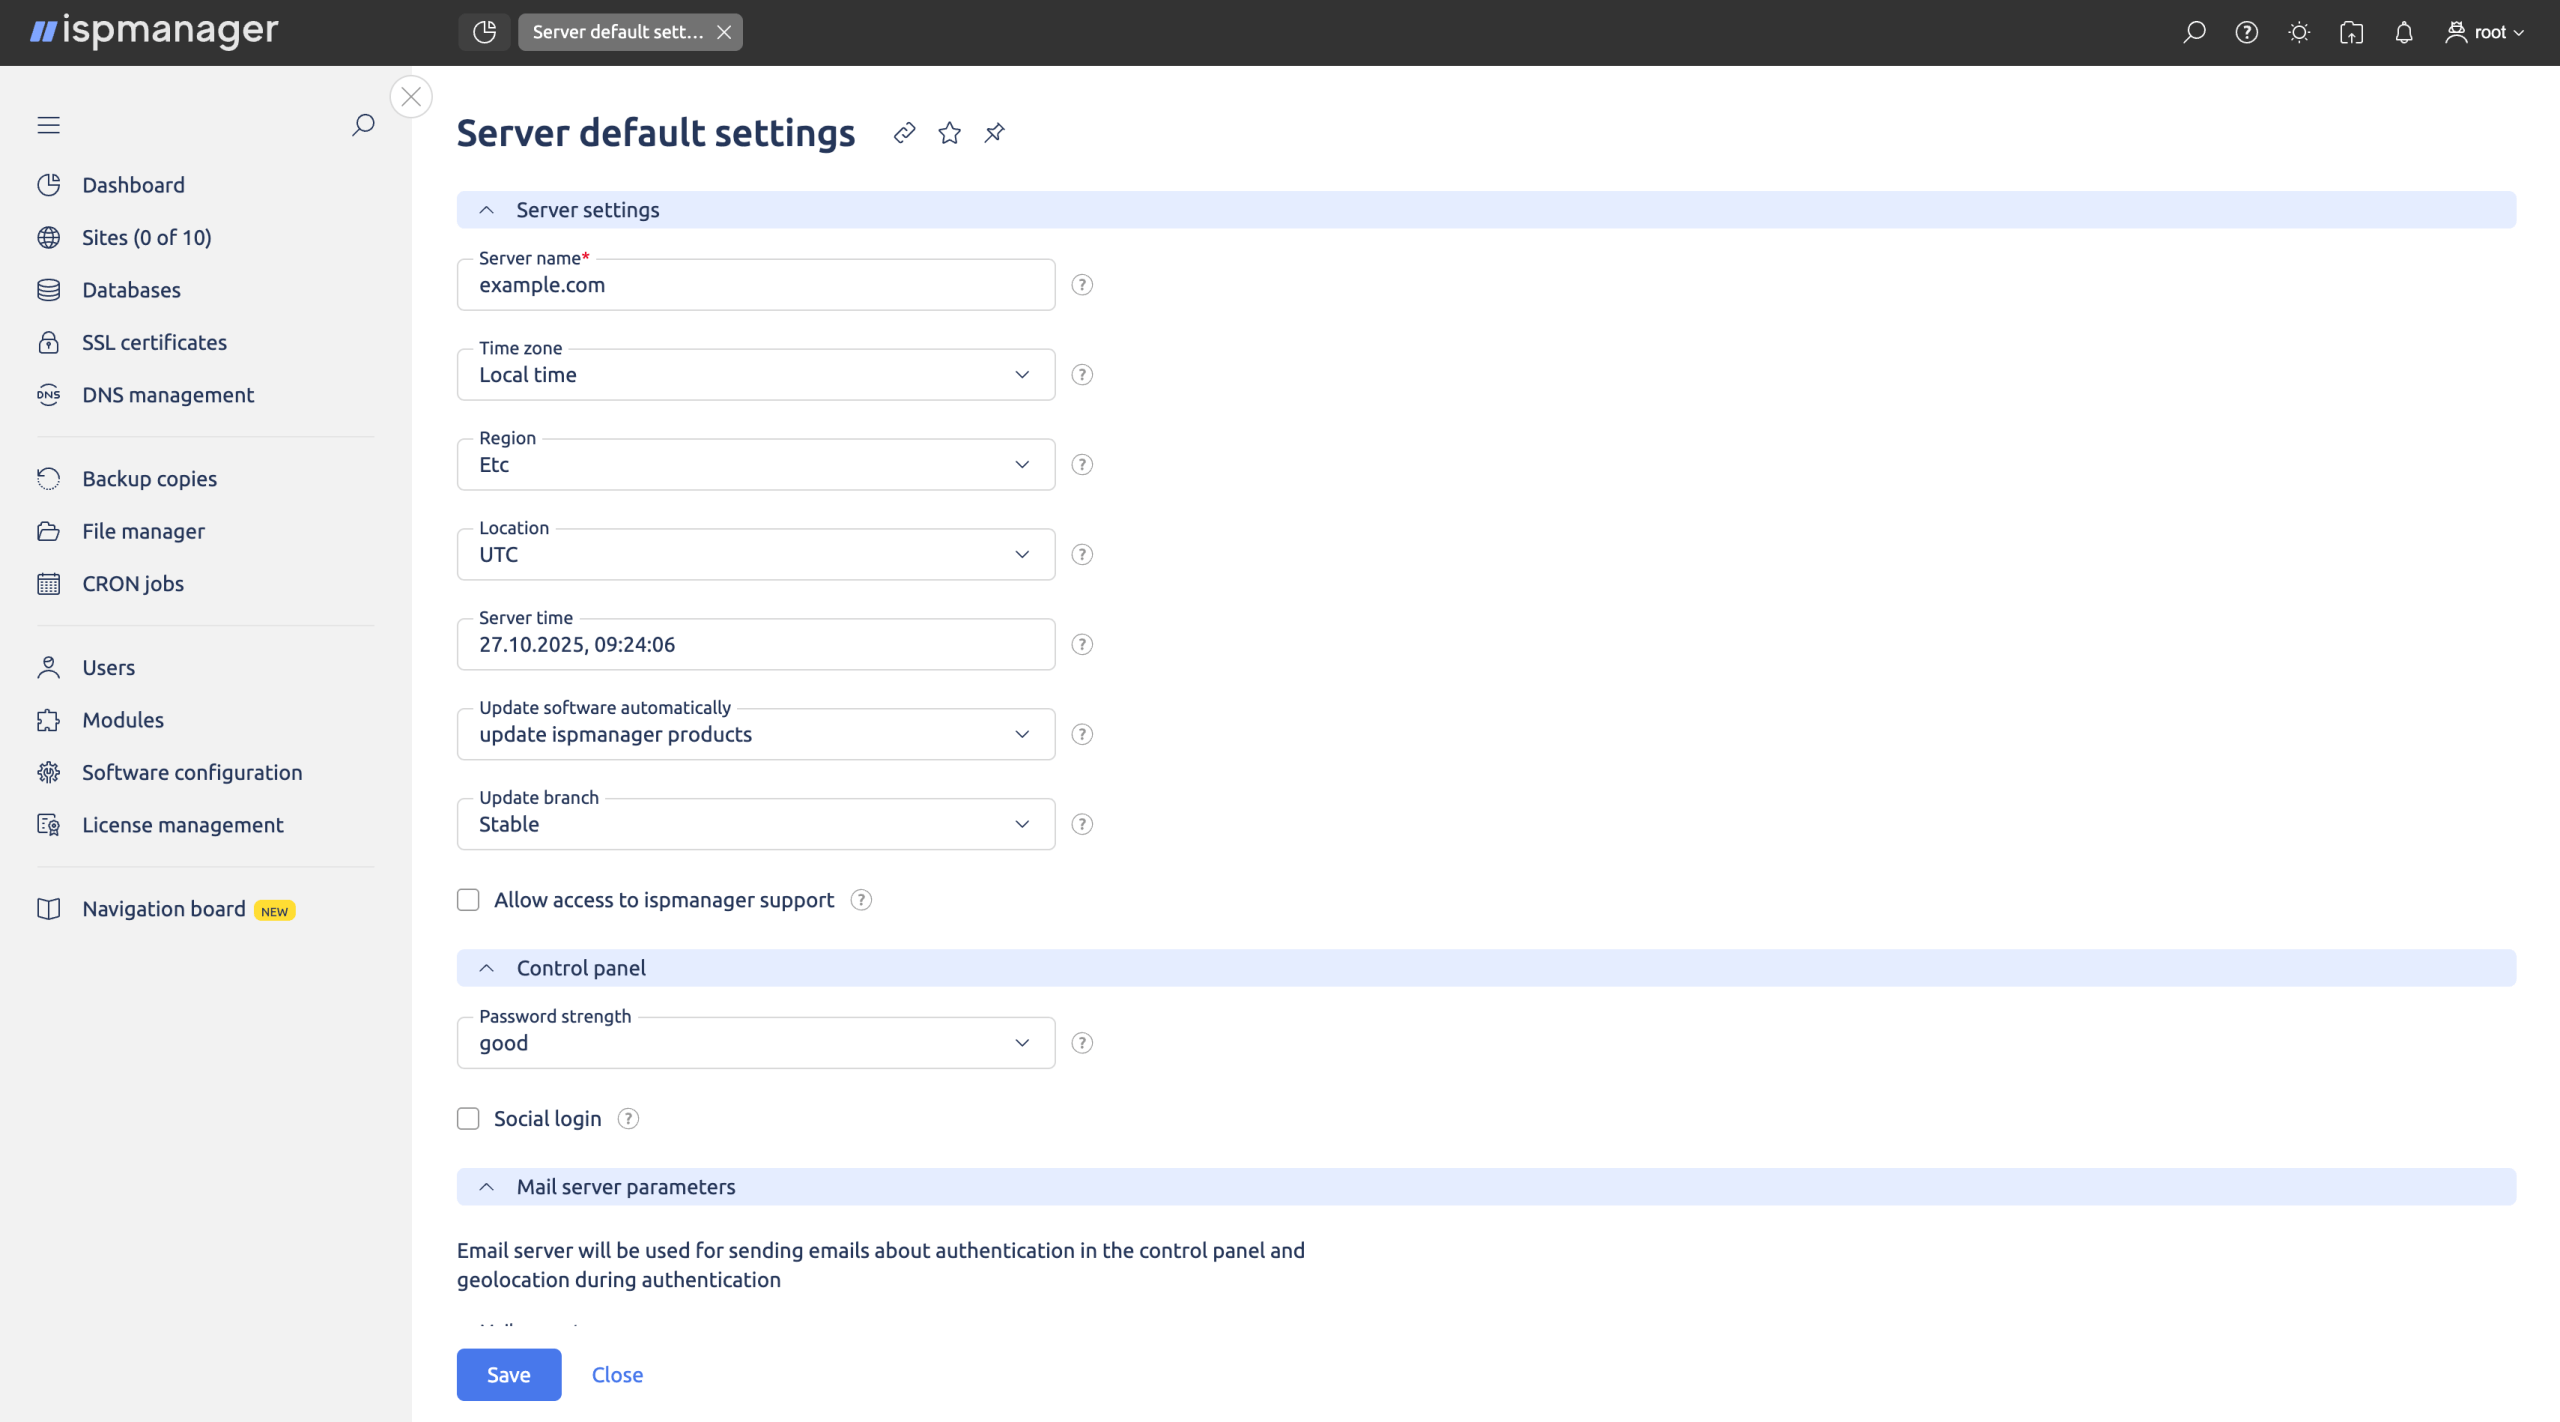
Step 10 — You're In — Start Managing Your Server
After accepting the license agreement, you'll land on the ispmanager dashboard — your central hub for all server and hosting management tasks. The interface is organized into logical sections:
- WWW — manage websites, domains, and virtual hosts
- Mail — configure email accounts, aliases, and spam filters
- Databases — create and manage MySQL/MariaDB databases
- Users — add and manage system and panel users
- Settings — configure server-wide parameters, firewall rules, and updates
Your VPS is now fully operational. You can immediately begin adding your first website, pointing a domain, or setting up email accounts.
Enhancing Your Hosting Setup: Recommended Next Steps
Once your ispmanager VPS is running, consider these additions to build a more robust and professional hosting environment:
Secure Your Sites with SSL Certificates
Every website you host should be served over HTTPS. ispmanager supports Let's Encrypt integration for free SSL certificates, or you can install a premium certificate for enhanced trust and warranty coverage. Browse AlexHost's SSL Certificates options to find the right certificate for your domain.
Register or Transfer Your Domain
If you haven't already pointed a domain to your new VPS, now is the time. AlexHost offers competitive pricing on Domain Registration across all major TLDs. Registering your domain through the same provider simplifies DNS management and billing.
Set Up Professional Email Hosting
For businesses that need reliable, dedicated email infrastructure separate from their web server, AlexHost's Email Hosting provides a managed solution with spam filtering, webmail access, and high deliverability — without the overhead of self-managing a mail server.
Scale to a Dedicated Server When You're Ready
As your traffic and resource demands grow, you may eventually outgrow a VPS environment. AlexHost's Dedicated Servers offer bare-metal performance with full hardware isolation — ideal for high-traffic websites, large databases, or hosting businesses managing hundreds of client accounts.
Troubleshooting Common Access Issues
| Issue | Likely Cause | Solution |
|---|---|---|
Cannot reach https://IP:1500 | Firewall blocking port 1500 | Allow inbound TCP on port 1500 in your VPS firewall rules |
| Browser shows "connection refused" | ispmanager service not running | SSH into the server and run systemctl status ispmgr to check the service status |
| SSL certificate warning on login | Self-signed certificate in use | Proceed past the warning or install a trusted SSL certificate |
| Forgotten root password | Credentials not saved | Reset via AlexHost dashboard or use VNC console access |
| Login fails with correct credentials | Caps Lock or copy-paste issue | Re-enter credentials manually; check for leading/trailing spaces |
Why Choose AlexHost for Your ispmanager VPS?
AlexHost has been providing reliable hosting infrastructure since 2008, with a strong focus on privacy, performance, and customer support. Here's what sets our ispmanager VPS offering apart:
- 🚀 Instant deployment — servers go live in minutes, not hours
- 🔒 Privacy-first infrastructure — hosted in Moldova with strong data protection policies
- ⚙️ Automated panel installation — no manual setup, no compatibility issues
- 🌐 Full root access — complete control over your server environment
- 📞 24/7 technical support — expert assistance whenever you need it
- 💳 Flexible billing — monthly and annual plans with multiple payment options
- 📈 Easy scalability — upgrade your plan as your projects grow
Whether you're launching your first website or migrating an established hosting business, a VPS with cPanel or ispmanager from AlexHost gives you the tools and infrastructure to succeed from day one.
Frequently Asked Questions
Can I switch ispmanager editions after ordering?
Yes, you can upgrade your ispmanager license (e.g., from Lite to Pro) by contacting AlexHost support or through your billing dashboard. A license upgrade may involve additional costs.
Is ispmanager included in the VPS price?
The ispmanager license is typically included as part of the pre-configured VPS package. Check the specific plan details on the ordering page for license pricing and inclusions.
Can I access ispmanager on a different port?
Yes, the default port (1500) can be changed in the ispmanager configuration file. However, unless you have a specific reason to change it, the default port is recommended for simplicity.
What operating system does the pre-installed image use?
The default pre-installed image uses Ubuntu 24.04 LTS, which provides long-term support and excellent compatibility with ispmanager.
Can I install additional software on my ispmanager VPS?
Absolutely. You have full root access to your VPS, allowing you to install any compatible software via SSH in addition to what ispmanager manages through its interface.
Conclusion
A VPS with ispmanager pre-installed is one of the fastest and most efficient ways to get a professional hosting environment up and running. With AlexHost's automated deployment, you go from order confirmation to a fully functional control panel in minutes — no manual installation, no configuration headaches, no wasted time.
Whether you're an individual developer, a growing business, or a hosting provider scaling your operations, ispmanager's tiered editions give you exactly the level of control and functionality you need. Pair that with AlexHost's reliable infrastructure, privacy-first policies, and round-the-clock support, and you have everything required to build and manage a successful online presence.
Ready to get started? Visit the AlexHost VPS Hosting page, select your plan, choose the ispmanager pre-installed image, and have your control panel live within minutes.