 English
 Русский
  Română
  Deutsch
  Français
  Türkçe
  Español
  Português
  Українська
  български
  Polski
  Indonesia
  中文 (中国)


N8N Automation Tutorial for Ubuntu – From Zero to Flow
Keywords
| Term | Quick Definition |
|---|---|
| 🚀 N8N | A visual, node-based workflow automation platform for connecting various external services. |
| 🐳 Docker | A containerization tool enabling consistent, isolated deployment and management of applications. |
| 🐘 PostgreSQL | A robust relational database serving as the primary, persistent data store for N8N. |
| 🧩 Node | A single functional block within N8N (e.g., a data trigger or API action) that executes a specific task. |
| 🔄 Workflow | A configured automated process built by linking multiple nodes together to handle sequences of tasks. |
| 💾 Docker Volume | A designated storage mechanism in Docker used to persistently save system data outside containers. |
| 🔐 Environment Variable | Secure configuration values (kept in a .env file) safely injected into Docker containers. |
Why automation matters

Modern teams don’t “run one app” — they operate a chain of SaaS tools, internal services, data stores, and chat/alerting systems. The cost of that complexity shows up in predictable ways:
- Manual handoffs and repeated busywork (copy/paste between systems)
- Slow response loops (approvals, ticket routing, incident notifications)
- Inconsistent outcomes (human error, missed steps, partial updates)
- Fragile integrations (one-off scripts with no visibility or ownership)
Automation is one of the highest-leverage ways to reduce that friction. Even small workflows — syncing data, validating payloads, posting notifications, updating records — can compound into meaningful wins: faster cycle time, fewer mistakes, and more consistent operations. Importantly, “automation” isn’t only about cutting effort; it’s also about making processes observable and repeatable.
This report approaches automation like production infrastructure: deploy it cleanly, control configuration, keep data persistent, and verify behavior with a deterministic test workflow.
What is N8N (and why it can become your best friend)
N8N is a workflow automation platform that lets you connect services using a node-based editor. You build workflows out of “nodes” (triggers, data transforms, API calls, database operations, notifications), then execute them manually, on a schedule, or via webhooks.
What makes n8n especially useful in a Linux deployment context:
- Self-hostable: you can run it on your own infrastructure for control over data and networking.
- Extensible integrations: many built-in nodes, plus generic HTTP nodes for anything with an API.
- Operationally friendly: runs well in containers, can use Postgres for persistence, and supports environment-driven configuration.
- Good for incremental adoption: start with simple workflows, then harden access (reverse proxy + HTTPS) and operational practices as usage grows.
In this assessment, n8n is treated like a service you might actually run: the deployment choices and configuration are documented with a bias toward clarity, reproducibility, and “future hardening” (without over-engineering the initial setup).
Self-host your own N8N instance
Ready to try? The setup requires a few technical steps, but don’t worry — follow this guide and you’ll have your first N8N instance up and running in no time.
This tutorial uses Ubuntu 22.04, running on a VPS provided by AlexHost.
Docker set-up
There are several ways to set up n8n. For this tutorial, we use Docker because it provides a clear and reliable approach to managing and configuring n8n.
First, make sure that docker and docker compose are installed on your system.
# Check for docker
docker -v

# Check for docker compose
docker compose
If that returns a version, you are all set.
If you do not have it installed, just follow this page for instructions: installation guide. Make sure to select the right OS you are using.
Project structure
Organizing files properly is essential for clarity and long-term maintainability. By convention, Docker services are typically placed under the /opt directory. Within it, a docker_services folder was created to store all services, including N8N.
# Create all the needed folders
sudo mkdir -p /opt/docker_services/n8n

# Navigate to n8n folder
cd /opt/docker_services/n8n
Adding the docker compose file
To spin up our n8n instance and its backend database, we will use a compose.yaml file. We are choosing PostgreSQL over the default SQLite as it provides a much more robust and production-ready data store for configuration and execution logs.
Create the file using a text editor like nano:
nano compose.yaml
Paste the following configuration into the file:
services:
  n8n:
    image: n8nio/n8n:latest
    restart: always
    ports:
      - "5678:5678"
    env_file:
      - .env
    volumes:
      - ./data:/home/node/.n8n
      - ./files:/files
    depends_on:
      - postgres

  postgres:
    image: postgres:15
    restart: always
    env_file:
      - .env
    volumes:
      - ./postgres-data:/var/lib/postgresql/data
Understanding the configuration:
| Component | Description |
|---|---|
| Services | Runs two containers: n8n (the main app) and postgres:15. Using Postgres is heavily preferred over the default SQLite. n8n natively depends on it to start first. |
| Restart Policy | Uses restart: always so the containers automatically restart on system boot or if they crash. |
| Ports | Exposes port 5678 so you can access the n8n web interface. |
| Environment | Both services load configuration from a shared .env file to securely handle variables like DB credentials. |
| Volumes | Binds local host directories to container paths to keep data persistent: • ./data → n8n configs (/home/node/.n8n) • ./files → file storage (/files) • ./postgres-data → Database (/var/lib/postgresql/data) |
Before starting the containers, you need to explicitly create the necessary directories so they are ready to be mapped:
# Use your own path if different
cd /opt/docker_services/n8n

mkdir data files postgres-data
Directory ownership and permissions
By default, when Docker automatically creates host directories for your volumes (like our data and files folders), it assigns ownership to the root user. However, for security reasons, the n8n container intentionally drops privileges and runs as a non-root user (specifically, UID 1000).
If these folders remain owned by root, n8n will be unable to save its configuration or database files, causing the container to crash on startup with a ‘permission denied’ error. To prevent this friction, we explicitly grant ownership of these directories to the correct user before starting the service.
# Set ownership of the volume directories to UID/GID 1000
sudo chown -R 1000:1000 data files
Adding the .env file
Docker uses the .env file to pass system configurations and secrets into our containers without hardcoding them into our compose.yaml.
Create the file in the same directory:
nano .env
Paste in the following configuration (make sure to replace example.com and the database password with your own secure values):
# n8n Settings
DOMAIN_NAME=example.com
SUBDOMAIN=n8n
GENERIC_TIMEZONE=Europe/Chisinau
N8N_HOST=n8n.example.com
N8N_PROTOCOL=https
WEBHOOK_URL=https://n8n.example.com/
N8N_SECURE_COOKIE=false
NODE_ENV=production


# PostgreSQL
POSTGRES_DB=n8n
POSTGRES_USER=n8n
POSTGRES_PASSWORD=changeme123
Understanding the environment variables:
| Variable | Description |
|---|---|
| Domain & Host | Defines DOMAIN_NAME, SUBDOMAIN, and N8N_HOST. These are essential for mapping the n8n application to a specific URL (like n8n.example.com), allowing external access via DNS. |
| Timezone | GENERIC_TIMEZONE sets the time zone specifically for the Node.js application process so scheduling and log timestamps are accurate for your region. |
| Protocols & Webhook | N8N_PROTOCOL and WEBHOOK_URL configure how n8n interacts with the outside world. This is crucial if you are integrating services that require a callback URL. |
| Secure Cookie | N8N_SECURE_COOKIE is set to false because we are running without an HTTPS reverse proxy locally by default. If you configure SSL/HTTPS later via external proxy, you can delete this line so it defaults to true. |
| Node Environment | NODE_ENV must strictly be set to production. This optimizes the underlying Node.js server for performance rather than debugging, regardless of actual deployment stages. |
| Database Credentials | POSTGRES_DB, USER, and PASSWORD are used upon the initial startup to create the PostgreSQL database and authenticate subsequent connections. Always use strong custom passwords here. |
Save and close the file. You now have all the necessary configuration set up to run your Docker Compose stack.
Starting docker services
Navigate to your project directory and bring all the services up in the background.
# Use your own path if different
cd /opt/docker_services/n8n

docker compose up -d
Docker pulls the necessary images and starts your containers. Once running, n8n will be available on port 5678 (default), or at your configured domain if using a reverse proxy.
To confirm it is working properly, check if n8n and postgres containers are listed and running.
docker ps
Working with N8N
Once the services are running successfully, it is finally the exciting time to start exploring N8N!
Access N8N
N8N can be accessed through a web browser. In this local setup, it is available at the following URL: http://localhost:5678.
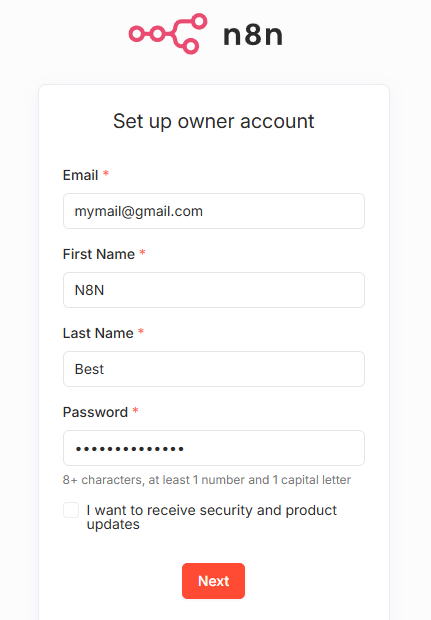
On first access, a login page appears with common fields to fill in.
Set up the license key
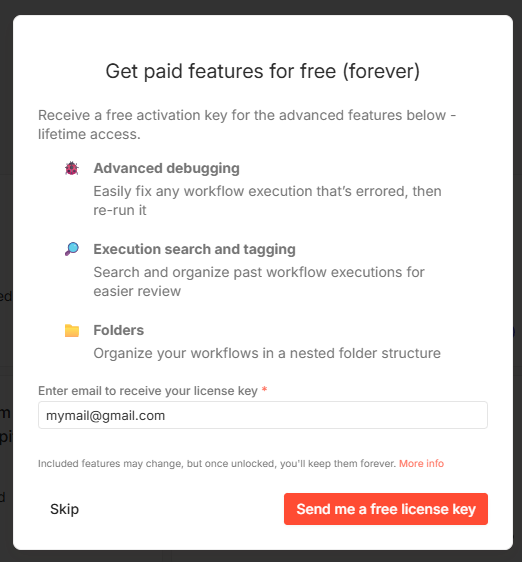
Initially, N8N displays a window offering a free license key that unlocks paid features. Yes, you have heard it right: paid features for free! This is one of the benefits of running a self‑hosted N8N instance.
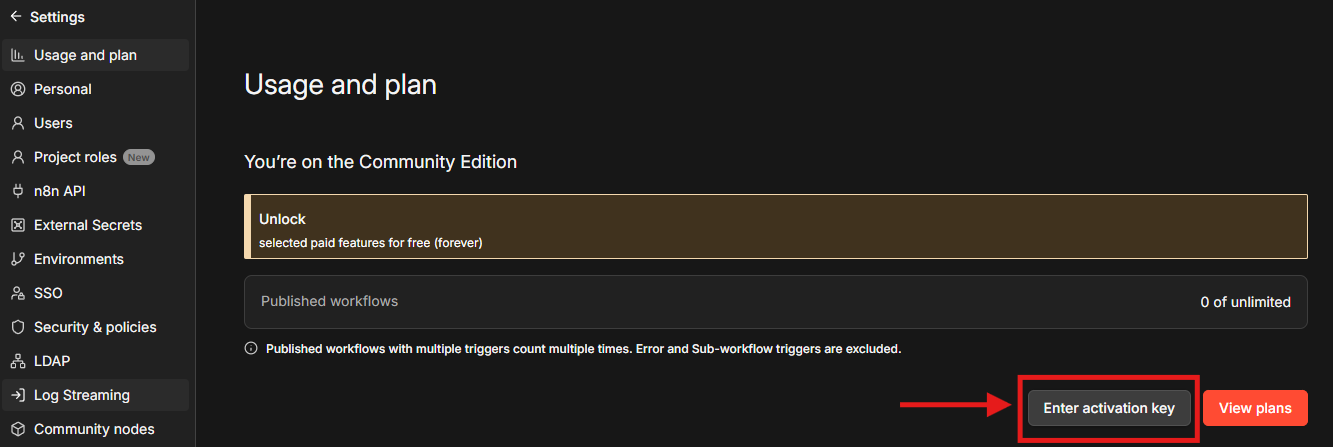
Once you received the license key in your email, you can navigate to Settings->Usage and Plan to activate it.
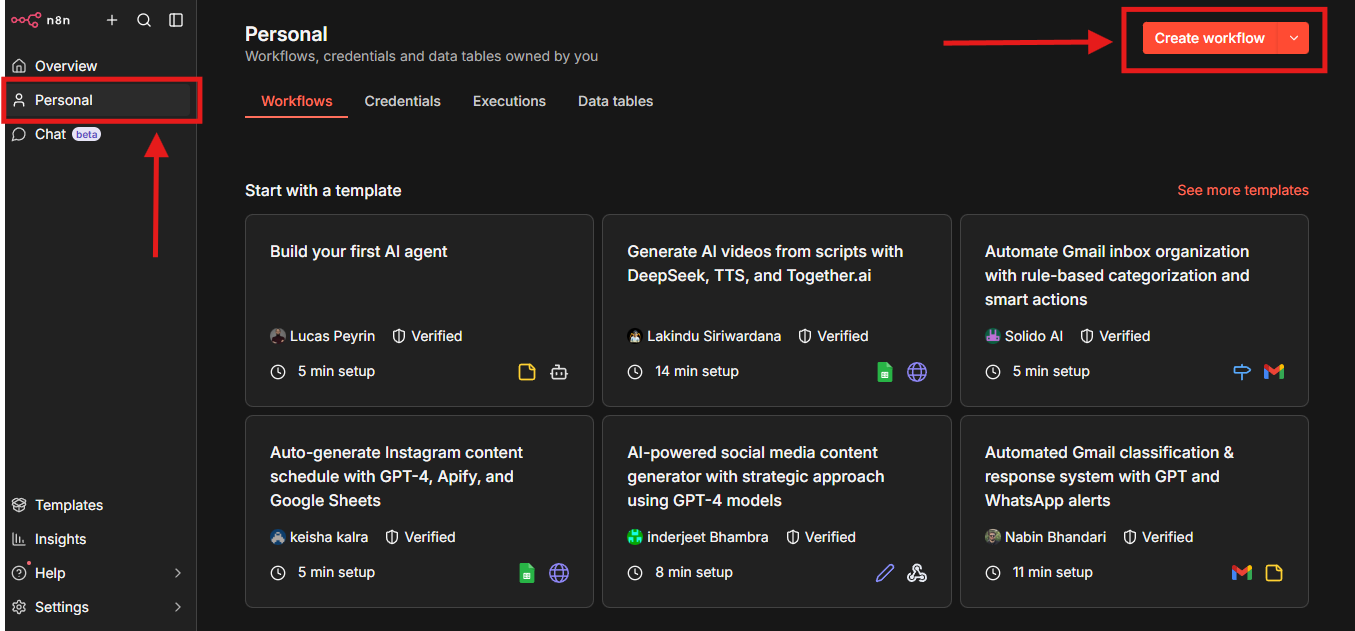
Creating first workflow
New workflows can be created directly from the main page. See the image below.
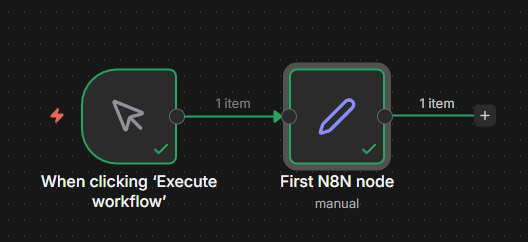
For the first execution use case, two nodes will be used:
- Manual Trigger: starts the workflow manually.
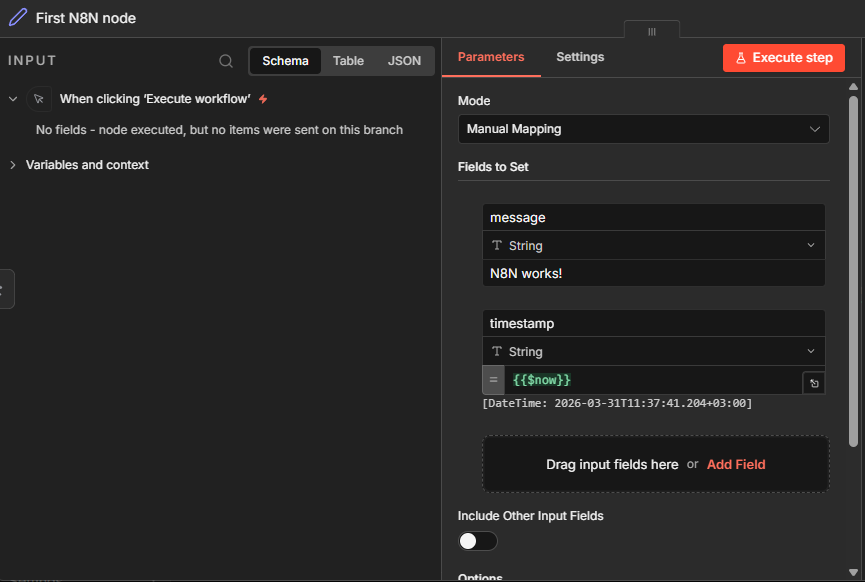
- Set Node: defines and works with fields and their values.
The Manual Trigger node requires no configuration, while the Set node does. In our case, the goal is to output a message stating ‘n8n works’ along with the timestamp of the event. The Set node is therefore configured as shown in the image below.
Once the two nodes are connected and configured, we start the workflow by pressing the Execute workflow button.
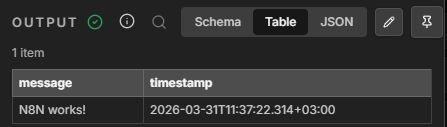
Congratulations 👏, your first N8N workflow has been successfully executed!
What next?
This initial setup is just the beginning. The real power of N8N unlocks when you start connecting your daily tools to automate repetitive tasks and reduce friction. For example, you can create workflows to automatically sync new leads from your website into a CRM, route urgent alerts and critical service errors to a team chat, or periodically back up data from various SaaS platforms to your database. The possibilities for automating your operations and simplifying your daily workload are almost endless.
Conclusion
By completing this guide, you have successfully deployed a powerful, self-hosted platform capable of transforming how you manage daily operations. Thank you for following along with this setup! As you continue to explore what N8N can do, be sure to check out our other tutorials to discover even more amazing and useful tools. When you are ready to scale or delve into new, exciting projects, remember that AlexHost provides all the robust infrastructure you need to host your services reliably.