English
 Русский
  Română
  Deutsch
  Français
  Türkçe
  Español
  Português
  Українська
  български
  Polski
  Indonesia
  中文 (中国)


 on All Hosting Services
How to Add a Domain to cPanel: Complete Technical Guide
Adding a domain to cPanel means registering an additional domain name within your hosting control panel so that the server knows where to route incoming requests and where to serve files from. In cPanel, this is handled through the Domains or Addon Domains interface, which creates a dedicated document root directory, configures the virtual host entry, and optionally sets up a subdomain for internal management — all in a single workflow.
This guide covers every step of that process in technical depth: from DNS prerequisites and domain configuration inside cPanel, through file deployment via File Manager, to MySQL database provisioning. It applies directly to any VPS with cPanel environment, including AlexHost VPS instances running LiteSpeed and NVMe storage.

Prerequisites Before You Add a Domain in cPanel
Skipping the DNS step is the most common reason a newly added domain fails to resolve. Before touching cPanel, confirm the following:
- DNS propagation is underway or complete. Your domain's A record must point to the server's public IP address. Propagation typically takes between 15 minutes and 48 hours depending on the registrar and TTL values.
- Your cPanel account has addon domain slots available. On a root-access VPS with WHM, this is controlled per-account under "Modify an Account." On shared plans, it depends on the hosting package.
- You own or control the domain. If you registered it elsewhere, you need access to the registrar's DNS management panel. If you need a new domain, domain registration through AlexHost keeps DNS management centralized.
- SSL is planned from the start. Adding the domain first, then requesting a certificate, is the correct order. AutoSSL in cPanel will attempt issuance automatically once the domain resolves to the server.
Step 1: Add the Domain Inside cPanel
Log in to your cPanel account (typically at yourdomain.com:2083 or via WHM's "Go to cPanel" link).
Navigating to the Domain Management Interface
In cPanel's modern Jupiter theme, the domain management workflow has been consolidated:
- From the cPanel home screen, locate the Domains section.
- Click Domains (the unified interface introduced in cPanel 76+, which replaces the older separate "Addon Domains," "Subdomains," and "Aliases" icons).
- Click the Create A New Domain button in the top-right corner.
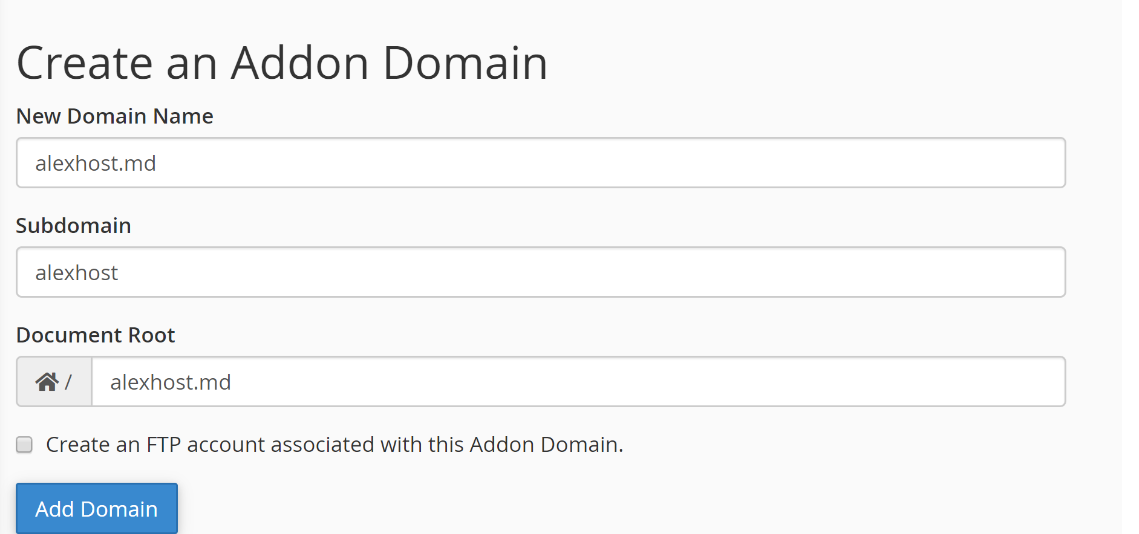
Configuring the New Domain Entry
You will see a form with the following fields:
- Domain: Enter the fully qualified domain name, for example
example.com. Do not includewww— cPanel handles thewwwsubdomain alias automatically. - Document Root: cPanel auto-populates this field based on the domain name, typically resolving to
/home/username/public_html/example.com. You can override this path, but the default is sensible for most deployments. - Share document root with main domain checkbox: Leave this unchecked unless you intentionally want this domain to serve the same files as your primary domain. Checking it is a common mistake that causes both domains to display identical content.
Click Submit (or Add Domain depending on your cPanel version). cPanel will:
- Create the document root directory.
- Write a new Apache or LiteSpeed virtual host configuration block.
- Create a subdomain entry (e.g.,
example.com.yourmainaccount.com) for internal routing. - Add the domain to the SSL/TLS queue if AutoSSL is enabled.
Verifying the Domain Was Added Correctly
After submission, return to the Domains list. The new entry should appear with its document root path and an option to manage DNS. If you are using cPanel's built-in nameservers, click Manage next to the domain to inspect the DNS zone and confirm the A record points to the correct IP.
Step 2: Upload Website Files via File Manager
With the domain configured, the server is ready to serve content from the document root. The next step is deploying your website files.
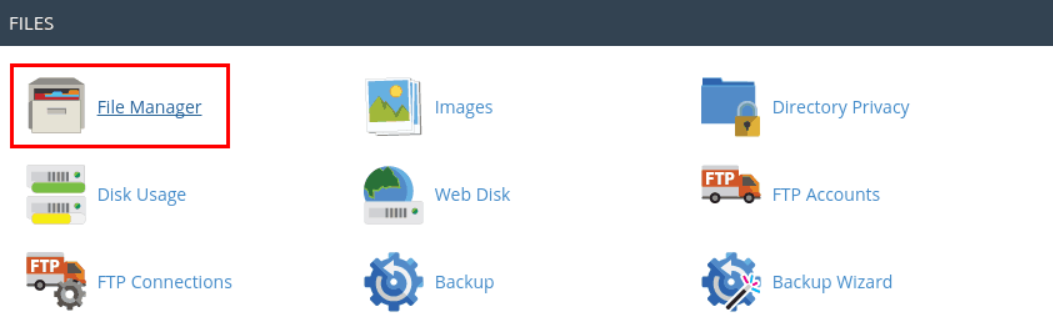
Accessing File Manager
- From the cPanel home screen, open File Manager under the Files section.
- In the left-hand directory tree, navigate to
public_html/and then into the folder named after your domain (e.g.,example.com/). - Alternatively, File Manager opens to
public_htmlby default — you can navigate from there.
Uploading Files as an Archive
cPanel's File Manager enforces an upload method that requires files to be packaged in an archive format. Uploading individual files one by one is both slow and, on many server configurations, restricted for performance reasons.
Supported archive formats for extraction:
.zip.tar.gz/.tgz.tar.bz2.gz
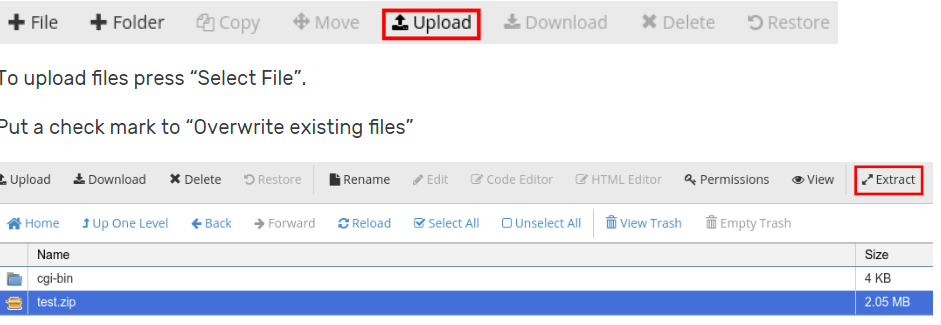
The correct upload procedure:
- Compress your website files locally into a
.ziparchive. For a WordPress installation, this means zipping the entire site directory contents (not the folder itself, unless you want an extra subdirectory level). - Inside File Manager, navigate to your domain's document root folder.
- Click Upload in the top toolbar.
- Select your archive file and wait for the upload to complete. File Manager shows a progress indicator.
- After the upload finishes, click Go Back to the directory.
- Right-click the uploaded archive and select Extract. Confirm the extraction path is the current directory.
- Delete the archive after extraction to keep the document root clean.
Critical detail: If your archive contains a top-level folder (e.g., mysite/index.php instead of index.php at the root), your site will be served from example.com/mysite/ rather than example.com/. Always verify the directory structure after extraction. Move files up one level using File Manager's Move function if needed.
Alternative: Deploying via SFTP
For larger sites or automated deployments, SFTP is significantly more efficient than File Manager. Use an SFTP client (FileZilla, WinSCP, or sftp on the command line) with the following parameters:
- Host: Your server's IP address or hostname
- Port: 22 (SSH/SFTP)
- Username: Your cPanel account username
- Authentication: Password or SSH key pair
Navigate directly to /home/username/public_html/example.com/ and transfer files. This method bypasses the archive requirement and supports resumable transfers.
Step 3: Create a MySQL Database for Your Website
Most CMS platforms — WordPress, Joomla, Drupal, Magento — require a relational database. cPanel provides two tools for this: MySQL Databases (manual, granular control) and MySQL Database Wizard (guided, step-by-step). For straightforward setups, the Wizard is faster.
Using the MySQL Database Wizard
- From cPanel home, navigate to Databases > MySQL Database Wizard.
- Step 1 — Create a Database: Enter a name for the database. cPanel prepends your account username automatically (e.g.,
username_dbname). Note this full name — you will need it during CMS installation. - Step 2 — Create a Database User: Enter a username and a strong password. Use cPanel's Password Generator to create a cryptographically strong password. The full username will also be prefixed (e.g.,
username_dbuser). - Step 3 — Add User to Database: Select the user you just created and assign privileges. For a standard CMS, grant All Privileges. Click Next Step.
- The Wizard confirms the database, user, and privilege assignment. Record all three values: database name, username, and password.
Using MySQL Databases (Advanced)
For environments requiring multiple users with different privilege levels, or when managing several databases per domain:
- Go to Databases > MySQL Databases.
- Create the database under Create New Database.
- Scroll down to Add New User and create the user with a strong password.
- Under Add User to Database, select the user and database, then define granular privileges (SELECT, INSERT, UPDATE, DELETE, etc.) rather than blanket ALL PRIVILEGES.
Security note: Never use the same database user across multiple sites on the same account. If one site is compromised, isolated database credentials limit lateral movement to other databases.
Database Host Value
When configuring your CMS installer, the database host is almost always localhost on a standard cPanel VPS. This is because the MySQL server runs on the same machine and listens on the local socket. Using 127.0.0.1 also works but forces TCP instead of the Unix socket, adding minor overhead.
Step 4: Configure SSL for the New Domain
A domain without HTTPS will be flagged by browsers and penalized in search rankings. cPanel's AutoSSL feature (powered by Let's Encrypt or Sectigo depending on the server configuration) handles certificate issuance automatically once the domain resolves correctly.
Verifying AutoSSL Coverage
- Navigate to Security > SSL/TLS Status.
- Your new domain should appear in the list. If AutoSSL has already run, it will show a green padlock and expiry date.
- If the domain shows as pending or failed, click Run AutoSSL to trigger an immediate attempt.
Common AutoSSL failure reasons:
- The domain's A record does not yet point to the server (DNS not propagated).
- A CAA DNS record on the domain restricts issuance to a different CA.
- The domain is behind a proxy (e.g., Cloudflare orange-cloud) that intercepts the ACME HTTP-01 challenge.
For domains requiring extended validation or wildcard coverage beyond what AutoSSL provides, you can install a third-party SSL certificate manually through cPanel's SSL/TLS Manager.
Addon Domains vs. Subdomains vs. Parked Domains: Key Differences
Understanding which domain type to add prevents misconfiguration and wasted troubleshooting time.
| Domain Type | cPanel Term | Serves Separate Content | Has Own Document Root | Typical Use Case |
|---|---|---|---|---|
| Additional domain | Addon Domain / Domain | Yes | Yes | Hosting a completely separate website |
| Subdomain | Subdomain | Yes | Yes (subdirectory) | Staging, blog, API endpoint |
| Domain alias | Parked Domain / Alias | No (mirrors main) | No | Brand protection, alternate TLDs |
| Redirect | Redirect | No (forwards) | No | Forwarding old domains to new ones |
The modern cPanel Domains interface consolidates these into one screen, but the underlying behavior remains distinct. When you add a domain and leave "Share document root" unchecked, you are creating what was historically called an Addon Domain.
Common Issues and How to Resolve Them
Domain Shows "Index of /" (Directory Listing)
This means the document root is empty or lacks an index.php / index.html file. Either your files were not uploaded, or they were extracted into a subdirectory. Verify the file structure in File Manager.
500 Internal Server Error After Upload
Usually caused by incorrect file permissions or a malformed .htaccess file. Check that directories are set to 755 and files to 644. In File Manager, right-click any file or folder and select Change Permissions.
Database Connection Error During CMS Installation
Double-check that you are using the full prefixed database name and username (e.g., username_dbname, not just dbname). Confirm the password has no special characters that might be misinterpreted by the CMS configuration parser — or wrap the value in quotes in the config file.
Domain Resolves to the Wrong Site
If two domains on the same account resolve to the same content, the document root was shared accidentally during setup. Go to Domains, edit the entry, and correct the document root path to the dedicated directory.
Scaling Beyond a Single cPanel Account
When you outgrow a single cPanel account — either in terms of the number of domains, traffic volume, or resource isolation requirements — the architecture options diverge:
- Multiple cPanel accounts on one VPS via WHM: Each account has its own resource limits, document roots, and database users. Ideal for agencies managing client sites.
- Dedicated server with WHM/cPanel: Full hardware isolation, no noisy-neighbor effects, and the ability to customize the LiteSpeed or Apache configuration at the server level. AlexHost dedicated servers support full WHM root access.
- Multiple VPS instances: Each VPS runs an independent cPanel environment. Useful when sites have different security or compliance requirements.
For most small-to-medium deployments, a single VPS Hosting account with cPanel hosting 5–20 domains is the most cost-effective architecture. NVMe storage ensures that even high-I/O operations like database queries and PHP opcode caching remain fast across all hosted domains.
Technical Key-Takeaway Checklist
Before considering a domain fully operational in cPanel, verify each item:
- DNS A record points to the correct server IP and has propagated (verify with
dig example.com Aor an online DNS checker). - Document root is a dedicated directory, not shared with the main domain.
- Files are extracted at the correct directory level —
index.phpmust be directly inside the document root, not inside a subdirectory. - File permissions are set to
755for directories and644for files. - Database credentials (full prefixed name, username, password, host
localhost) are recorded and tested. - SSL certificate is active and covers both
example.comandwww.example.com. - AutoSSL or manual certificate renewal is confirmed — Let's Encrypt certificates expire every 90 days.
.htaccesscontains a valid HTTPS redirect rule if you want to enforce SSL.- Email hosting for the new domain is configured if needed — cPanel's Email Accounts section, or a dedicated email hosting solution if you need advanced deliverability features.
FAQ
Does adding a domain in cPanel automatically configure DNS?
Only if your domain uses cPanel's nameservers. If the domain is registered elsewhere and uses external nameservers, you must manually add the A record at your registrar or DNS provider pointing to your server's IP. cPanel creates the zone file internally, but external resolvers will not use it unless the domain delegates to cPanel's nameservers.
How many domains can I add to a single cPanel account?
The limit is set in WHM under account configuration. On a root-access VPS, you can set this to unlimited. On managed shared hosting plans, the limit depends on the package tier. There is no hard technical ceiling in cPanel itself — the practical limit is server resource capacity.
What is the difference between the MySQL Database Wizard and MySQL Databases in cPanel?
The Wizard walks you through database creation, user creation, and privilege assignment in a linear three-step flow — best for quick setups. The MySQL Databases interface gives you granular control over multiple users, individual privilege assignments, and database repair/optimization tools. For production environments with security requirements, use the manual interface.
Why does my domain show a cPanel default page after being added?
The cPanel default page (cgi-sys/defaultwebpage.cgi) appears when the document root is empty. Upload and extract your site files, or place an index.html file in the document root to replace it immediately.
Can I add a domain to cPanel without root access to the server?
Yes. Standard cPanel user accounts (non-root) can add domains up to the limit set by the hosting provider. Root access is only required to change account-level limits, install server-wide software, or modify configurations outside the cPanel user's home directory.